Author: Sean C

  • Why Check Your Electrical Panel: A Homeowner’s Guide

    Why Check Your Electrical Panel: A Homeowner’s Guide

    Your home’s electrical panel is the central distribution unit that routes power to every circuit in the house, and checking it regularly is the single most effective step you can take to prevent electrical fires, system failures, and expensive emergency repairs. Most homeowners never look at their panel until something goes wrong. That’s the problem. Regular maintenance reduces equipment failure rates by 67%, which means skipping inspections doesn’t just create risk. It almost guarantees a future problem. Understanding why check electrical panel matters, and how to do it safely, puts you in control before a crisis forces your hand.

    Why checking your electrical panel should be a regular habit

    The electrical panel, also called a breaker box or load center, is the nerve center of your home’s power system. Every time you flip a light switch or run an appliance, current flows through a circuit controlled by a breaker in that panel. When the panel develops problems, the effects ripple through your entire home.

    Ignoring panel problems can lead to emergency repairs exceeding $3,500 and insurance claim denials when damage is traced to negligence. That number doesn’t include the cost of replacing appliances or repairing fire damage. The financial case for routine checks is straightforward.
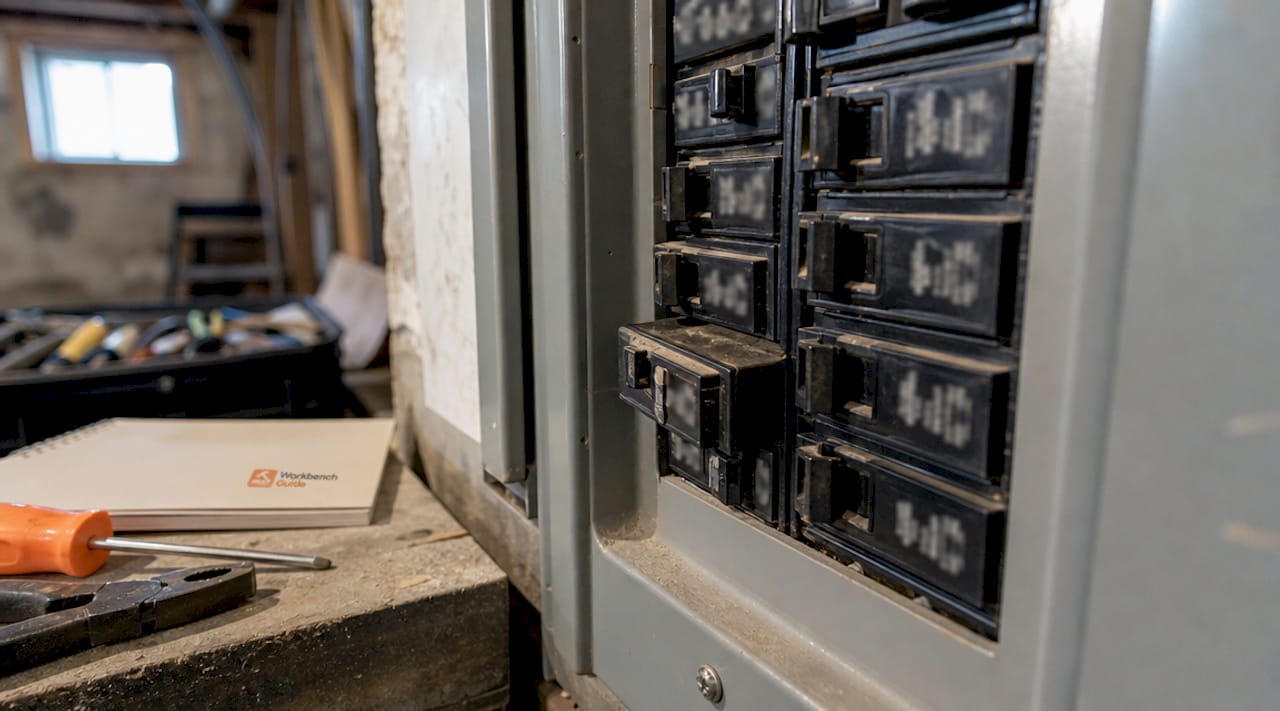
    Close-up view of electrical breakers showing warning signs

    Beyond money, the safety stakes are serious. OSHA and NFPA report approximately 160 electrical fatalities annually, with thousands more injuries tied to electrical hazards in residential and commercial settings. Many of those incidents trace back to panels that were never inspected. A quick visual check twice a year costs nothing and takes less than ten minutes.
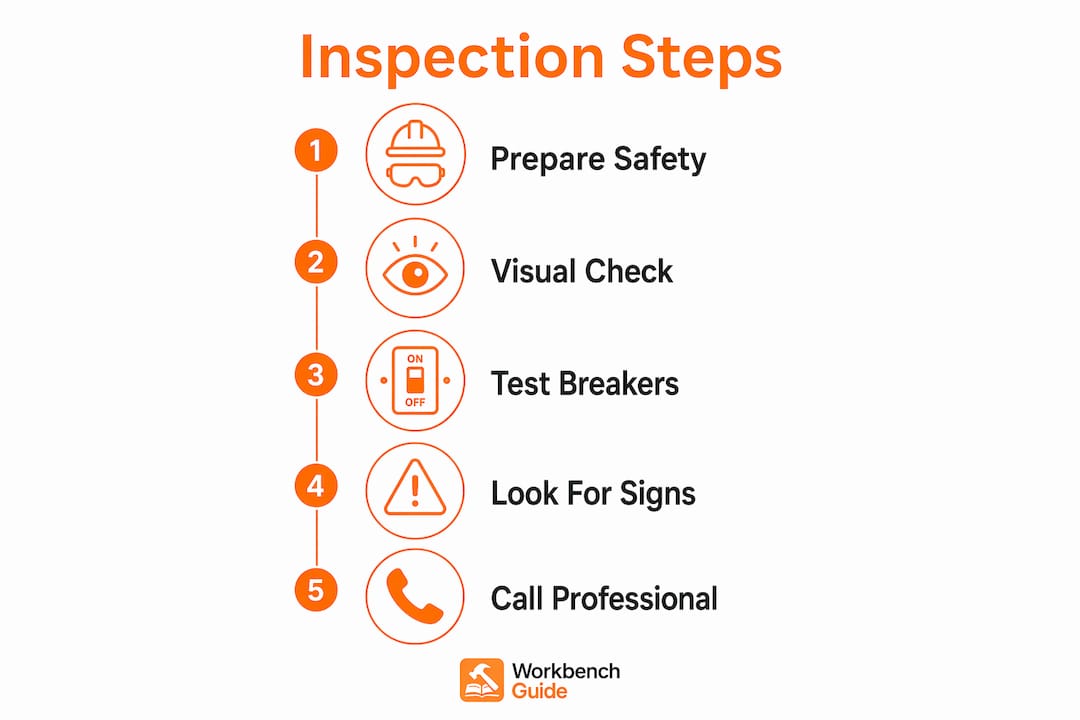
    Infographic illustrating steps to inspect electrical panel

    The importance of checking electrical panel health also extends to your home’s efficiency. Overloaded circuits, loose connections, and aging breakers force your system to work harder than it should, which raises your energy bill and shortens the lifespan of your appliances.

    How often should you inspect your electrical panel?

    Inspection frequency depends on two factors: what you can safely do yourself and what requires a licensed electrician.

    For DIY visual checks, the recommended schedule looks like this:

    • Every 6 to 12 months for a basic exterior inspection
    • After any major storm, flood, or event that could affect your electrical system
    • Immediately if you notice any warning signs (covered in the next section)
    • After adding new high-draw appliances like an EV charger, hot tub, or central air unit

    For professional inspections, the standard guidance is:

    • Every 3 to 5 years for homes with no known issues
    • After any major renovation or electrical upgrade
    • When purchasing a home, regardless of its age
    • For homes older than 25 years, every 2 to 3 years is more appropriate

    Professional inspections detect internal issues like loose connections and arcing that no visual check from the outside can catch. Arcing inside a panel can ignite surrounding materials without triggering a breaker trip. You won’t see it, smell it, or hear it until it’s already a fire.

    Homes built before 1990 deserve extra attention. Panels from that era often used components that no longer meet current National Electrical Code standards. If your home still has a Federal Pacific Electric Stab-Lok panel or a Zinsco panel, schedule a professional evaluation immediately. Both brands have documented histories of breaker failure.

    What are the warning signs of electrical panel issues?

    Panel problems commonly appear as frequent breaker trips, flickering lights, burning smells, buzzing sounds, warm panel covers, corrosion, or outdated fuse boxes. Each of these signals a specific type of failure. Knowing what each one means helps you respond correctly.

    Frequent breaker trips. A breaker that trips once after you overload a circuit is doing its job. A breaker that trips repeatedly under normal load is failing. This is a sign of either an overloaded circuit or a breaker that can no longer hold its rated amperage.

    Flickering or dimming lights. Lights that flicker when you run a large appliance point to a circuit that’s drawing more current than the wiring can handle. This is a load balancing problem and a fire risk.

    Burning smell or scorch marks. Any smell of burning plastic near your panel is a red flag. Scorch marks around breakers or on the panel door indicate heat buildup from arcing or a loose connection. Do not ignore this. Call an electrician the same day.

    Warm or hot panel cover. A panel that feels warm to the touch is dissipating heat it shouldn’t be generating. This is a sign of overloading or internal arcing.

    Buzzing or crackling sounds. Electrical panels should be silent. Any audible noise from the panel indicates loose wiring, a failing breaker, or arcing. All three are fire hazards.

    Visible rust, corrosion, or water stains. Moisture inside a panel destroys insulation and creates short circuit conditions. If you see rust or water damage, treat it as an emergency.

    An old fuse box. Homes that still use screw-in fuses instead of circuit breakers are operating on technology from the mid-20th century. Fuse boxes cannot handle modern electrical loads and are a known fire risk. Replacement is not optional.

    Pro Tip: Take a photo of your panel every time you inspect it. Comparing photos over time makes it easy to spot new scorch marks, corrosion, or changes that you might otherwise miss.

    How to safely inspect your electrical panel yourself

    A homeowner’s inspection is strictly external. Opening the panel cover exposes energized bus bars and creates arc flash risk, which can cause severe burns or death. The interior is off-limits unless you are a licensed electrician. With that boundary clear, here is what you can and should do:

    1. Clear the area around the panel. The National Electrical Code requires 36 inches of clear space in front of any electrical panel. If boxes, shelving, or stored items are blocking access, move them. Blocked panels are a code violation and a safety hazard.

    2. Inspect the panel exterior. Look for rust, dents, scorch marks, or any sign of physical damage. Check the door latch and make sure the cover closes fully with no gaps.

    3. Check the circuit directory. Every breaker should be labeled with the circuit it controls. An accurate circuit directory speeds up emergency response and helps electricians work faster and more safely. If your labels are missing, faded, or wrong, update them.

    4. Look at the breakers through the panel door. Without touching anything, scan the breakers. Any breaker sitting in a middle position (not fully on or off) has tripped. Reset it by pushing it fully to off, then back to on. If it trips again immediately, there is a fault on that circuit.

    5. Test your GFCI outlets monthly. Ground fault circuit interrupter outlets have test and reset buttons. Press the test button. The outlet should lose power. Press reset to restore it. GFCI outlets protect kitchens, bathrooms, garages, and outdoor areas from shock hazards.

    6. Listen and smell. Stand near the panel for 30 seconds. Any buzzing, crackling, or burning smell is a reason to call a professional before you do anything else.

    Pro Tip: Label your circuit directory in pencil, not pen. Circuits get reassigned during renovations, and pencil makes updates easy without creating a confusing mess of crossed-out labels.

    Why professional inspections catch what you can’t

    A licensed electrician brings tools and training that no homeowner inspection can replicate. Thermal imaging cameras identify hidden hotspots and failing connections that are completely invisible to the naked eye. A connection that looks fine from the outside can be running at 200°F internally, melting insulation and building toward a fire.

    Here is what a professional inspection covers that a DIY check cannot:

    • Internal connection tightening. Connections loosen over time from thermal expansion and contraction. A loose connection creates resistance, which creates heat. Electricians use calibrated torque wrenches to tighten every connection to manufacturer specifications.
    • Breaker load testing. Professionals test whether each breaker trips at its rated amperage. A breaker rated for 20 amps that doesn’t trip until 30 amps is not protecting your wiring.
    • Arc fault detection. Arc faults are a leading cause of residential electrical fires. Electricians test arc fault circuit interrupter (AFCI) breakers to confirm they are functioning correctly.
    • Code compliance review. Electrical codes update regularly. A panel installed in 2005 may not meet 2026 National Electrical Code requirements, especially if you have added circuits or appliances since then.
    • Load balancing assessment. An unbalanced panel puts uneven stress on your wiring and reduces system efficiency. Professionals redistribute circuits to balance the load across both legs of your service.
    What DIY checks cover What professional inspections add
    Exterior damage and corrosion Internal connection tightness
    Breaker labels and directory Thermal imaging for hidden hotspots
    Tripped breakers Breaker load and trip testing
    GFCI outlet function AFCI breaker verification
    Smell and sound check Code compliance review

    Key takeaways

    Checking your electrical panel on a regular schedule, combining visual DIY inspections every 6 to 12 months with professional evaluations every 3 to 5 years, is the most reliable way to prevent electrical fires, avoid costly emergency repairs, and keep your home’s power system running safely.

    Point Details
    Inspection frequency Perform visual checks every 6 to 12 months; hire a professional every 3 to 5 years.
    Warning signs Burning smells, warm panels, buzzing sounds, and frequent trips all require immediate attention.
    DIY boundaries Never open the panel cover. External visual checks are safe; internal work is not.
    Professional tools Thermal imaging and torque wrenches detect failures no homeowner inspection can find.
    Cost of neglect Skipping inspections risks emergency repair bills over $3,500 and potential insurance denials.

    The quiet danger most homeowners underestimate

    Here’s what I’ve seen over years of writing about home maintenance: most homeowners treat their electrical panel the way they treat their water heater. They assume it’s fine until it isn’t. That assumption is exactly what makes electrical panels so dangerous.

    Panels often fail silently until a catastrophic event occurs, which means the absence of symptoms is not evidence of safety. A connection can be arcing inside your panel right now, building heat behind a cover you’ve never opened, and your breakers won’t trip because the fault isn’t drawing enough current to trigger them.

    The other thing I’d push back on is the idea that a newer panel is automatically a safe panel. I’ve seen homes with panels installed in the last decade that had loose connections, mislabeled circuits, and zero documentation. Age matters less than maintenance history.

    My practical advice: treat your panel inspection the same way you treat changing your smoke detector batteries. Put it on a calendar. Take a photo each time. Keep a simple log of what you found and when. If you notice anything that wasn’t there before, call a licensed electrician before you convince yourself it’s probably nothing. The small checks that prevent major repairs are almost always the ones homeowners skip because nothing seems wrong yet.

    — Sean

    Stay ahead of electrical problems with Workbenchguide

    Workbenchguide is built for exactly this kind of maintenance. The platform gives you step-by-step DIY guides, seasonal checklists, and maintenance reminders so nothing falls through the cracks. You can log your panel inspections, track what you found, and get connected to a licensed electrician when a job goes beyond what’s safe to handle yourself. Start with the home maintenance checklist to build a full-year inspection schedule that covers your electrical system alongside every other critical system in your home. Staying organized is how you avoid the $3,500 emergency call. Workbenchguide makes that organization simple.

    FAQ

    Why should I check my electrical panel regularly?

    Regular panel checks catch warning signs like loose connections, tripped breakers, and corrosion before they cause fires or system failures. Proactive maintenance prevents more than two-thirds of electrical system failures.

    How do I know if my electrical panel has a problem?

    Look for frequent breaker trips, flickering lights, burning smells, warm panel covers, buzzing sounds, or visible rust. Any one of these signs means you should call a licensed electrician promptly.

    Can I inspect my electrical panel myself?

    You can safely perform an external visual inspection, check circuit labels, reset tripped breakers, and test GFCI outlets. Never open the panel cover without professional training due to arc flash and electrocution risk.

    How often should a professional inspect my panel?

    A licensed electrician should inspect your panel every 3 to 5 years under normal conditions, and sooner after renovations, major appliance additions, or if your home is older than 25 years.

    What does a professional electrical inspection include that I can’t do myself?

    Professionals use thermal imaging to find hidden hotspots and calibrated torque wrenches to tighten internal connections. They also test breaker trip accuracy and verify code compliance, none of which are possible from an external check.


  • Why Check Smoke Alarms: Your Home Safety Guide

    Why Check Smoke Alarms: Your Home Safety Guide

    Working smoke alarms reduce the risk of dying in a home fire by approximately 60%, making regular testing one of the highest-value safety habits a homeowner or renter can build. Checking smoke alarms means more than pressing a button once a year. It covers monthly functional tests, annual battery replacement, sensor cleaning, and full unit replacement every 10 years. The National Fire Protection Association (NFPA) and the U.S. Fire Administration (USFA) both publish clear guidelines on smoke alarm testing frequency, yet millions of homes remain unprotected because alarms are ignored, disabled, or simply too old to work. This guide explains exactly why smoke alarm checks matter, how to do them correctly, and what to watch for when something goes wrong.

    Why check smoke alarms every single month

    Three out of five home fire deaths occur in homes without working smoke alarms. That single statistic defines the entire case for regular testing. A detector mounted on your ceiling is not automatically a working detector. Dust, aging sensors, dead batteries, and accidental disabling all create the same outcome: silence when a fire starts.

    The USFA and NFPA both recommend testing every smoke alarm in your home once a month. Monthly testing catches battery drain, sensor faults, and wiring issues before they become fatal gaps in your protection. Fire safety experts caution against treating alarms as “set and forget” devices because dust and environmental factors reduce reliability over time. Active monthly testing is the only way to confirm your alarms will actually sound during an emergency.

    Hands holding phone with smoke alarm test reminder

    The gap between intention and action is wide. Approximately 31% of residents admit to never having checked their smoke alarms in the last year, and 1 in 4 lack confidence in how to test them correctly. That means roughly a third of households are operating on assumption rather than verified safety. Pairing your monthly test with an existing habit, such as the first day of each month or a recurring calendar reminder, removes the friction that causes most people to skip it.

    Here is a simple monthly and annual schedule to follow:

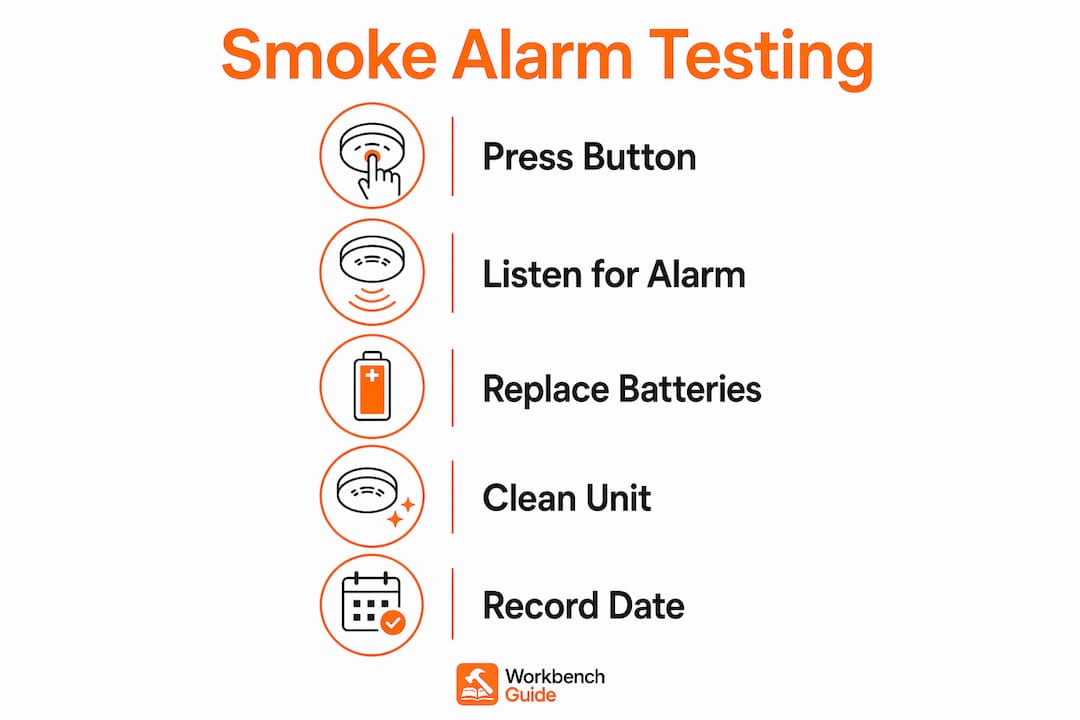
    1. Monthly: Press and hold the test button on every alarm until you hear a loud, continuous tone.
    2. Monthly: Walk through each room to confirm the sound is audible from every sleeping area.
    3. Annually: Replace all batteries, even if the alarm has not chirped a low-battery warning.
    4. Every 10 years: Replace the entire unit, regardless of whether it appears to be functioning.
    5. After any trigger event: Test immediately after a nuisance alarm, power outage, or battery swap.

    Pro Tip: Set a recurring phone reminder on the first of every month labeled “Smoke Alarm Test.” It takes under two minutes and removes the guesswork entirely.

    What does checking a smoke alarm actually involve?

    Testing a smoke alarm correctly takes less than two minutes per unit, but most homeowners have never been shown the right way to do it. The process starts with pressing and holding the test button, which is typically located on the face of the unit. A working alarm sounds loud and steady when the button is held. A weak, brief, or absent sound signals a low battery or internal fault that needs immediate attention.

    Battery replacement is the most common smoke detector maintenance task. Replace batteries at least once a year, or immediately when you hear the low-battery chirp, which is typically a single beep every 30 to 60 seconds. After replacing the battery, some alarms require a full reset by holding the test button for several seconds to clear any stored fault codes and stop continued chirping. Skipping this reset step is why many homeowners think a new battery did not fix the problem.

    Infographic showing smoke alarm testing steps

    Cleaning is an underrated part of smoke alarm upkeep. Dust and insects can clog the sensing chamber and trigger false alarms or, worse, block real smoke from reaching the sensor. Use a vacuum with a soft brush attachment around the vents every six months. Avoid spraying cleaning products directly on the unit.

    Watch for these signs that your alarm needs replacing rather than just servicing:

    • The unit is more than 10 years old. Manufacturers recommend replacement every 10 years because sensor sensitivity degrades even when the alarm appears functional.
    • The alarm chirps continuously after a fresh battery and a reset attempt.
    • The test button produces no sound at all, even with a new battery installed.
    • The unit has visible yellowing, cracks, or physical damage to the casing.

    Pro Tip: Write the installation date in marker on the back of every alarm when you mount it. You will never have to guess whether it is time for replacement.

    Ionization vs. photoelectric: which type needs what kind of care?

    Not all smoke alarms detect fire the same way, and the type you own affects both your testing routine and your false alarm rate. Understanding the difference helps you make smarter decisions about placement and replacement.

    Feature Ionization alarms Photoelectric alarms
    Detection strength Fast-flaming fires Slow, smoldering fires
    False alarm risk Higher near kitchens and bathrooms Lower near kitchens and bathrooms
    Best placement Bedrooms, hallways away from cooking Near kitchens, living areas
    Nuisance trigger cause Steam, cooking aerosols Less susceptible to steam
    Recommended for budget buyers Secondary choice Primary choice

    Photoelectric alarms are less prone to nuisance triggering from steam and cooking aerosols, making them the better choice near kitchens and bathrooms. Ionization alarms respond faster to open, flaming fires and work well in bedrooms and hallways. Combination alarms containing both sensor types provide the fastest response across all fire types and are the gold standard when budget allows.

    The practical implication for your testing routine is straightforward. Photoelectric alarms near the kitchen are less likely to produce false positives during your monthly test, so a failed test there is a genuine red flag. Ionization alarms in bedrooms may occasionally chirp from humidity, but a failed test button response is always a problem regardless of type.

    Interconnected alarm systems add another layer of protection by triggering all units simultaneously when one detects smoke. This matters most in larger homes where a fire starting in the basement might not be audible from a second-floor bedroom with the door closed. A closed bedroom door reduces the audible alarm level by 20 to 25 decibels, which is enough to prevent a sleeping occupant from waking up. Interconnected systems eliminate that risk entirely.

    Common challenges with smoke alarm upkeep and how to fix them

    The most dangerous smoke alarm is one that has been deliberately disabled. Low-battery chirps and nuisance false alarms are the two leading reasons homeowners remove batteries or take units off the ceiling entirely. Both problems are solvable without sacrificing protection.

    Nuisance alarms from cooking are the most common complaint. The fix is not to remove the alarm. It is to relocate it or replace it with a photoelectric model. NFPA guidelines recommend placing alarms at least 10 feet from cooking appliances to reduce false triggers. If your kitchen alarm fires every time you make toast, that is a placement problem, not a reason to disable the device.

    Misconceptions about alarm functionality create a false sense of security. Many homeowners believe that if an alarm has not chirped or gone off recently, it must be working fine. Visible indicator lights and silence do not guarantee sensor functionality. Dust and aging degrade the sensing chamber without producing any outward sign of failure. The only way to confirm function is to press the test button.

    “During sleep, humans lose the ability to smell smoke. Only a loud, functioning alarm provides the critical seconds needed to escape a fire.” — Fire Rescue Victoria

    Placement errors are another overlooked issue. Alarms installed only in hallways outside bedrooms can fail to wake sleeping occupants because a closed door absorbs too much sound. Place alarms inside every bedroom, on every level of the home, and near attached garages. This is not optional for renters either. Landlords in most U.S. states are legally required to provide working alarms, but tenants are responsible for reporting failures and, in many cases, replacing batteries.

    Smart smoke alarms from brands like Nest Protect and First Alert Onelink address several of these challenges at once. Modern smart alarms with internet connectivity can notify homeowners remotely and reduce false alarms through smarter sensor calibration. They also send low-battery alerts to your phone before the chirping starts, removing the most common trigger for disabling. The technology does not replace monthly testing, but it does make consistent upkeep significantly easier.

    Key takeaways

    Working smoke alarms, tested monthly and replaced every 10 years, are the single most effective tool for surviving a home fire.

    Point Details
    Monthly testing saves lives Three out of five fire deaths happen in homes with non-working alarms; monthly tests catch failures early.
    Replace batteries annually Swap batteries every year and reset the unit after replacement to clear fault codes.
    Sensor type affects placement Use photoelectric alarms near kitchens to cut false triggers; use combination alarms for full coverage.
    Never disable a chirping alarm Relocate or replace nuisance-triggering alarms instead of removing batteries or taking units down.
    Replace every 10 years Sensor sensitivity degrades silently; replace the entire unit on schedule regardless of apparent function.

    The habit most homeowners skip until it’s too late

    I have talked with enough homeowners to know that smoke alarm testing falls into the same category as changing the furnace filter or flushing the water heater. Everyone knows it should happen. Almost no one does it on schedule. The difference is that a dirty filter costs you money. A dead smoke alarm can cost you everything.

    What surprises me most is how many people believe their alarm is fine simply because it went off last time they burned dinner. A nuisance alarm from cooking smoke tells you the horn works. It tells you nothing about whether the sensor will detect a slow, smoldering fire at 2 a.m. Those are two completely different functions, and only a monthly button test covers both.

    I am genuinely enthusiastic about smart alarms for this reason. Nest Protect, for example, sends a phone notification when the battery is low and lets you silence a nuisance alarm from your phone without standing on a chair waving a dish towel. That kind of friction reduction actually changes behavior. People stop disabling alarms when disabling them is no longer the easiest option. That said, smart alarms still need the same 10-year replacement cycle and the same monthly test. Technology does not change the physics of sensor degradation.

    My practical advice: treat smoke alarm checks as part of your annual home safety routine, not a separate task you will get to someday. Build it into a monthly walkthrough alongside checking door locks and testing GFCI outlets. Two minutes a month is a reasonable trade for the protection it provides.

    — Sean

    Make smoke alarm checks part of your home maintenance routine

    Smoke alarm testing does not exist in isolation. It belongs inside a broader monthly and annual home maintenance schedule that keeps your entire property safe and functional. Workbenchguide’s home maintenance checklist includes smoke alarm testing alongside other critical safety tasks like carbon monoxide detector checks, chimney inspections, and roof and gutter maintenance. Having everything in one place means nothing gets skipped. If you want to go further in protecting your home from fire-related losses, pairing working alarms with fireproof storage for important documents adds another layer of protection. Use Workbenchguide’s checklists to stay organized, stay safe, and stop relying on memory to protect your home.

    FAQ

    How often should you test smoke alarms?

    Test every smoke alarm in your home once a month by pressing and holding the test button until a loud, steady tone sounds. The NFPA and USFA both recommend this monthly schedule to catch battery failures and sensor faults before they create a safety gap.

    What happens if you never check your smoke alarms?

    Sensors degrade silently over time, and batteries drain without warning. Homes with non-working alarms account for three out of five home fire deaths, making unchecked alarms one of the most preventable fire risks in any household.

    How do you know when to replace a smoke alarm?

    Replace the entire unit every 10 years from the installation date, regardless of whether it appears to be working. Sensor sensitivity degrades with age, and no indicator light or test result can confirm full sensor reliability in an aging unit.

    Why does my smoke alarm keep chirping after a new battery?

    A persistent chirp after battery replacement usually means the unit needs a full reset. Hold the test button for 10 to 20 seconds after installing the new battery to clear stored fault codes. If chirping continues, the unit likely needs to be replaced.

    Are photoelectric smoke alarms better than ionization alarms?

    Photoelectric alarms are better at detecting slow, smoldering fires and produce fewer false alarms near kitchens and bathrooms. Combination alarms with both sensor types offer the broadest protection and are the recommended choice when replacing older units.

  • Step by Step Plumbing Repair for Homeowners

    Step by Step Plumbing Repair for Homeowners

    Step by step plumbing repair is the process of methodically diagnosing and fixing common household plumbing issues using the right tools, materials, and safety measures. Most homeowners will face a leaking pipe, dripping faucet, or clogged drain at some point. 66% of U.S. homeowners experienced plumbing problems in summer, and 27% suffered property damage as a result. That statistic means the difference between a quick fix and a costly insurance claim often comes down to how fast and how correctly you act. This guide walks you through every stage of the process, from grabbing the right tools to knowing when to call a licensed plumber.

    What essential tools and materials do you need for plumbing repairs?

    Plumbing tools and safety gear flat lay

    The right tools make the difference between a clean repair and a stripped fitting. Before you touch a single pipe, gather your core toolkit. Quality multi-purpose tools reduce fixture damage and improve your odds of a successful first attempt, which is why a basin wrench and an adjustable wrench should sit at the top of your list.

    Must-have tools

    • Adjustable wrench: Fits most supply line nuts and compression fittings without scratching chrome
    • Basin wrench: Reaches up behind sinks to loosen or tighten mounting nuts that no other tool can access
    • Pipe cutter: Produces clean, square cuts on copper and plastic pipe, which is critical for leak-free joints
    • Plumber’s tape (PTFE tape): Wraps threaded connections to create a watertight seal
    • Plunger: A flange plunger works on toilets; a cup plunger handles sinks and tubs
    • Hand auger (drain snake): Clears clogs that a plunger cannot reach

    Repair materials to keep on hand

    Material Best use Expected durability
    Self-fusing silicone tape Emergency pipe wrap, no tools needed Temporary, hours to days
    Pipe repair clamp Pinhole or small crack on straight pipe 10 or more years
    Epoxy putty Tight spaces, irregular surfaces Permanent when cured
    Push-fit couplings Joining cut pipe sections, no soldering Long-term permanent
    Replacement washers and cartridges Dripping faucets Several years

    Pro Tip: Buy a 27-piece plumbing toolkit that covers wrenches, tape, and cutters before you face an emergency. Scrambling to a hardware store with water spraying from a pipe is a situation you want to avoid.

    Safety gear matters too. Keep safety glasses on when cutting pipe, and wear rubber gloves when handling epoxy putty or working near drain chemicals. Always turn off the water supply before you open any fitting.

    How do you diagnose common plumbing problems effectively?

    A structured diagnostic phase avoids unnecessary labor and incorrect part replacement. Guessing costs money. The goal is to isolate the exact location and cause of the problem before you buy a single part.

    Follow these diagnostic steps in order:

    1. Shut off the correct supply valve. Under-sink valves control individual fixtures. The main shutoff controls the whole house. Turn off only what you need to keep the rest of your home functional.
    2. Inspect visible fixtures first. Look for water stains, mineral deposits, or active drips around faucet bases, supply lines, and drain connections.
    3. Listen for running water. A toilet that runs between flushes points to a faulty flapper or fill valve. Running water you cannot see suggests a supply line leak inside a wall.
    4. Check the water meter. Turn off all fixtures and watch the meter dial for 15 minutes. Movement confirms an active leak somewhere in the system.
    5. Use a flashlight and a moisture meter. Shine a light under cabinets and behind appliances. A moisture meter confirms dampness in drywall or subfloor before you start cutting.

    Distinguishing a localized leak from a whole-house issue changes your repair plan completely. A dripping faucet is a fixture problem. A pressure drop at every tap points to the main line or pressure regulator. Infrared cameras, available at most tool rental shops, can detect moisture behind walls without destructive investigation.

    Pro Tip: Before you replace any part, isolate the problem location by running one fixture at a time and watching for the symptom to appear. This single habit eliminates the most common DIY mistake: replacing the wrong component.

    What are the step-by-step repair processes for the most common plumbing fixes?

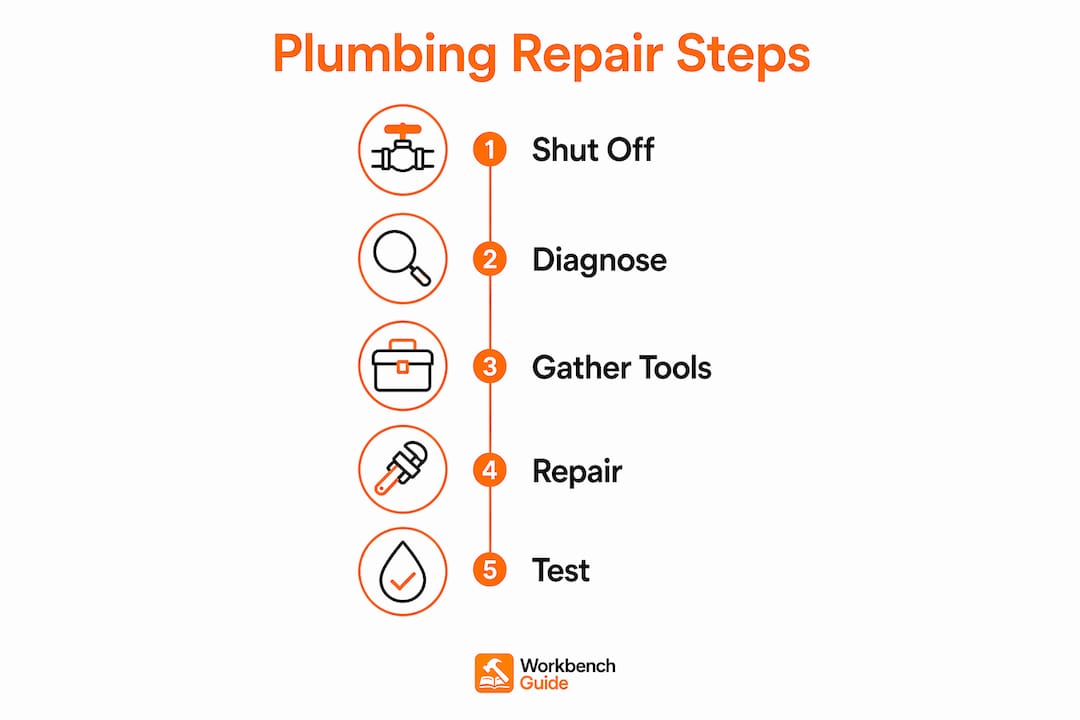
    Infographic showing step-by-step plumbing repair process

    Most routine plumbing repairs take under 30 minutes with basic tools. That number applies to leaking pipes, toilet flappers, and pipe patches. The key is following a clear sequence for each repair type rather than improvising.

    Fixing a leaking pipe

    1. Shut off the water supply to the affected section and open a downstream faucet to drain the line.
    2. Dry the pipe surface completely with a cloth or heat gun. No repair material bonds to a wet surface.
    3. For a pinhole leak or small crack, wrap self-fusing silicone tape tightly around the pipe, overlapping each layer by half. This is a temporary fix only.
    4. For a more durable result, slide a pipe repair clamp over the leak and tighten the bolts evenly until snug.
    5. For tight or awkward spaces, knead epoxy putty until the two parts blend to a uniform color, press it firmly over the leak, and allow it to cure for at least one hour before restoring water pressure.
    6. For a permanent fix, cut out the damaged section with a pipe cutter and install a push-fit coupling. Push-fit couplings require no soldering and connect in seconds.
    7. Restore water pressure slowly and inspect the repair for 10 minutes before declaring it done.

    Repairing a dripping faucet

    1. Turn off the supply valves under the sink and open the faucet to release residual pressure.
    2. Remove the faucet handle by unscrewing the decorative cap and the handle screw beneath it.
    3. Unscrew the packing nut and pull out the stem or cartridge.
    4. Replace the rubber washer at the base of the stem, or swap the entire cartridge if it shows wear or cracking.
    5. Reassemble in reverse order. Tighten the packing nut to just snug, then add a quarter turn. Over-tightening causes handle binding and new leaks.
    6. Turn the supply back on and test for drips.

    Pro Tip: Photograph the cartridge or washer before you remove it, then bring it to the hardware store for an exact match. Faucet manufacturers like Moen, Delta, and Kohler each use proprietary cartridge designs.

    Clearing a clogged drain

    1. Start with a plunger. For sinks, block the overflow opening with a wet rag to create suction, then plunge firmly 10 to 15 times.
    2. If the plunger fails, remove the P-trap under the sink by unscrewing the slip nuts by hand. Place a bucket underneath first. Clean out any debris and reinstall.
    3. For deeper clogs, feed a hand auger into the drain opening, lock the cable, and rotate the handle clockwise as you push forward. When you feel resistance, work the auger back and forth to break up or hook the clog.
    4. Flush with hot water for two minutes after clearing.

    Fixing a running toilet

    1. Remove the tank lid and observe the fill cycle. If water runs into the overflow tube, the float is set too high.
    2. Bend the float arm down slightly on older ball-float systems, or turn the adjustment screw on newer fill valves to lower the water level one inch below the overflow tube.
    3. If the toilet still runs, press down on the flapper. If the running stops, the flapper is worn and needs replacement. Turn off the supply valve, flush to empty the tank, unhook the old flapper from the overflow tube ears, and snap the new one in place.
    4. Restore water and confirm the tank fills and stops correctly.

    When should you use a temporary fix and when to call a professional?

    Temporary repair materials like silicone tape and epoxy putty are designed to buy time before a permanent repair. They are not substitutes for proper pipe replacement. Understanding that boundary protects your home.

    Temporary fixes are appropriate when:

    • You have an active leak and need to stop water damage while waiting for parts
    • The damaged section is accessible and the pipe is otherwise in good condition
    • The repair involves a single pinhole or hairline crack, not a split or corroded section

    Call a licensed plumber immediately when you encounter any of these situations:

    • A burst pipe with significant water volume
    • Leaks near or involving gas lines
    • Extensive corrosion affecting multiple pipe sections
    • Water damage that has already reached walls, floors, or electrical panels
    • Any repair that requires opening walls or working on the main supply line

    A temporary fix applied correctly buys you hours or days. A temporary fix treated as permanent can cause thousands of dollars in water damage within weeks. Know the difference before you walk away from a repair.

    For guidance on urgent situations, Workbenchguide’s emergency repair guide covers the critical first steps when water is actively damaging your home.

    Key takeaways

    Successful DIY plumbing repair depends on diagnosing the problem correctly, using the right material for each repair type, and recognizing when a temporary fix must give way to a permanent solution.

    Point Details
    Diagnose before you repair Check the water meter, inspect fixtures, and isolate the leak location before buying any parts.
    Match the material to the job Use silicone tape for emergencies, epoxy putty for tight spaces, and push-fit couplings for permanent pipe repairs.
    Follow the correct sequence Shut off water, dry the surface, apply the repair, test under pressure, and inspect for 10 minutes.
    Avoid over-tightening Tighten packing nuts snug plus a quarter turn to prevent handle binding and new leaks.
    Know when to stop Burst pipes, corroded sections, and gas-adjacent leaks require a licensed plumber, not a DIY fix.

    What I’ve learned from years of watching homeowners tackle plumbing

    Most plumbing failures I’ve seen were not caused by the original leak. They were caused by the repair that went wrong afterward. The two most common patterns: someone skipped the diagnostic step and replaced a faucet cartridge when the real problem was a cracked supply line, or someone used silicone tape on a joint under constant pressure and called it done.

    The repair instructions in this guide work. What makes them work is the order. Shutting off the water before you touch anything is not optional. Drying the surface before applying epoxy is not optional. Testing under pressure before you close up the cabinet is not optional. Every step that gets skipped becomes the reason the repair fails.

    One habit I’d push every homeowner to adopt: keep a small repair kit under every sink. A roll of PTFE tape, a set of replacement washers, and a tube of epoxy putty cost less than $20 total. They have saved more than a few people from a flooded bathroom at midnight. Pair that kit with annual plumbing checks and you will catch most problems before they become emergencies.

    The goal is not to become a plumber. The goal is to handle the 80% of common issues that do not require one.

    — Sean

    Keep your home protected with Workbenchguide

    Plumbing repairs are easier when you have a system behind you. Workbenchguide gives homeowners step-by-step DIY guides, project checklists, and maintenance reminders so nothing falls through the cracks. The home maintenance checklist covers plumbing inspections, seasonal checks, and repair tracking in one place. For broader repair coverage, the household repair guides walk you through fixes room by room. Stop reacting to problems and start staying ahead of them with Workbenchguide.

    FAQ

    How long does a typical plumbing repair take?

    Most routine repairs, including leaking pipes, dripping faucets, and toilet flappers, take under 30 minutes with basic tools. Complex repairs involving pipe replacement or wall access take longer and may require professional help.

    What is the best temporary fix for a leaking pipe?

    Self-fusing silicone tape is the fastest temporary fix and requires no tools. For a more durable stop-gap, a pipe repair clamp holds for years but should still be followed by a permanent pipe section replacement.

    Can I fix a dripping faucet without a plumber?

    Yes. Replacing a worn washer or cartridge is a straightforward DIY repair. Turn off the supply valve, remove the handle, swap the worn part, and reassemble. The most common mistake is over-tightening the packing nut.

    How do I know if my plumbing problem needs a licensed plumber?

    Burst pipes, leaks near gas lines, extensive corrosion, and any repair requiring wall access go beyond standard DIY scope. If water has already reached electrical panels or structural elements, call a licensed plumber immediately.

    What is the difference between a temporary and a permanent pipe repair?

    Temporary repairs using tape or epoxy putty stop active leaks but do not restore the pipe’s structural integrity. Permanent repairs involve cutting out the damaged section and installing push-fit couplings or replacement fittings that restore full pressure capacity.

  • Roof Maintenance Tips to Protect Your Home

    Roof Maintenance Tips to Protect Your Home

    Roof maintenance tips are a set of routine inspection, cleaning, and repair practices that extend roof lifespan and prevent expensive structural damage. A well-maintained roof can last 25 to 30 years on asphalt shingles, while a neglected one may fail in half that time. The difference comes down to consistent upkeep: clearing gutters, checking flashings, controlling attic moisture, and cleaning surfaces with methods that preserve your warranty. This guide walks you through every critical step, from safe inspection techniques to ARMA-approved cleaning, so you can protect one of your home’s most valuable assets.

    1. How to safely inspect your roof without taking unnecessary risks

    Safe roof inspection starts on the ground. Use binoculars from your yard to scan for visible damage like missing shingles, lifted edges, or sagging sections before you ever touch a ladder. This approach gives you a clear picture of the roof’s overall condition without the risk of a fall.

    If you do use a ladder, inspect only the edges and gutters. Avoid walking on the roof surface unless absolutely necessary. Wet or moss-covered shingles are slippery, and foot traffic accelerates granule loss on asphalt shingles. Always use a spotter and work on clear, dry days.

    Close-up of person inspecting roof edge from ladder

    Focus your close inspection on the highest-failure areas: flashings around chimneys, vent pipes, and skylights. These metal and caulk junctions degrade faster than shingles and are responsible for a disproportionate share of residential leaks. Check for cracked caulk, rust stains, or lifted metal edges.

    Inside the attic, look for water stains, dark discoloration, or mold on the decking and rafters. These are direct signs of an active or past leak. A flashlight and a few minutes twice a year can catch problems before they spread to insulation or drywall.

    Pro Tip: For roofs older than 15 years or after any severe weather event, schedule a professional inspection. A licensed roofer can spot micro-cracks and flashing gaps that are invisible from the ground.

    2. Cleaning your roof the right way to preserve warranty and prevent damage

    Pressure washing asphalt shingle roofs is one of the most common and costly mistakes homeowners make. High-pressure water strips granules from shingle surfaces, creates direct leak paths, and voids manufacturer warranties. The damage is often invisible at first but accelerates aging significantly.

    The Asphalt Roofing Manufacturers Association (ARMA) approves a soft washing method using low-pressure application of sodium hypochlorite-based solutions. This approach kills algae, moss, and lichen at the root without mechanical abrasion. The process involves applying the solution, allowing proper dwell time, and rinsing gently with a garden hose.

    Here is the correct sequence for a safe, ARMA-compliant roof cleaning:

    1. Pre-wet all surrounding vegetation and cover landscaping with plastic sheeting to protect plants from chemical runoff.
    2. Mix a sodium hypochlorite solution at the concentration recommended for your specific growth type (algae requires less than moss or lichen).
    3. Apply the solution at low pressure using a pump sprayer or soft wash system, working from the ridge down.
    4. Allow the solution to dwell for 15 to 20 minutes without letting it dry on the surface.
    5. Rinse gently with a standard garden hose, never a pressure washer.

    Cleaning alone does not solve recurring biological growth. Algae and moss return when moisture sources and drainage problems remain unaddressed. Fix the root cause first, then clean.

    After cleaning, install zinc or copper strips just below the ridge line. Rainwater carries trace metals down the roof surface, inhibiting future moss and algae growth for years. This is one of the most cost-effective preventative steps available to homeowners.

    3. Maintaining gutters, flashing, and penetrations to stop leaks early

    Gutters and downspouts are the roof’s drainage system. When they clog with leaves, pine needles, or debris, water backs up under shingles and saturates fascia boards. Clean gutters at least twice yearly, in late fall after leaves drop and in spring after tree pollen and seed pods accumulate.

    Key maintenance tasks for this category include:

    • Inspect and re-seal flashing caulk around all roof penetrations annually. Cracked or missing caulk is the single most common entry point for water.
    • Check downspouts to confirm water exits at least 3 feet from the foundation. Short or clogged downspouts direct water toward footings and can cause basement moisture problems.
    • Look for granule accumulation in gutters during each cleaning. Heavy granule buildup signals aging shingles that may need replacement within the next few years.
    • Repair or replace damaged soffits and fascia promptly. Rotted wood behind gutters compromises the entire gutter attachment and creates an entry point for pests.

    Pro Tip: Snap a photo of your gutters before and after cleaning each season. Over two or three years, the granule accumulation trend tells you more about shingle health than any single inspection.

    Flashing inspection deserves its own focused pass. Annual resealing of caulk around chimneys, vent pipes, and skylights costs almost nothing in materials and prevents repairs that can run into thousands of dollars. Use a polyurethane or silicone roofing caulk rated for exterior use and temperature cycling.

    4. Attic ventilation and insulation: the hidden drivers of roof health

    The attic is the most overlooked component in residential roof care. Poor ventilation traps heat and moisture, which accelerates shingle degradation from below and creates conditions for mold growth on roof decking. Balanced airflow and insulation directly reduce the risk of ice dams in winter and premature shingle failure year-round.

    The EPA recommends keeping indoor humidity below 60%, with an ideal range of 30 to 50%, to prevent mold growth. In the attic, this means soffit vents and ridge vents must work together without obstruction. Insulation pushed against soffit vents blocks airflow and defeats the entire system.

    Condition What it signals Recommended action
    Frost or condensation on decking Inadequate ventilation in winter Clear soffit vents, add ridge vent if missing
    Mold or dark staining on rafters Chronic moisture, possible leak Fix leak source, improve airflow, treat mold
    Attic temperature above 150°F in summer Insufficient ventilation Add attic fan or additional ridge venting
    Ice dams at roof edge in winter Heat escaping through under-insulated attic Improve insulation and air sealing at ceiling level

    Inspect attic ventilation twice a year: once before the first hard freeze and once after the winter thaw. The pre-winter check catches blocked vents before ice dam season. The post-winter check reveals any moisture damage that accumulated over the cold months. This timing aligns with the broader seasonal roof maintenance rhythm that keeps your roof performing year after year.

    5. Replacing damaged shingles before small problems become big ones

    Missing, curled, cracked, or lifted shingles are not cosmetic issues. Damaged shingles must be replaced immediately to prevent water from reaching the underlayment and decking below. Once water penetrates the shingle layer, repair costs multiply quickly.

    A single missing shingle exposes the underlayment to UV degradation and direct rain. Within one or two seasons, the underlayment can crack and allow water into the decking. From there, rot spreads laterally and the repair scope expands from one shingle to a section of decking.

    Curling shingles come in two forms: cupping, where edges turn upward, and clawing, where the middle lifts while edges stay flat. Both indicate age or moisture imbalance and signal that replacement is approaching. If more than 20 percent of shingles show curling, a full roof replacement conversation with a licensed contractor is worth having.

    For isolated damage after a storm, three-tab and architectural shingles are available at most home improvement stores. Match the color and profile as closely as possible. Replacing one or two shingles is a manageable DIY task for a confident homeowner on a low-slope section, but steep or high roofs should always go to a professional.

    6. Documenting your roof condition to protect your investment over time

    Documentation is the most underused tool in residential roof care. Time-stamped photos filed in a simple folder on your phone or computer track deterioration over time and give you concrete evidence when filing insurance claims or warranty requests.

    Follow this documentation routine to build a useful record:

    1. Photograph the full roof from each corner of the property at every inspection.
    2. Take close-up shots of any damage, staining, or repaired areas with a date stamp visible.
    3. Log the date, weather conditions, and any work performed in a simple notes app or spreadsheet.
    4. Store contractor invoices and warranty documents alongside your photo log.
    5. Review the full record annually to spot gradual changes that are invisible inspection to inspection.

    A well-maintained roof inspection log also supports contractor communication. When you can show a roofer three years of photos, they can give you a far more accurate assessment than a cold inspection allows. This record also helps you plan a replacement timeline and avoid the financial shock of an emergency re-roof.

    Schedule formal maintenance twice yearly, in spring and fall, plus an additional check after any hailstorm, high-wind event, or heavy snow load. The spring check catches winter damage. The fall check prepares the roof for ice and freeze-thaw stress. This rhythm is the backbone of any solid preventative roof care program.

    Key takeaways

    Consistent roof maintenance prevents the majority of residential leaks, premature shingle failure, and costly structural repairs by addressing inspection, cleaning, ventilation, and documentation on a regular schedule.

    Point Details
    Inspect twice yearly plus after storms Focus on flashings, gutters, attic, and shingle condition each visit.
    Use ARMA-approved soft washing only Pressure washing voids warranties and strips granules from asphalt shingles.
    Control attic humidity below 60% Balanced soffit and ridge ventilation prevents mold, rot, and ice dams.
    Replace damaged shingles immediately Delayed repairs allow water to reach decking and multiply repair costs.
    Document every inspection with photos Dated photo logs support warranty claims and help plan replacement timing.

    What I’ve learned from watching homeowners skip the basics

    I’ve reviewed hundreds of home maintenance records through Workbenchguide, and the pattern is consistent. Homeowners who avoid expensive roof repairs are not doing anything exotic. They clean gutters in fall, check flashing caulk once a year, and take photos. That’s most of it.

    The misconception I see most often is that roof maintenance means walking the roof. It does not. The most valuable inspection work happens from the ground with binoculars, inside the attic with a flashlight, and at the gutter line with a ladder. Roof walks add risk without proportional benefit for the average homeowner.

    The second misconception is that pressure washing is a thorough cleaning method. It feels satisfying and looks dramatic, but it shortens shingle life and can void the warranty on a roof that still has years of service left. Soft washing with a sodium hypochlorite solution is slower and less visually dramatic, but it is the method that actually protects your investment.

    My honest recommendation: treat flashing and gutter maintenance as non-negotiable twice-yearly tasks, and treat everything else as a bonus. If you do only those two things consistently, you will catch 80 percent of the problems that turn into expensive repairs. Add documentation, and you will have the evidence you need when insurance or warranty conversations arise.

    — Sean

    Stay on top of roof care with Workbenchguide

    Keeping your roof in good shape is easier when you have a system. Workbenchguide gives homeowners a year-round maintenance checklist that includes seasonal roof tasks, smart reminders, and step-by-step DIY guides for everything from gutter cleaning to attic ventilation checks. You can log completed tasks, track expenses, and know exactly what needs attention before a small issue becomes a costly repair. If a job goes beyond DIY, Workbenchguide connects you with trusted contractors. Start your preventative maintenance plan today and stop reacting to roof problems after they happen.

    FAQ

    How often should I inspect my roof?

    Inspect your roof twice a year, in spring and fall, plus after any severe weather event involving hail, high winds, or heavy snow. Roofs older than 15 years benefit from an annual professional inspection.

    Can I pressure wash my asphalt shingle roof?

    No. Pressure washing strips granules, creates leak paths, and voids most manufacturer warranties. ARMA recommends low-pressure soft washing with a sodium hypochlorite solution as the only safe cleaning method for asphalt shingles.

    What causes ice dams and how do I prevent them?

    Ice dams form when heat escapes through a poorly insulated attic, melts snow on the roof, and refreezes at the cold eaves. Improving attic insulation and air sealing, combined with clear soffit and ridge vents, eliminates the heat loss that causes them.

    How do I know when to replace my roof instead of repairing it?

    If more than 20 percent of shingles show curling, cracking, or granule loss, or if the roof is approaching 20 to 25 years old, a full replacement is likely more cost-effective than continued repairs. A licensed roofing contractor can give you a replacement timeline based on current condition.

    Why is flashing the most important thing to inspect?

    Flashing at chimneys, skylights, and vent pipes fails faster than shingles and is the leading cause of residential roof leaks. Annual resealing of flashing caulk costs very little and prevents water intrusion that can damage decking, insulation, and interior ceilings.

  • Why Weatherproof Your Exterior: Save Money and Protect Your Home

    Why Weatherproof Your Exterior: Save Money and Protect Your Home

    Weatherproofing a home’s exterior is the most direct way to prevent moisture damage, structural decay, and escalating repair costs before they start. The industry term for this practice is “exterior moisture management,” and it covers everything from weather-resistant barriers (WRBs) and air barriers to sealants, flashing, and cladding selection. If you own a home or manage a property, understanding why weatherproof exterior protection matters is not optional. A single neglected gap around a window frame can allow water intrusion that leads to mold, rot, and thousands of dollars in remediation. This article walks you through the core components, the best materials, and the practical steps that make the difference between a durable home and a maintenance nightmare.

    Why weatherproof your exterior: the core case

    Weatherproofing protects your home from four primary threats: liquid water, wind-driven rain, air leakage, and vapor diffusion. Each one can cause serious damage on its own. Together, they accelerate structural deterioration faster than most homeowners expect. The good news is that a properly weatherproofed exterior addresses all four simultaneously, and the investment pays back through lower repair bills and longer material lifespans.

    The financial argument is straightforward. Fixing seepage after finishes are applied costs far more and causes far greater disruption than waterproofing during initial construction or renovation. Mold remediation, structural repairs, and full siding replacements routinely run into five figures. Weatherproofing upfront costs a fraction of that.

    Homeowner inspecting water damage on wall

    The health argument is equally compelling. Moisture that penetrates walls creates conditions for mold growth, which degrades indoor air quality and triggers respiratory problems. Controlling moisture at the exterior shell keeps the interior environment clean and safe.

    What is weatherproofing and how does it differ from waterproofing?

    Weatherproofing is broad protection against multiple environmental forces, including rain, wind, temperature swings, and air pressure differences. Waterproofing is a subset of weatherproofing. It specifically prevents liquid water from passing through a surface or assembly. You need both, but confusing them leads to gaps in your home’s defense.

    Here is how the key components break down:

    • Weather-resistant barriers (WRBs): Installed behind exterior cladding, WRBs shed water that gets past the outer surface while allowing vapor to escape. Products like Tyvek HomeWrap and Typar BuildingWrap are common examples.
    • Air barriers: Stop uncontrolled air movement through wall assemblies. Air leakage carries moisture far more aggressively than vapor diffusion alone.
    • Flashing: Metal or membrane strips installed at transitions, windows, doors, and roof edges to redirect water away from vulnerable joints.
    • Sealants and caulking: Fill gaps around penetrations, trim, and framing to block both air and water entry.
    • Exterior cladding: The outermost layer, whether fiber cement, vinyl, or wood composite, acts as the first line of defense and determines how much weather stress reaches the layers beneath.

    Waterproofing products like elastomeric coatings and liquid-applied membranes are applied to specific high-risk surfaces such as foundations, decks, and below-grade walls. They block liquid water completely but do not address air leakage or vapor management. A complete weatherproofing strategy uses both approaches in the right locations.

    How do WRBs and air barriers protect your exterior walls?

    A weather-resistant barrier prevents water infiltration while allowing vapor to escape, protecting walls from moisture damage such as mold and rot. This dual function is what makes WRBs so critical. They are not simply plastic sheeting. They are engineered membranes that manage the movement of water in both liquid and vapor states.

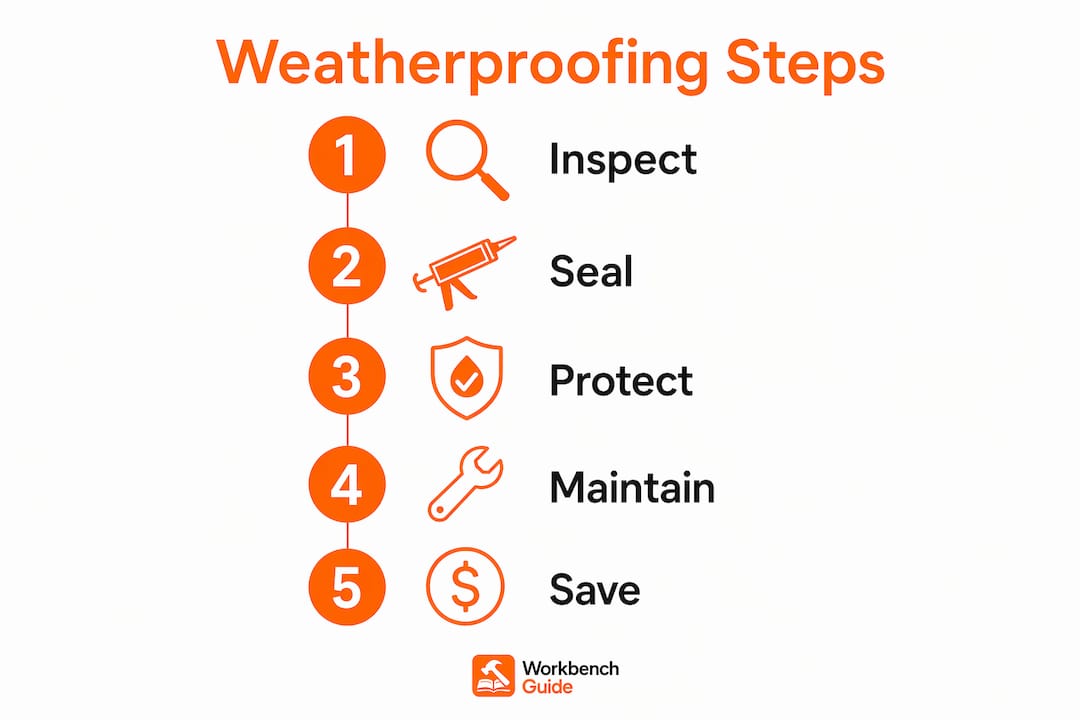
    Infographic outlining weatherproofing process steps

    Under building codes IRC R703.2 and IBC 1404.2, WRBs are required on most new construction and major renovations. In coastal and marine climate zones with frequent wind-driven rain, drainable house wraps or rainscreen assemblies are mandated to balance water resistance with drying potential. This is not a technicality. It reflects decades of building science research showing that walls need to dry out, not just stay dry.

    Air barriers work alongside WRBs to address a separate but related threat. An air barrier stops uncontrolled air movement that transports moisture 100 times more than vapor diffusion, making it a critical layer in wall assemblies. Most homeowners focus on vapor barriers and miss this entirely. Controlling air leakage is often more critical than vapor retarder placement.

    Proper installation follows a specific sequence:

    1. Install the WRB over sheathing, lapping upper layers over lower layers so water runs down and out.
    2. Tape all seams and penetrations with compatible flashing tape to maintain continuity.
    3. Install flashing at all windows, doors, and roof-to-wall transitions before cladding goes on.
    4. Verify air barrier continuity at top plates, rim joists, and any penetrations for pipes or wires.
    5. Install cladding with a drainage gap where climate conditions require it.

    Flashings at transitions and penetrations are a primary source of water intrusion, and controlling air leakage is crucial because it carries far more moisture than vapor diffusion. Skipping or rushing flashing details is the single most common cause of expensive water damage in residential construction.

    Pro Tip: When inspecting an existing home, check the caulking around every window and door frame first. Cracked or missing caulk at these transitions is the fastest path for water to bypass even a well-installed WRB.

    What exterior materials offer the best weatherproof performance?

    Material selection determines how much protection your WRB and air barrier actually need to provide. A durable, weather-resistant cladding reduces the frequency and severity of water intrusion events. Here is how the most common options compare:

    Material Installed cost (per sq ft) Weather resistance Maintenance interval
    Fiber cement $10–$18 Excellent, resists rot and impact Repaint every 10–15 years
    Vinyl $6–$12 Good, no rot but can crack in cold Low, occasional cleaning
    Aluminum $9–$15 Excellent UV and moisture resistance Very low, ideal for coastal areas
    Wood composite (WPC) $8–$14 Good, better than PVC for color retention Moderate

    Fiber cement typically costs $10–$18 per square foot installed and delivers longer durability than vinyl, which runs $6–$12 per square foot but may require more frequent maintenance. The upfront cost difference often disappears over a 20-year period when you factor in repainting, repairs, and replacement cycles.

    WPC cladding provides better color retention, fire resistance, and longer service life compared to PVC, though PVC is cheaper upfront and lighter weight. Aluminum cladding shows excellent UV resistance and waterproof capability, making it the top choice for coastal environments where salt air accelerates corrosion in other materials.

    For exterior lighting fixtures and trim elements, material selection affects long-term durability just as much as it does for cladding. Powder-coated aluminum and marine-grade stainless steel outperform standard steel or plastic in high-moisture environments.

    Pro Tip: If you are replacing siding on a budget, prioritize fiber cement on the north and west faces of your home first. These elevations receive the most wind-driven rain and UV exposure in most U.S. climate zones.

    What practical steps can homeowners take to weatherproof outside?

    Effective exterior weatherproofing is not a single project. It is a maintenance system. These steps cover both new work and ongoing upkeep:

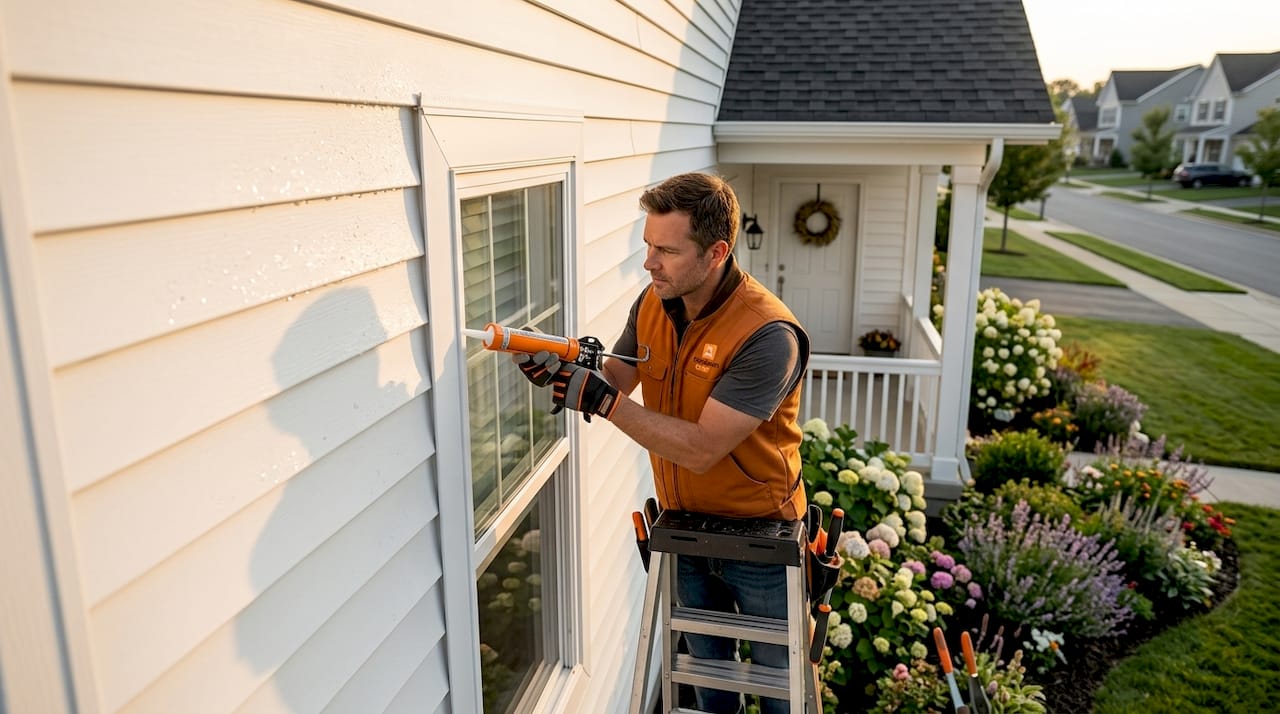
    1. Inspect and reseal all penetrations annually. Check caulking around windows, doors, utility penetrations, and trim. Replace any caulk that is cracked, shrinking, or pulling away from the substrate. Use a polyurethane or silicone sealant rated for exterior use.
    2. Check roof shingles and flashing after every major storm. Damaged shingles and lifted flashing are the most common entry points for water that eventually reaches exterior walls. Address these within days, not weeks.
    3. Upgrade WRBs during any siding replacement. If you are pulling off old cladding for any reason, install a new WRB and retape all seams. The labor cost to do this while the wall is open is minimal compared to doing it as a standalone project.
    4. Maintain a drainage gap behind cladding. In humid climates, a 3/8-inch to 1/2-inch rainscreen gap between the WRB and cladding allows water to drain and walls to dry. This single detail dramatically extends the life of both the WRB and the cladding.
    5. Clean gutters and downspouts twice a year. Overflowing gutters dump water directly against the foundation and lower wall assembly. This is one of the most preventable causes of moisture intrusion in residential buildings.

    Moisture will penetrate walls eventually, so assemblies with drying potential in at least one direction are critical to avoid damage. This is why drainage gaps and vapor-permeable WRBs matter as much as the initial water-blocking layers.

    A fall maintenance checklist is one of the most practical tools for staying ahead of weatherproofing failures before winter weather arrives. Workbenchguide provides seasonal checklists that walk you through every exterior inspection point so nothing gets missed.

    What are the long-term benefits of weatherproofing your home’s exterior?

    The advantages of exterior weatherproofing extend well beyond keeping water out. Here is what a properly protected exterior delivers over time:

    • Reduced mold and rot. Moisture-managed walls do not create the conditions mold needs to grow. This protects both the structure and the indoor air quality.
    • Lower lifetime maintenance costs. Materials with longer repaint intervals and fewer maintenance cycles reduce lifetime labor and material costs, even when the initial price is higher. A fiber cement exterior repainted once every 12 years costs far less to maintain than a wood exterior repainted every 5 years.
    • Extended structural lifespan. Framing lumber that stays dry lasts for generations. Framing that cycles through wet and dry conditions repeatedly degrades within decades.
    • Higher resale value. Buyers and inspectors notice well-maintained exteriors. A home with no moisture history, no staining, and intact cladding commands a premium in any market.
    • Improved indoor comfort. Air barriers that stop uncontrolled air movement also reduce drafts, cold spots, and heating and cooling losses. The energy savings are a direct financial benefit.

    The exterior maintenance guide from Workbenchguide covers the full range of strategies homeowners can use to protect their property and reduce lifetime maintenance costs. Combining that resource with a consistent weatherproofing approach gives you a complete system.

    Key takeaways

    Weatherproofing your home’s exterior requires a layered system of WRBs, air barriers, flashing, quality cladding, and regular maintenance to prevent moisture damage and reduce long-term repair costs.

    Point Details
    WRBs are code-required IRC R703.2 and IBC 1404.2 mandate WRBs on most new construction and major renovations.
    Air leakage is the bigger threat Uncontrolled air movement carries 100 times more moisture than vapor diffusion through walls.
    Material choice drives maintenance costs Fiber cement at $10–$18 per sq ft outlasts vinyl and reduces repaint cycles significantly.
    Flashing failures cause most leaks Transitions at windows, doors, and roof edges are the primary entry points for water intrusion.
    Early investment prevents costly repairs Waterproofing during construction or renovation costs far less than fixing moisture damage after finishes are in place.

    Why I think most homeowners weatherproof too late

    Most homeowners I talk to treat weatherproofing as something they do after a problem appears. A water stain on the ceiling, a musty smell in the basement, paint peeling off the siding. By that point, the damage is already inside the wall assembly, and the repair bill is always bigger than expected.

    The part that frustrates me most is how preventable it all is. The difference between a home that holds up for 40 years and one that needs major repairs every decade is almost always installation quality and material selection at the start. Not exotic products. Not expensive technology. Just proper WRB installation, taped seams, and flashing details done right.

    I also see a persistent misconception that waterproofing and weatherproofing are the same thing. Homeowners apply a waterproof coating to their foundation and assume the job is done. They miss the air leakage at the rim joist, the unsealed gap behind the window trim, and the missing flashing at the roof-to-wall transition. Each one is a slow leak waiting to become a big repair.

    The most practical shift you can make is to treat weatherproofing as a maintenance system, not a one-time project. Inspect your exterior every fall, reseal what needs resealing, and address flashing issues before winter. That habit alone will save you more money than any single product upgrade.

    — Sean

    Stay ahead of exterior repairs with Workbenchguide

    Workbenchguide is built for exactly this kind of proactive home care. The year-round maintenance checklist gives you a structured schedule for every exterior inspection task, from checking caulking and flashing to cleaning gutters and assessing siding condition. You get step-by-step DIY guides, seasonal reminders, and contractor referrals when a job goes beyond what you want to tackle yourself. Staying organized with the right checklist means you catch weatherproofing failures early, before they turn into expensive structural repairs. Start with the checklist and build your exterior protection routine from there.

    FAQ

    What is weatherproofing in simple terms?

    Weatherproofing is the process of protecting a building’s exterior from rain, wind, air leakage, and temperature changes using barriers, sealants, flashing, and weather-resistant cladding. It is broader than waterproofing, which only addresses liquid water.

    How often should you weatherproof your home’s exterior?

    Full weatherproofing upgrades happen during construction or major renovations, but maintenance tasks like resealing caulk, inspecting flashing, and cleaning gutters should be done at least once a year, ideally every fall before winter weather arrives.

    What is the difference between a WRB and a vapor barrier?

    A WRB sheds liquid water while allowing vapor to pass through, keeping walls dry without trapping moisture. A vapor barrier blocks vapor movement entirely and is used in specific climate conditions where vapor diffusion is the primary concern.

    Which exterior cladding material is most weather resistant?

    Fiber cement and aluminum are the top performers for weather resistance. Fiber cement resists rot, impact, and moisture, while aluminum offers excellent UV resistance and is ideal for coastal environments with high humidity and salt air exposure.

    Does weatherproofing increase home value?

    A well-maintained, moisture-free exterior with intact cladding and no water damage history increases resale value and reduces negotiation leverage for buyers. Inspectors flag moisture issues consistently, and addressing them proactively protects your asking price.

  • The Role of Exterior Paint in Protecting Your Home

    The Role of Exterior Paint in Protecting Your Home

    Exterior paint is defined as the primary protective coating system that shields your home’s structure from weather, moisture, and UV damage while simultaneously shaping its visual identity. The role of exterior paint goes far beyond color choice. It is a functional barrier that determines whether your siding, trim, and wood substrates survive decades of sun, rain, and temperature swings or deteriorate into costly repairs. Brands like Valspar and product categories like latex acrylic paints have made this barrier more durable than ever, yet most homeowners still treat paint as a cosmetic decision. Understanding what exterior paint actually does changes how you maintain your home and spend your money.

    How does exterior paint protect your home from environmental damage?

    Exterior paint protects siding and trim from sun, wind, sand, storms, and moisture intrusion. When paint fails, those surfaces are directly exposed to the elements, and breakdown accelerates fast. Think of paint as your home’s outer skin. Once it cracks or peels, everything beneath it becomes vulnerable.

    Moisture is the biggest threat

    Water is the primary enemy of any wood or composite exterior. Paint blocks moisture from soaking into porous materials and closes hairline cracks that allow water intrusion. When moisture gets past the paint layer, it triggers wood rot, mold growth, and structural swelling. Repairing rot in window frames or siding boards costs far more than a timely repaint.

    Painted wood siding repelling water droplets

    UV damage and surface breakdown

    Sunlight breaks down paint binders and pigments over time, causing a chalky residue on the surface called chalking. UV-resistant formulations in modern latex acrylic paints slow this process significantly, but no paint lasts forever without maintenance. South-facing and west-facing walls take the hardest UV hit and typically show failure first.

    Paint as a system, not just a coat

    Skipping primer or sealing joints and cracks increases the risk of trapped moisture and accelerated paint failure. A proper exterior paint system includes a primer, a quality topcoat, and sealed joints at windows, doors, and trim transitions. Each layer has a job. The primer bonds to the substrate, the topcoat resists weather, and the sealant prevents water from sneaking in at edges.

    The most common failure modes you will see are:

    • Peeling: Paint loses adhesion, usually from moisture beneath the film or inadequate surface prep
    • Cracking: Binder breakdown from UV exposure or temperature cycling
    • Chalking: Surface oxidation leaving a powdery residue, common on older oil-based paints
    • Blistering: Trapped moisture or solvent vapor pushing paint away from the substrate

    Pro Tip: Run your hand across a painted wall. If white powder transfers to your palm, the paint is chalking and has lost its protective integrity. That surface needs cleaning and recoating before the next rain season.

    What are the benefits of exterior paint beyond protection?

    Infographic showing key benefits of exterior paint

    The importance of exterior paint extends well past weather resistance. Paint is one of the most cost-effective tools a homeowner has for increasing perceived and actual property value.

    The financial case for fresh paint

    Small exterior paint touch-ups can increase home value by 2 to 5 percent, according to Consumer Reports data cited by Angi. On a $400,000 home, that represents $8,000 to $20,000 in added value from a project that might cost $2,000 to $5,000. That return on investment beats most other cosmetic upgrades.

    Paint also acts as a diagnostic tool. When you inspect your exterior before repainting, you often discover cracked caulk, soft wood, or failing flashing that would otherwise go unnoticed until water damage appears inside the home. Catching these problems early is one of the underrated benefits of exterior paint maintenance.

    Valspar’s 2026 exterior color data reveals a surprising surge in sunny yellows alongside modern black stains, while classic neutrals, blues, and greens remain strong. This shift toward warmer, more expressive palettes reflects a broader cultural move away from the gray-dominated exteriors that dominated the 2010s.

    Current trends shaping exterior color choices in 2026:

    • Earthy neutrals: Warm taupes, greiges, and soft browns that age gracefully
    • Radiant yellows: A bold but approachable choice gaining traction in suburban markets
    • Deep blues and greens: Nature-inspired tones that read as sophisticated without being cold
    • Modern black stains: Popular on trim, doors, and accent features for high-contrast drama
    Color Category Best Use Case 2026 Trend Status
    Warm neutrals Full body color on most home styles Consistently popular
    Radiant yellows Accents, doors, smaller homes Surging in 2026
    Deep blues/greens Full body or large accent areas Strong and growing
    Modern black stains Trim, shutters, garage doors Emerging trend

    How should homeowners maintain and apply exterior paint for maximum durability?

    Maintenance is where most homeowners lose ground. They either repaint on a rigid schedule without checking actual paint condition, or they ignore the exterior until failure is severe. Neither approach is efficient.

    Annual inspection plus targeted maintenance painting is the preferred approach over automatic full repainting schedules. Catching a small area of peeling paint on a north-facing gable and addressing it immediately costs a fraction of what full-wall repainting costs two years later when the rot has spread.

    Surface preparation is non-negotiable

    Proper surface prep is what separates a paint job that lasts 10 years from one that fails in three. Follow this sequence before applying any exterior paint:

    1. Clean the surface thoroughly. Pressure wash or hand-wash with a TSP substitute to remove dirt, mildew, and chalking residue. Paint will not bond to a contaminated surface.
    2. Sand rough or peeling areas. Feather the edges of any existing peeling paint so the new coat blends smoothly.
    3. Repair cracks and gaps. Use a paintable exterior caulk at all joints, window frames, and trim intersections. This is the moisture barrier step most DIYers skip.
    4. Prime bare wood and repaired areas. Priming and caulking are essential for paint to perform as an effective moisture barrier. Bare wood absorbs topcoat unevenly and dries out faster without primer.
    5. Apply topcoat in appropriate conditions. Avoid painting in direct midday sun, below 50°F, or when rain is forecast within 24 hours.

    Pro Tip: If you are spraying paint on textured surfaces like stucco or rough-sawn wood, always backroll immediately after spraying. Backrolling improves coverage and adhesion by working the paint into the texture rather than leaving it sitting on top.

    When to call a professional

    DIY exterior painting is entirely achievable for single-story homes with straightforward surfaces. Multi-story homes, complex trim details, or surfaces with significant rot or moisture damage are situations where a professional brings real value. The risk of painting over compromised paint layers is that you lose weather resistance despite the fresh color. A professional will identify and address the underlying failure before coating over it. You can also use Workbenchguide’s siding inspection guide to identify early warning signs before deciding whether to DIY or hire out.

    How do exterior paint choices affect curb appeal and neighborhood fit?

    Color selection is both a science and a personal statement. The color perception challenges created by north-facing facades and evening lighting mean that a paint chip that looks perfect in the store can read completely differently on your home. This is not a minor issue. Undertones shift dramatically under different light conditions, and a warm beige can turn pink on a north-facing wall.

    House size and orientation shape which colors work. Lighter colors make smaller homes feel larger and work well in shaded settings. Darker, saturated tones add drama and definition to larger homes with strong architectural features. Trim color contrast is equally important. A body color with no trim contrast reads as flat and unfinished, while a well-chosen trim color in a semi-gloss or pearl finish highlights window casings, corner boards, and fascia details.

    Doors and accent features are where personality enters the picture. A deep navy or forest green front door against a warm gray body color creates a focal point without overwhelming the street view. Pearl and semi-gloss finishes on trim and doors are practical too. They are easier to clean and hold up better to direct contact than flat finishes. For a deeper look at how color and finish choices connect to your overall exterior maintenance strategy, Workbenchguide covers the full picture.

    Key takeaways

    Exterior paint serves a dual function: it is the primary moisture and UV barrier protecting your home’s structure, and it is the most visible aesthetic statement your property makes.

    Point Details
    Paint is a protective system Primer, topcoat, and sealed joints work together. Skipping any layer increases failure risk.
    Surface prep determines lifespan Cleaning, sanding, caulking, and priming before painting doubles the effective life of any coat.
    Annual inspection beats full repaints Catching small failures early and touching up targeted areas saves thousands over reactive repainting.
    Color choice is building science House orientation, roof undertones, and lighting all affect how a color reads on your exterior.
    Paint touch-ups add real value Small exterior paint improvements can increase home value by 2 to 5 percent.

    Why I think most homeowners are solving the wrong paint problem

    I have seen the same pattern repeat itself constantly. A homeowner notices their exterior looks tired, picks a color they love, and hires someone to paint over whatever is already there. Two years later, the paint is peeling again. The color was never the problem. The substrate was.

    The most common misconception I encounter is that fresh paint fixes a failing exterior. It does not. Paint is a coating, not a repair. If the wood beneath is soft, the caulk is cracked, or the primer was skipped, the new topcoat will fail at the same rate as the old one. The paint job looks great for one season and then starts telling the same story of neglect underneath.

    What actually works is treating paint as part of a maintenance system rather than a cosmetic refresh. That means inspecting your exterior every spring, addressing small failures immediately, and understanding that the prep work is where the durability lives. The color is the last decision you make, not the first.

    Color science is also undervalued. Most homeowners pick a color they like indoors under artificial light, then wonder why it looks wrong on the house. Testing large swatches directly on the wall and observing them at different times of day is not optional if you want a result you will be happy with for a decade. The role of primer and proper surface prep is where professional painters earn their fee, even if you handle the topcoat yourself.

    Exterior paint done right is one of the highest-return maintenance investments a homeowner can make. Done wrong, it is an expensive illusion.

    — Sean

    Keep your exterior paint working harder for longer

    Workbenchguide is built for homeowners who want to stay ahead of repairs rather than react to them. The home maintenance checklist includes seasonal exterior paint inspection reminders, surface prep checklists, and step-by-step guides for identifying early paint failure before it becomes structural damage. You can track what needs attention, schedule touch-up projects, and know exactly when to call a contractor versus handle it yourself. Staying organized around exterior maintenance is how you protect your investment year after year without the stress of emergency repairs.

    FAQ

    What is the main role of exterior paint on a house?

    Exterior paint serves as the primary protective barrier between your home’s structural materials and weather damage, including moisture, UV radiation, and temperature fluctuations. It also defines curb appeal and influences property value.

    How often should exterior paint be inspected or touched up?

    Annual inspection is the recommended approach, with targeted touch-ups applied to any areas showing peeling, cracking, or chalking. This prevents small failures from becoming large, costly repairs.

    Does exterior paint color affect home value?

    Yes. Small exterior paint improvements, including fresh color and touch-ups, can increase home value by 2 to 5 percent according to Consumer Reports data. Color choice also affects buyer perception and time on market.

    What happens if you skip primer on exterior paint?

    Skipping primer increases the risk of poor adhesion, uneven coverage, and trapped moisture beneath the topcoat. Bare wood and repaired surfaces require primer to bond properly and resist water intrusion.

    What are the signs that exterior paint has failed?

    The main signs are peeling, cracking, blistering, and chalking. Chalking leaves a white powder residue when you run your hand across the surface. Any of these signs indicate the paint is no longer providing effective weather protection and needs attention.

  • Spring Cleaning Checklist: Room-by-Room Guide for 2026

    Spring Cleaning Checklist: Room-by-Room Guide for 2026

    A spring cleaning checklist is a prioritized sequence of tasks designed to deep clean and organize your entire home efficiently, starting with decluttering and ending with floors. Most homeowners treat spring cleaning as a single overwhelming event, but the right structure turns it into a manageable, room-by-room reset that actually sticks. Tools like microfiber cloths, a well-stocked cleaning caddy, and products like Simple Green All-Purpose Cleaner make the process faster and more effective. This guide gives you the exact sequence, timing, and room-specific tasks to get your home clean without burning out.

    1. What’s the best sequence for your spring cleaning checklist?

    The single biggest mistake in spring cleaning is starting in the wrong place. Cleaning in the wrong order means you end up re-cleaning surfaces you already finished, which wastes both time and effort. The expert-recommended sequence is: declutter first, then dry cleaning, then wet cleaning, then floors last.

    Why this order works:

    • Declutter first. Decluttering before cleaning avoids cleaning surfaces twice. Moving items after you’ve already wiped a shelf means starting over.
    • Dry dusting before wet cleaning. Airborne dust rebound traps you in a cycle of re-suspension. Dry dusting with microfiber cloths captures particles before any liquid is applied.
    • Wet cleaning with dwell time. Spray your cleaner and wait. A 2-minute dwell time after applying product lets the chemistry do the work, so you’re wiping away grime rather than smearing it.
    • Floors absolutely last. Dust and debris fall during every earlier step. Vacuuming or mopping at the end catches everything in one pass.

    Following this sequence can cut total cleaning time by up to 25 to 30 percent. That’s not a minor efficiency gain. On a full-home clean, that difference can mean finishing in two weekends instead of three.

    Pro Tip: Set a timer for each room before you start. The 20-minute rule focuses your effort on one task or zone per session, which prevents the scattered, unfinished feeling that derails most spring cleaning attempts.

    2. Room-by-room spring cleaning guide with time estimates

    A thorough spring clean typically takes 2 to 3 weekends when broken into rooms. Planning your sessions around realistic time blocks keeps the project moving without exhaustion.

    Kitchen (3 to 4 hours)

    Starting in the kitchen gives you the biggest morale boost and visual payoff, which sets positive momentum for the rest of the home. Focus on the refrigerator interior, oven, range hood filter, cabinet fronts, and the area behind appliances. Pull the refrigerator out at least once a year to vacuum the coils. Wipe down every cabinet door with a degreaser before moving to counters and the sink.

    Man deep cleaning oven in a sunlit kitchen

    Bathrooms (2 to 2.5 hours)

    Bathrooms concentrate grime in predictable spots: grout lines, the base of the toilet, the shower door track, and the exhaust fan cover. Spray tile and grout with a cleaner and let it sit while you tackle the mirror and vanity. Finish with the floor and replace the shower curtain liner if it shows mold.

    Bedrooms (2 to 3 hours)

    Swap winter bedding for lighter options and wash all pillows, duvet covers, and mattress protectors. Flip or rotate the mattress. Edit the closet by pulling out anything you haven’t worn in 12 months. Dust ceiling fan blades, wipe baseboards, and vacuum under the bed.

    Living room (1.5 to 2 hours)

    Vacuum upholstered furniture and flip cushions. Wipe down electronics, remote controls, and lamp bases. Clean window sills and tracks. Dust blinds with a microfiber cloth or the brush attachment on your vacuum.

    Entry, laundry room, and garage

    These spaces are easy to skip but matter for overall home function. Clean the entry mat, wipe down the front door, and organize shoes. In the laundry room, run a cleaning cycle on the washer and wipe the dryer drum. In the garage, sweep the floor, check stored chemicals for expiration, and test the garage door safety reverse.

    Room Estimated time Priority tasks
    Kitchen 3 to 4 hours Appliance interiors, cabinet fronts, range hood
    Bathrooms 2 to 2.5 hours Grout, exhaust fan, toilet base, liner
    Bedrooms 2 to 3 hours Bedding swap, closet edit, mattress rotation
    Living room 1.5 to 2 hours Upholstery, electronics, window tracks
    Entry and laundry 1 to 1.5 hours Door, washer cycle, dryer drum
    Garage 1 to 2 hours Floor sweep, chemical check, door test

    3. Seasonal and allergen-aware tasks for your deep cleaning checklist

    Indoor air quality is one of the most overlooked parts of any seasonal cleaning list. The EPA identifies source control, ventilation, and air filtration as the three key strategies for healthy indoor air. Spring cleaning is the right time to address all three at once.

    Allergen-aware tasks to add to your checklist:

    • Replace HVAC filters and clean return air vents. A clogged filter recirculates dust, pet dander, and pollen through every room.
    • Keep windows closed during high pollen days and use an air purifier with a HEPA filter instead. Opening windows during peak pollen hours (typically 5 a.m. to 10 a.m.) pulls allergens directly into the space you just cleaned.
    • Use damp dusting or microfiber cloths rather than dry feather dusters. Dry dusters launch particles back into the air. Microfiber traps them.
    • Wash all throw blankets, decorative pillow covers, and curtains. Fabric surfaces hold allergens year-round.
    • Test smoke alarms and carbon monoxide detectors. Replace batteries in both.
    • Check the dehumidifier if you have one. Mold growth accelerates above 50 percent relative humidity, and spring brings moisture.

    Note: If you or a family member has seasonal allergies, wear an N95 mask while dusting and vacuuming. This is especially true when cleaning areas that have been closed off all winter, like basements, attics, and storage rooms.

    The American Cleaning Institute recommends treating spring cleaning as a temporarily expanded version of your normal routine rather than a separate, intimidating project. That framing makes allergen tasks feel like natural additions rather than extra work.

    4. How renters can adapt a spring cleaning checklist

    Renters face a different set of priorities than homeowners. The core cleaning tasks are the same, but the stakes around deposits and landlord relationships add a layer of documentation that most spring cleaning guides ignore.

    Renter-specific adjustments:

    • Document everything with photos. Dated photos of repairs and cleaning progress protect your deposit when you move out. Take photos before and after cleaning each room, and store them in a dated folder on your phone or cloud storage.
    • Scale the checklist to your space. A studio apartment does not need the same 3-weekend commitment as a four-bedroom house. Focus on high-impact tasks: kitchen appliances, bathroom grout, window tracks, and closet organization.
    • Check what you’re responsible for. Many leases exclude tasks like carpet shampooing or exterior window cleaning. Review your lease before adding those to your list.
    • Use a printable or digital checklist. A customizable spring cleaning checklist that generates renter-specific recommendations helps you prioritize without guessing. Apps like Tody or Habitica let you track tasks and set reminders.
    • Report maintenance issues in writing. Spring cleaning is the best time to notice problems like a dripping faucet, a loose outlet cover, or a slow drain. Reporting them in writing during your cleaning creates a timestamped record.

    For apartment-specific cleaning techniques, apartment cleaning guidance covers modifications that apply when you’re working with smaller spaces and shared building systems. The core principle is the same: work top to bottom, declutter first, and document as you go.

    Key takeaways

    A spring cleaning checklist works best when you follow the declutter-to-floors sequence, clean room by room with realistic time blocks, and layer in allergen control and seasonal safety checks.

    Point Details
    Sequence drives efficiency Declutter first, then dry dust, then wet clean, then floors to avoid re-cleaning.
    Room-by-room timing Kitchen takes 3 to 4 hours; plan 2 to 3 weekends for a full home reset.
    Allergen control matters Replace HVAC filters, use microfiber cloths, and keep windows closed on high pollen days.
    Renters need documentation Dated photos of cleaning and repairs protect deposits and create a maintenance record.
    Pacing prevents burnout The 20-minute rule and 31-day declutter plans make large projects sustainable.

    Why I stopped treating spring cleaning as one big event

    Most people approach spring cleaning the way they approach a tax deadline: one frantic push, then relief until next year. I did the same thing for years, and the result was always the same. I’d clean hard for a weekend, feel good for a week, and watch the house slide back to its previous state by May.

    What changed things for me was treating the deep clean as a 31-day declutter plan spread across manageable daily chunks rather than a single event. One drawer on Monday. One closet shelf on Tuesday. The cleaning itself became faster because the clutter was already gone before I picked up a cloth.

    The other shift was taking allergen tasks seriously. I used to skip filter replacements and assume open windows meant fresh air. Once I started replacing HVAC filters at the start of every season and using a HEPA air purifier in the bedroom, the difference in how the house felt was immediate. That’s the part most home cleaning guides bury in a footnote.

    My honest advice: build your spring cleaning checklist around the sequence first, then the rooms, then the seasonal tasks. Don’t start with the garage just because it bothers you most. Start with the kitchen, follow the order, and let the momentum carry you through. The system works when you trust it.

    — Sean

    Keep your home in shape all year with Workbenchguide

    Spring cleaning resets your home, but the houses that stay in the best shape are the ones with a plan that runs year-round. Workbenchguide’s home maintenance checklist connects your spring deep clean to the seasonal tasks that prevent costly repairs before they start. From HVAC servicing schedules to gutter checks and weatherproofing reminders, the platform keeps you on track with structured task lists and timely reminders. You can also explore the seasonal home prep guide for a full breakdown of what to check each season, including the spring tasks that go beyond cleaning and into real maintenance.

    FAQ

    What is a spring cleaning checklist?

    A spring cleaning checklist is a structured list of deep cleaning and organizing tasks, sequenced by room and priority, to reset your home at the start of the season. It goes beyond weekly maintenance to cover areas like appliance interiors, bedding swaps, and allergen control.

    How long does a full spring clean take?

    A thorough spring clean typically takes 2 to 3 weekends when broken into rooms. The kitchen alone takes 3 to 4 hours, and bathrooms take 2 to 2.5 hours, so planning by room prevents the project from feeling unmanageable.

    What order should I clean my house in spring?

    Clean in this sequence: declutter first, then dry dust from top to bottom, then apply wet cleaners with a 2-minute dwell time, then finish with floors. This order prevents re-cleaning and cuts total time by up to 25 to 30 percent.

    What spring cleaning tasks reduce allergens?

    Replace HVAC filters, use microfiber cloths for dusting, wash all fabric surfaces including curtains and throw blankets, and keep windows closed during high pollen periods. The EPA recommends source control, ventilation, and air filtration as the three core strategies for healthy indoor air.

    How should renters approach spring cleaning differently?

    Renters should document cleaning progress and any repairs with dated photos to protect their deposit. They should also scale the checklist to their space, check the lease for excluded tasks, and report maintenance issues in writing during the cleaning process.

  • Why Maintain Your Septic System: Save Money and Stay Safe

    Why Maintain Your Septic System: Save Money and Stay Safe

    Septic system maintenance is the practice of regularly inspecting, pumping, and managing your home’s on-site wastewater treatment system to prevent failure, contamination, and costly repairs. Every home with a septic system depends on that system working correctly, not just for comfort, but for the health of your family, your neighbors, and the groundwater beneath your property. The EPA estimates that routine maintenance costs just $250 to $500 every three to five years, while a full system repair or replacement runs $5,000 to $15,000. That gap tells you everything you need to know about why maintain septic system care should be a non-negotiable part of homeownership.

    Why maintaining your septic system matters most

    A septic system does something most homeowners never think about: it treats all the wastewater leaving your home before it reaches the soil and groundwater. The tank separates solids from liquids, bacteria break down organic matter, and the drainfield filters treated effluent into the ground. When the system works, it’s invisible. When it fails, the consequences are immediate, expensive, and sometimes dangerous.

    Well-maintained septic systems remove most pollutants before they reach groundwater, while a malfunctioning system can contaminate drinking water sources and spread disease. This isn’t a theoretical risk. Failing systems have been linked to outbreaks of hepatitis A, gastroenteritis, and other waterborne illnesses in communities across the United States. Your system sits underground, but its effects reach far beyond your property line.

    Residential septic drain field with pipes and grass

    The importance of septic maintenance also extends to your finances. A neglected system doesn’t just fail quietly. It fails expensively, often requiring drainfield excavation, soil remediation, and full system replacement. Treating maintenance as optional is one of the most common and costly mistakes homeowners make.

    How septic systems work and what maintenance actually involves

    Understanding the basics of your system makes it much easier to understand why each maintenance task matters. A conventional septic system has three main components: the septic tank, the distribution box, and the drainfield (also called a leach field). Wastewater flows from your home into the tank, where heavy solids sink to form sludge and lighter materials float as scum. The liquid layer in the middle, called effluent, flows out to the drainfield for final treatment in the soil.

    Bacteria inside the tank break down organic waste continuously, but they can’t eliminate everything. Sludge and scum accumulate over time, and if they’re not removed, they overflow into the drainfield and clog the soil. That’s why pumping is the single most critical maintenance task for any septic system.

    The EPA recommends the following core maintenance schedule:

    • Tank inspection: Every one to three years by a licensed professional, checking for leaks, baffle condition, and sludge depth
    • Tank pumping: Every three to five years to remove accumulated sludge and scum
    • Effluent filter cleaning: Every six to twelve months, a task most homeowners can handle themselves
    • Mechanical component checks: Pumps and controls in alternative systems may need replacement every 10 to 20 years, so lifecycle budgeting matters
    • Drainfield inspection: Look for wet spots, odors, or unusually lush grass, which signal system stress

    Your daily habits also shape system health. How much water you use, what you flush, and what goes down the drain all affect how hard your system has to work. Maintenance responsibility includes both professional service intervals and the household practices that happen every single day.

    What happens when you neglect septic system care

    Infographic illustrating key septic maintenance steps

    Neglect has a predictable pattern. Sludge builds up, the drainfield clogs, sewage backs up into the home or surfaces in the yard, and the repair bill arrives. Failure to pump sludge leads to drainfield clogging and permanent damage, costing $5,000 to $15,000 to repair or replace. That figure doesn’t include landscaping restoration, permit fees, or the cost of temporary accommodations if your home becomes uninhabitable during repairs.

    The consequences of neglecting septic systems go well beyond your wallet:

    • Groundwater contamination: Untreated sewage carries bacteria, viruses, and nitrates that seep into wells and aquifers, threatening drinking water for your household and your neighbors
    • Surface water pollution: Malfunctioning systems release bacteria, viruses, and toxic chemicals that harm aquatic ecosystems, killing plants, fish, and shellfish in nearby streams, ponds, and coastal waters
    • Disease transmission: Pathogens from failing systems can cause hepatitis, dysentery, and other serious illnesses in humans and animals
    • Property value loss: A failed or flagged septic system can reduce your home’s resale value significantly and complicate or block a sale entirely
    • Legal liability: In many states, knowingly selling a home with a failing septic system exposes you to legal action from buyers

    The environmental damage is worth emphasizing. A single failing system in a neighborhood near a lake or estuary can trigger shellfish bed closures and swimming bans that affect the entire community. The benefits of septic upkeep extend far beyond your own property.

    Routine maintenance tasks and their real benefits

    The good news is that keeping a septic system healthy doesn’t require constant effort. It requires scheduled effort, which is a very different thing. Here’s how to build a maintenance routine that protects your system for decades.

    1. Schedule professional inspections every one to three years. A licensed inspector checks baffle condition, measures sludge and scum layers, tests mechanical components, and identifies early signs of drainfield stress. Catching a cracked baffle early costs a few hundred dollars. Replacing a drainfield costs tens of thousands.

    2. Pump the tank every three to five years. This is the most important single task in any septic system maintenance schedule. Pumping removes accumulated solids before they can overflow into the drainfield. The exact frequency depends on household size, tank capacity, and water usage, so ask your service provider for a personalized schedule.

    3. Clean the effluent filter every six to twelve months. The effluent filter sits at the outlet of your tank and catches solids before they reach the drainfield. It’s a critical checkpoint between pump-outs. Neglecting it can cause solids breakthrough even when the tank is pumped on schedule. Cleaning it is a straightforward DIY task: pull the filter, rinse it with a garden hose over a bucket, and reinstall it.

    4. Adjust your habits seasonally. In spring, inspect the drainfield area for wet spots after snowmelt. In summer, spread laundry loads throughout the week to avoid hydraulic overload. In fall, locate and mark your tank lid before the ground freezes. In winter, avoid parking vehicles over the drainfield, since frozen soil combined with compaction can crack pipes.

    5. Practice water conservation year-round. High water volume is one of the leading causes of hydraulic overload in septic systems. Fix leaky faucets, install low-flow fixtures, and run dishwashers and washing machines with full loads only.

    Pro Tip: Install a riser over your septic tank lid so future pump-outs and inspections don’t require digging. A $50 to $150 riser saves time and money every service visit for the life of the system.

    Maintenance costs versus repair costs: the financial case

    The financial argument for regular septic system care is straightforward. Routine maintenance is a predictable, manageable expense. Repair and replacement are not.

    Expense Typical cost range
    Tank pumping (every 3 to 5 years) $300 to $500
    Professional inspection $100 to $300
    Effluent filter cleaning (DIY) $0 to $50
    Minor repair (baffle replacement) $200 to $500
    Drainfield repair or replacement $5,000 to $15,000
    Full system replacement $10,000 to $30,000+

    Spending $400 to $800 every few years on preventative maintenance is the only rational financial choice when the alternative is a five-figure emergency. A well-maintained conventional septic system lasts 25 to 30 years. A neglected one can fail in under a decade.

    “Septic maintenance is a cost-effective risk management strategy. The homeowners who call for emergency service are almost always the ones who skipped the routine visits.” — Almco Plumbing, septic service specialists

    The math gets even clearer when you factor in property value. Home inspectors flag septic systems during real estate transactions, and a system with no maintenance records is a red flag that can kill a sale or force a price reduction far exceeding the cost of years of proper upkeep.

    Owner responsibilities and best practices for daily septic care

    How you use your home directly determines how long your septic system lasts. The EPA is explicit that homeowners are responsible for both professional service and the daily habits that affect system health. Here’s what that looks like in practice.

    What to never flush or drain:

    • Wipes of any kind, including those labeled “flushable”
    • Grease, cooking oil, or fat
    • Medications and pharmaceuticals
    • Harsh chemical drain cleaners, bleach in large quantities, or antibacterial soaps used excessively
    • Coffee grounds, paper towels, or feminine hygiene products

    These materials either kill the beneficial bacteria your tank depends on or physically clog the system. A garbage disposal adds significant solids load to your tank and shortens the time between required pump-outs.

    Physical protection of the drainfield:

    • Never park vehicles, place heavy equipment, or build structures over the drainfield
    • Keep deep-rooted trees and shrubs at least 30 feet away from the drainfield, since roots actively seek out and invade pipes
    • Direct roof drains, sump pumps, and surface runoff away from the drainfield area to prevent hydraulic saturation

    Warning signs that require a professional call:

    • Slow drains throughout the house (not just one fixture)
    • Sewage odors inside or outside the home
    • Soggy, spongy, or unusually green grass over the drainfield
    • Sewage backup in toilets or floor drains

    Pro Tip: Keep a simple maintenance log with dates of inspections, pump-outs, and any repairs. This record adds real value when you sell your home and helps your service provider track system trends over time.

    Checking your plumbing annually alongside your septic inspection catches problems at the connection points between your home’s pipes and the tank before they become serious.

    Key takeaways

    Regular septic system maintenance is the single most effective way to prevent system failure, protect groundwater, and avoid repair costs that can exceed $15,000.

    Point Details
    Pump every 3 to 5 years Removing sludge prevents drainfield clogging, the leading cause of system failure.
    Inspect every 1 to 3 years Professional inspections catch baffle damage, leaks, and early drainfield stress before they escalate.
    Clean effluent filters regularly Cleaning every 6 to 12 months prevents solids breakthrough even between scheduled pump-outs.
    Maintenance costs far less than repairs Routine upkeep costs $400 to $800 per cycle versus $5,000 to $30,000 for repairs or replacement.
    Daily habits matter as much as service visits Avoiding wipes, grease, and harsh chemicals protects the bacterial process your tank depends on.

    The real cost of waiting: a perspective from Sean

    Most homeowners I’ve talked to treat their septic system the same way they treat their car’s transmission: they ignore it until something goes wrong. The problem is that a transmission failure leaves you stranded on the road. A septic failure leaves you with sewage in your yard, a condemned drainfield, and a bill that can wipe out a year’s worth of home improvement budget in a single afternoon.

    The maintenance tasks themselves are not complicated or expensive. What makes them feel optional is that a healthy septic system gives you no feedback. It just works. That silence is exactly what tricks homeowners into skipping the three-year pump-out or the annual filter cleaning. The system seems fine, so why spend the money?

    Here’s what I’ve seen change that thinking: homeowners who keep a maintenance log and actually look at the dates. When you write down that your last pump-out was six years ago, the urgency becomes real. The system hasn’t failed yet, but you’re borrowing time.

    The environmental angle is also underappreciated. Your septic system sits above the same aquifer that supplies your well, your neighbor’s well, and possibly a local stream or pond. Properly functioning systems protect that water. Failing ones contaminate it, sometimes for years before anyone traces the source. That’s not just a personal financial problem. It’s a community health problem that you have the power to prevent with a $400 pump-out.

    Treat your septic system like the infrastructure it is. Schedule the service, keep the records, and protect the investment you’ve already made in your home.

    — Sean

    Stay ahead of septic issues with Workbenchguide

    Workbenchguide is built for homeowners who want to stay ahead of maintenance, not react to emergencies. The platform gives you smart reminders for septic pump-outs, inspection schedules, and seasonal care tasks so nothing falls through the cracks. Use the home maintenance checklist to track every system in your home, from your septic tank to your roof, with step-by-step guidance and contractor recommendations when a job needs a professional. If you’ve been putting off a septic inspection or can’t remember the last time your tank was pumped, Workbenchguide is the place to start getting organized and protecting your home’s most critical systems.

    FAQ

    How often should a septic tank be pumped?

    Septic tanks should be pumped every three to five years for most households. The exact frequency depends on tank size and the number of people in the home.

    What are the signs of a failing septic system?

    The most common warning signs include slow drains throughout the house, sewage odors indoors or outdoors, soggy ground over the drainfield, and sewage backing up into toilets or floor drains. Any of these symptoms require an immediate professional inspection.

    Can I clean my own effluent filter?

    Yes. Effluent filter cleaning is one of the few septic maintenance tasks suited for DIY. Pull the filter from the outlet baffle, rinse it thoroughly with a garden hose into a bucket, and reinstall it. The EPA recommends cleaning it every 6 to 12 months.

    Why do septic systems fail prematurely?

    Most premature failures trace back to infrequent pumping, flushing materials that harm the bacterial process, hydraulic overload from excessive water use, or physical damage to the drainfield from vehicles or tree roots. Sewer backup risks increase sharply when any of these factors go unaddressed.

    Does septic maintenance affect home resale value?

    A documented maintenance history adds real value during a home sale and prevents the system from becoming a negotiating liability. A failed or unmaintained system can reduce your home’s value or block a sale entirely during the inspection process.

  • What Is Home Zoning? A Guide for Homeowners

    What Is Home Zoning? A Guide for Homeowners

    Home zoning is defined as local government land-use regulation that divides land into designated zones, each with specific rules about what can be built, how it can be used, and how large structures can be. Every parcel of residential property in the United States sits within a zoning district that controls everything from whether you can add a second unit to how close your garage can sit to the property line. Understanding the home zoning definition is not optional knowledge for homeowners. It is the foundation of every renovation, addition, or land-use decision you will ever make on your property.

    Zoning is public law, enforced by your city or county. It is separate from HOA rules or private deed covenants, though both can apply simultaneously to your property. The role of home zoning extends beyond neighborhood aesthetics. It shapes housing affordability, guides community growth, and protects residents from incompatible development next door.

    What is home zoning and how does it work?

    Home zoning is local government regulation that divides a municipality into zones, each with its own permitted uses, building types, and dimensional standards. A single-family residential zone, for example, typically allows only detached houses on individual lots. A multi-family zone permits apartment buildings or duplexes. A mixed-use zone allows ground-floor retail with residential units above.

    Zoning map pinned on corkboard with planner's hand

    The system works through a zoning ordinance, a legal document adopted by your local government. That ordinance assigns every parcel a zoning designation, such as R-1 for single-family residential or MU for mixed-use. The designation determines what you can do with your land by right, meaning without special approval, and what requires a permit, a variance, or a full rezoning process.

    Zoning is also about balancing community needs and protecting neighborhoods from incompatible development. A factory next to a school is the classic example of what zoning prevents. For homeowners, the practical effect is that your property rights are real but bounded. You own the land, but the zone governs what you can do with it.

    Types of home zoning you need to know

    Residential zoning is not a single category. Most municipalities use a tiered system with several distinct subtypes, and knowing which one applies to your property changes everything about what you can build or modify.

    Zoning type Typical uses Common restrictions
    Single-family residential (R-1) Detached homes, one unit per lot No duplexes, strict setbacks, low density
    Multi-family residential (R-2/R-3) Duplexes, apartments, condos Height limits, parking minimums, density caps
    Mixed-use residential Residential plus small commercial Ground-floor use rules, design standards
    Agricultural residential Homes on large rural lots Minimum lot size, livestock rules
    Planned unit development (PUD) Custom developments with flexible rules Site-specific standards negotiated with the city

    Beyond these base zones, overlay districts add extra rules on top of the base zoning. A historic overlay might restrict exterior changes. A flood zone overlay imposes elevation requirements. A transit overlay may allow higher density near bus or rail lines. You must check both the base zone and any overlays before planning a project.

    Zoning historically influenced suburban sprawl and housing affordability, which is why many cities are now reforming their codes to allow more housing types in traditionally single-family zones. This is worth knowing because your municipality’s rules may be in flux, and a zone that prohibited accessory dwelling units two years ago may permit them today.

    Infographic illustrating main home zoning types

    Key zoning rules that affect your property

    Knowing your zoning designation is only the first step. The real detail lives in the dimensional standards and use regulations that govern what you can actually build.

    Setbacks are the minimum distances a structure must maintain from property lines. Typical front setbacks run 20 to 30 feet in suburban residential zones, side setbacks range from 5 to 10 feet, and rear setbacks fall between 15 and 25 feet. These numbers vary by district, so always check your specific ordinance rather than assuming a neighborhood standard applies to your lot.

    Beyond setbacks, here are the core dimensional rules that affect most homeowners:

    • Lot coverage: The maximum percentage of your lot that can be covered by structures, including the house, garage, and sheds. A 40% coverage limit on a 6,000-square-foot lot means no more than 2,400 square feet of structure footprint.
    • Floor area ratio (FAR): The ratio of total building floor area to lot size. A FAR of 0.5 on a 5,000-square-foot lot allows up to 2,500 square feet of total floor area across all stories.
    • Building height: Most residential zones cap height at 25 to 35 feet, measured from grade to the roof peak. Some zones use story limits instead.
    • Permitted uses: Activities explicitly allowed in the zone without special approval, such as a single-family home or a home office.
    • Conditional uses: Activities allowed only with a conditional use permit, such as a daycare center or a bed-and-breakfast in a residential zone.
    • Prohibited uses: Activities the zone does not allow under any circumstances, such as a manufacturing facility in an R-1 district.

    Pro Tip: Always check overlay districts separately from the base zone. A property in an R-2 base zone with a historic overlay may face stricter height and facade rules than the base zone alone would suggest. Your city’s zoning viewer will usually display overlays alongside the base designation.

    How to find your home’s zoning designation

    Local governments provide online zoning viewers and GIS maps where you can enter an address or parcel ID to see the zoning district, any overlays, and links to the applicable dimensional standards. Boston’s zoning viewer is a well-known example, but nearly every major city and most counties now offer a similar tool through their planning or inspectional services department.

    Here is a practical workflow for finding and understanding your zoning:

    1. Go to your city or county’s official planning department website. Search for “zoning map” or “zoning viewer” along with your city name. Avoid third-party aggregators as your first stop.
    2. Enter your address or parcel ID. The viewer will return your base zoning designation and any overlay districts.
    3. Locate the dimensional standards table for your zone. This table lists setbacks, height limits, lot coverage, and FAR in one place. It is faster and more reliable than reading through the full ordinance text.
    4. Check the use regulations. Confirm whether your planned project or use is permitted by right, conditional, or prohibited.
    5. Download or screenshot the results. Zoning maps are updated periodically, and having a dated record protects you if a dispute arises later.

    Third-party zoning lookup tools can lag behind official records after a rezoning action. A parcel that was rezoned six months ago may still show the old designation on a commercial data aggregator. Always verify with the official source before making any financial or construction decisions.

    Pro Tip: If you are uncertain about your zoning or planning a significant project, request a written zoning confirmation letter from your local planning or building department. Most jurisdictions provide this for a small fee, and it gives you an official record of your property’s zoning status on a specific date.

    Zoning exceptions: variances, rezoning, and special permits

    Not every project fits neatly within existing zoning rules. When your plans conflict with what the zone allows, you have three main paths forward.

    Projects allowed by right proceed through standard building permits. Projects that are conditional or prohibited require one of the following:

    • Variance: A variance is relief from a specific dimensional standard, such as a reduced setback, when strict compliance would cause undue hardship. You must typically prove the hardship is unique to your property, not self-created, and that the variance will not harm neighbors. Variances are decided by a zoning board of appeals.
    • Special use permit (conditional use permit): This allows a use that is not permitted by right but is conditionally allowed in the zone. A home-based daycare in a residential zone is a common example. The board evaluates whether the specific use at the specific location meets defined criteria.
    • Rezoning: A rezoning changes the zoning designation of a parcel entirely. This is the most significant and time-consuming process, often requiring a planning commission hearing and a city council vote. Rezonings are typically pursued for larger development projects, not individual home additions.

    The practical implications for homeowners are significant. A variance application can take 60 to 120 days and cost several hundred to several thousand dollars in filing fees and professional preparation. A renovation plan that assumes a variance will be granted is a plan built on uncertain ground. Always confirm your zoning status before finalizing project designs or signing contractor agreements.

    Key Takeaways

    Home zoning is the public regulatory framework that controls what you can build and how you can use your property, and understanding it before any project saves time, money, and legal risk.

    Point Details
    Zoning is public law Local government zoning ordinances control permitted uses and building standards on every residential parcel.
    Overlays change the rules Always check overlay districts alongside the base zone, since overlays can impose stricter limits on height, setbacks, or design.
    Verify with official sources Third-party zoning tools can be outdated; use your city’s official zoning viewer or request a written confirmation letter.
    Exceptions take time and money Variances and special permits can add 60 to 120 days and significant cost to a project timeline.
    Zoning and HOA rules are separate Both can apply to your property simultaneously, so compliance with one does not guarantee compliance with the other.

    Why most homeowners learn about zoning the hard way

    Most homeowners I have encountered discover zoning exists only after a problem surfaces. A contractor pulls a permit and the project gets flagged. A neighbor files a complaint about a new fence that crosses a setback line. A buyer’s lender requires a zoning compliance letter and the sale stalls. These are all avoidable situations, and they share a common cause: zoning research was skipped at the planning stage.

    The conventional advice is to “check with your local municipality.” That is accurate but incomplete. What you actually need to do is read the dimensional standards table for your specific zone, check every overlay that applies, and confirm your project’s use classification before you spend a dollar on design. The HVAC zoning systems conversation is a good parallel here. Homeowners who understand how their systems are zoned make better decisions about upgrades and efficiency. The same logic applies to land-use zoning.

    The part that surprises most people is how much zoning codes have changed in the last five years. Accessory dwelling unit rules, short-term rental regulations, and home-based business permissions have all shifted in many cities. A rule you heard about from a neighbor three years ago may no longer apply. Treat your zoning research as a current-year task, not a one-time lookup.

    My honest recommendation: spend 30 minutes with your city’s official zoning viewer before you finalize any project that touches the exterior of your home or changes how the property is used. That half hour is the cheapest insurance you will ever buy.

    — Sean

    Plan smarter home projects with Workbenchguide

    Understanding your zoning is the first step. Executing a project within those rules is where most homeowners need real support. Workbenchguide gives you the tools to stay organized from the research phase through project completion, with step-by-step guides, maintenance checklists, and contractor guidance built specifically for homeowners. Whether you are planning a deck addition, a garage conversion, or routine upkeep that keeps your property in compliance, the home maintenance checklist from Workbenchguide helps you track every task and avoid the costly surprises that come from skipping steps. Start with a clear plan and the right resources behind you.

    FAQ

    What is the home zoning definition in simple terms?

    Home zoning is a local government system that divides land into districts and sets rules for what can be built and how property can be used in each district. It controls building types, sizes, setbacks, and permitted activities on residential parcels.

    How do I find out what zone my property is in?

    Visit your city or county planning department’s official website and use their zoning viewer or GIS map tool to enter your address. Always verify with the official source rather than third-party lookup tools, which can show outdated information after a rezoning.

    What are the main types of home zoning?

    The main residential zoning types are single-family, multi-family, mixed-use residential, agricultural residential, and planned unit development. Each type carries different rules for density, building height, setbacks, and permitted uses.

    What is a zoning variance and when do I need one?

    A variance is official relief from a specific zoning rule, such as a reduced setback, granted when strict compliance would cause undue hardship unique to your property. You need one when your project cannot meet a dimensional standard and the use is not prohibited outright.

    Does zoning apply if I have an HOA?

    Yes. Zoning and HOA rules are separate legal frameworks, and both apply simultaneously if your property is in an HOA. Complying with your HOA’s covenants does not exempt you from local zoning requirements.

  • Top 4 havenledger.app Home Maintenance Alternatives 2026

    Top 4 havenledger.app Home Maintenance Alternatives 2026

    Keeping up with home maintenance across multiple properties quickly becomes chaotic when reminders, checklists, and expense records are trapped in isolated apps or not tailored to real-world repair workflows. Many home maintenance management tools either hide task guidance behind a paywall, lack contractor-vetted checklists, or stop short of combining maintenance schedules with inventory and budgeting features in a single interface. This head-to-head review covers guidance, reminder systems, inventory support, and payment structures for four alternatives so you can pick the home maintenance management platform that best fits your routines, budget, and detail needs.

    Table of Contents

    WorkbenchGuide

    https://workbenchguide.com

    At a Glance

    Created by a licensed contractor, WorkbenchGuide embeds real-world maintenance know-how into its workflows. That origin shows up in task notes, realistic checklists, and DIY guides that avoid theory and focus on what works on a job site.

    • Contractor-created content that guides common repairs and inspections.
    • Recurring schedules and property records for multiple homes or rentals.

    Pick it if you want maintenance processes written by someone who’s done the work.

    Core Features

    WorkbenchGuide centralizes the practical pieces of property care so you can stop chasing paperwork and dates. The app groups guides, schedules, and records around each property and task.

    • Step-by-step DIY guides with photos and notes to walk you through repairs.
    • Maintenance scheduling with recurring tasks and reminders to avoid missed upkeep.
    • Inspection checklists tailored to seasonal and routine needs.
    • Task entries that accept photos, notes, and status updates.

    Use the checklists to move inspections from guesswork to a repeatable process.

    Key Differentiator

    What separates WorkbenchGuide is that its guides and workflows were developed by a licensed contractor rather than a generic product team. That leads to checklists and task sequences that match real repair order and timing instead of abstract task lists.

    The result is fewer surprises during inspections and clearer next steps when a repair is needed.

    Pros

    • Practical guidance reduces guesswork. The contractor perspective means checklists and DIY steps read like a field guide, not a textbook.
    • Multi-property support keeps records for each address separately, which helps landlords and property managers who juggle several units.
    • Reminders and recurring scheduling cut down on forgotten maintenance, lowering the risk of emergency repairs.
    • Task entries accept photos and notes so you build a usable repair history for contractors or future inspections.
    • The structured approach helps standardize recurring tasks across rentals, saving time during turnover.

    Cons

    • Pricing tiers range widely; starting costs may be a barrier for budget-conscious users who only need basic reminders.

    Who It’s For

    Homeowners who prefer a hands-on approach, landlords managing a few rentals, and property managers wanting a repeatable maintenance system will find the product useful. It fits people who will regularly log tasks and follow checklists rather than those who want fully automated device integrations.

    Unique Value Proposition

    The contractor-authored guides are embedded directly into scheduled tasks, so when a reminder arrives you can open the exact repair steps you need. That changes the work from searching for how to fix something to performing the fix with confidence and fewer calls to outside help.

    This tight coupling of guidance plus schedule shortens the time between spotting an issue and resolving it.

    Real World Use Case

    A property manager consolidates maintenance schedules, inspection checklists, and repair logs for a ten-unit portfolio. Instead of piecemeal spreadsheets and emails, the team runs seasonal inspections from saved checklists and logs photos for every repair, reducing repeat visits and emergency calls.

    Pricing

    Plans start at $7/month for homeowners and scale up to $99/month for larger property management needs. Pricing varies by number of properties and feature set, so compare tiers against how many units you manage before committing.

    Website: https://workbenchguide.com

    HomeManager

    https://homemanager.io

    At a Glance

    HomeManager offers a free basic plan and a HomeManager Plus upgrade at $8 per month or $80 per year. The app bundles maintenance reminders, an insurance-ready inventory, DIY videos, and a contractor portal aimed at keeping documents and service contacts in one place.

    Core Features

    • Automated maintenance reminders with customizable notifications and seasonal scheduling so tasks do not slip through the cracks.
    • Extensive checklists paired with a DIY video library to guide common home tasks and simple repairs.
    • Home inventory management that stores photos, video, and notes for insurance claims and resale planning.
    • Financial summaries showing ownership costs and a replacement budget calculator to forecast future appliance and system expenses.
    • HomeTeam contractor portal for managing service professionals and exchanging documents and job notes.

    Key Differentiator

    What separates HomeManager from single-purpose apps is the way reminders, inventory, financials, and contractor relationships live together. Having the contractor portal linked to scheduled tasks and an insurance-ready inventory reduces the friction of coordinating repairs and documenting claims.

    Pros

    • The free tier gives homeowners a low-friction way to start tracking maintenance and warranties without upfront commitment.
    • The combination of checklists and a DIY video library helps confident DIYers complete routine tasks with fewer calls to contractors.
    • HomeTeam contractor portal centralizes contacts and service history so you can find past receipts, warranties, and contractor notes quickly.
    • The replacement budget calculator frames longer term costs, which helps planning for major appliance or system replacements over several years.
    • Custom reminders and seasonal planning support steady preventive habits rather than ad hoc repairs.

    Cons

    • Public reviews and third-party validation are sparse, which makes it harder to judge long term reliability for high-stakes issues.
    • Feature set is basic compared with professional property management platforms, so estate portfolios or large rental portfolios may outgrow it.
    • Available descriptions do not deeply document the user interface or workflow, so real-world ease of use is unclear before you try it.
    • The system depends on accurate user input for inventories and schedules, so results vary with the time you invest in setup.

    When It May Not Fit

    If you manage dozens of units or run large renovation projects, HomeManager’s core feature set may feel limited. Professional property managers who need tenant billing, batch scheduling, or advanced reporting will likely require a dedicated property management platform. If independent verification of uptime or support quality matters for commercial portfolios, the current paucity of third-party reviews is a valid concern.

    Who It’s For

    HomeManager fits homeowners who want a single place to keep maintenance reminders, manuals, and contractor contacts. First-time buyers setting routines will find the checklist and video guidance useful. Small landlords or single-property owners who prefer a simple digital manual will also benefit.

    Real World Use Case

    A homeowner uses HomeManager to schedule monthly HVAC filter replacements, store appliance manuals, and keep photos and receipts for a jewelry-scale home inventory. When a leak occurs, the homeowner pulls the inventory, shared contractor contact, and maintenance history to accelerate the repair and the insurance claim process.

    Pricing

    Free basic plan available. HomeManager Plus costs $8 per month or $80 per year and adds document storage, maintenance history tracking, and premium features. The vendor also offers gifting and annual discount options.

    Website: https://homemanager.io

    HomeKeep

    https://homekeep.com

    At a Glance

    Free on iOS and Android, HomeKeep pairs step-by-step home maintenance guidance with document and inventory organization so homeowners can stop guessing what to do next. The app centers on scheduled reminders tied to the items you register.

    Start by adding one appliance to see how reminders reduce missed maintenance.

    Core Features

    • Step-by-step maintenance guidance that walks you through seasonal and item-specific tasks.
    • Organized home records and warranties for receipts, manuals, and service documentation.
    • Home inventory management to track appliances, systems, and their details.
    • Contact management for contractors and service providers, plus reminder alerts for scheduled tasks and services.

    Use the mobile app to add items on the spot and set the first reminder in under two minutes.

    Key Differentiator

    HomeKeep’s angle is being an all in one home management app that blends organization, guided maintenance, and device-synced reminders into a single experience. That combined approach reduces the tracking friction that usually scatters records across email, paper, and photos.

    If you prefer a central place for warranties, contacts, and recurring tasks, HomeKeep makes the bookkeeping feel manageable.

    Pros

    • Convenient document storage. You can attach warranties and receipts to specific items so paperwork is searchable when you need it.
    • Practical reminders. Scheduled alerts tied to items help you do small maintenance before it becomes an emergency.
    • Simple setup. The app is easy to use on mobile, which matters when you add new appliances during a home walkthrough.
    • Helps protect property value. Keeping maintenance records in one place makes resale conversations smoother.

    Add a few high-value items first and you’ll see the benefit within months.

    Cons

    • Limited integration details. The vendor does not list third-party partners, so automatic data syncing is minimal.
    • Basic automation only. Reviews show the app relies on manual entry and lacks advanced conditional automations.
    • Not designed for complex diagnostics. HomeKeep focuses on preventative tasks rather than troubleshooting multi-component failures.

    When It May Not Fit

    If you want automated system monitoring, push alerts from smart sensors, or advanced automation workflows, HomeKeep will feel too manual. Large properties with sophisticated HVAC, solar, or smart-home ecosystems will likely need a specialist tool.

    Who It’s For

    HomeKeep fits homeowners who want an affordable, straightforward way to organize warranties, inventory, and routine maintenance reminders. New homebuyers and owners working with builders or contractors will find the guided checklists especially useful.

    Real World Use Case

    A homeowner catalogs major appliances with purchase dates and warranty scans, then sets quarterly reminders for maintenance tasks. After following the reminders for a year, the homeowner avoided an emergency repair on the water heater and has documentation ready for a future buyer.

    Website: https://homekeep.com

    HavenLedgers

    https://havenledgers.com

    At a Glance

    A single £99 one-time payment unlocks lifetime access plus cloud synchronization across multiple properties and currencies. That pricing model removes recurring fees for owners who split time between homes and need straightforward expense records rather than subscription complexity.

    Core Features

    HavenLedgers focuses on a compact set of tools that cover multi-property expense needs.

    • Multi-currency expense tracking for logging costs in local currencies and viewing consolidated totals.
    • Multiple property management so each home keeps its own ledger and combined reports remain easy to consult.
    • PDF report exports for sharing tidy statements with accountants or mortgage services.
    • Cloud backup and browser access make the app device agnostic without installations.

    Key Differentiator

    The product’s central claim is lifetime access via a one-off fee paired with automatic sync across devices and properties. That setup is aimed at owners who prefer paying once over subscribing annually and who want portable records for taxes or rental accounting.

    Pros

    A compact list of strengths, based on the vendor’s feature set and positioning.

    • The one-time payment model eliminates subscription renewals and billing headaches for owners who rarely use software year to year.
    • Built-in support for multiple properties and currencies simplifies bookkeeping when you own homes in different countries.
    • PDF exports make handing records to an accountant quick and predictable without chasing CSV workarounds.
    • Browser-based access means you can view ledgers from any device without installing apps, which helps during travel.
    • Emphasis on data privacy with cloud sync reduces the friction of backing up records across locations.

    Cons

    Known shortcomings drawn from the available product information.

    • Public feedback and third-party reviews are sparse, which makes external validation of usability and reliability difficult.
    • The vendor provides limited detail on advanced features and no clear app ecosystem, so integrations with banks or bookkeeping tools are unclear.
    • There is no mentioned subscription tier or ongoing support plan, which may leave buyers uncertain about future updates or help channels.

    When It May Not Fit

    If you rely on automatic bank imports, multi-account reconciliation, or an established integration ecosystem, HavenLedgers may feel too minimal. Teams or property managers who need shared multiuser permissions, audit trails, or vendor portals will likely outgrow it.

    Who It’s For

    Second home owners who want a simple, self-contained ledger for several properties and do not want recurring fees. Ideal when you need clear PDF reports for tax time and prefer a browser-accessible tool rather than a full accounting suite.

    Real World Use Case

    A UK owner with a French cottage and a Swiss chalet records expenses in euros and francs, syncs entries across laptop and phone, then produces monthly PDF summaries for a local accountant. That workflow replaces scattered receipts and manual currency conversion spreadsheets.

    Pricing

    The vendor lists a single purchase price of £99 one-time payment for lifetime access. There are no subscription tiers described and no mention of trials or refunds in the provided information.

    Website: https://havenledgers.com

    Comparing Home Maintenance Management Options

    Selecting the right home maintenance management platform involves assessing practicality, usability, and value. We explore how WorkbenchGuide, HomeManager, HomeKeep, and HavenLedgers stack up in their unique offerings.

    Practical Guidance for Repairs and Maintenance

    WorkbenchGuide excels in providing DIY guides deeply rooted in real-world contractor experience. Its task lists and repair guides directly correspond to user needs during home maintenance. In contrast, HomeManager offers DIY videos that cater to tackling common repairs, making it a strong candidate for visual learners. HomeKeep streamlines setup by allowing users to start with just one appliance and expand gradually, which could appeal to new homeowners. For users seeking detailed and localized expense management, HavenLedgers offers support for multiple properties and currencies in a single log.

    Cost Considerations and Value

    When evaluating cost structures, HavenLedgers stands out with its one-time £99 fee, offering lifetime access without recurring charges, catering to budget-conscious property managers. On the opposite spectrum, WorkbenchGuide begins at $7/month, scaling to $99/month, aligning with broad feature sets designed for multi-property management. Meanwhile, HomeManager provides a free tier to introduce its platform to potential users, facilitating experimentation before subscribing to its $8/month plan. On the other hand, HomeKeep focuses on being a free app with optional services, making it an attractive choice for users prioritizing affordability.

    Best Fit Scenarios

    • WorkbenchGuide is recommended for property owners requiring structured and contractor-authored guidance to maintain multiple properties efficiently.
    • HomeManager suits those who value accessible home maintenance videos and wish to centralize insurance and maintenance data affordably.
    • HomeKeep meets the needs of new homeowners seeking a minimally invasive approach to organizing warranties and setting simple, itemized maintenance schedules.
    • HavenLedgers is an excellent solution for property owners needing a one-time purchase solution designed for international multi-property financial management.

    Our Pick

    For dedicated property owners focused on minimizing maintenance surprises and maintaining detailed service records, WorkbenchGuide is an excellent match. Its professional-built systems offer reliability and practicality. Users needing broader automation or solution-specific integrations might find HomeKeep an appealing option.

    Home Maintenance Management Comparison

    Choosing the right home maintenance platform depends on balancing needs for practical workflows, user-friendly interfaces, and pricing.

    Product Core Feature Key Differentiator Best For Pricing Notable Limitation
    WorkbenchGuide Step-by-step DIY guides and scheduling Contractor-created for practical workflows Homeowners and property managers $7–99/month Higher starting cost for small-scale needs
    HomeManager Maintenance reminders and inventory Contractor portal integration First-time buyers and small landlords Free or $8/month Sparse independent reviews
    HomeKeep Maintenance guidance and document storage All-in-one home management experience New homebuyers Free Basic automation and manual data entry
    HavenLedgers Multi-property expense tracking Lifetime access with a one-time fee Multi-homeowners £99 one-time payment Minimal automation and no subscription support

    Simplify Home Maintenance Beyond Havenledger.app Alternatives

    If managing multiple homes or tracking expenses across currencies feels limited by havenledger.app alternatives, consider a more hands-on solution designed for homeowners who want practical maintenance guidance. Workbenchguide offers smart reminders, step-by-step DIY instructions, and detailed checklists crafted by a licensed contractor. This approach helps you avoid costly surprise repairs by providing clear action plans when issues arise.

    Take control of your home’s upkeep with an organized system that combines scheduling, repair notes, and contractor help when needed. Visit Workbenchguide to start building a reliable maintenance routine today. Get started by exploring comprehensive guides and project checklists that empower you to handle repairs confidently and reduce emergency calls.

    Frequently Asked Questions

    How does Workbenchguide’s maintenance scheduling feature stand out?

    Workbenchguide offers maintenance scheduling with recurring tasks and reminders to help you avoid missed upkeep. This feature is designed to centralize maintenance processes, making it easier to keep track of property care compared to competitors. Users can expect improved organization and fewer emergency repairs as a result.

    What is the difference between Workbenchguide and HomeManager?

    HomeManager provides a free basic plan along with a contractor portal that centralizes contacts and service history effectively. In contrast, Workbenchguide focuses on contractor-created checklists and step-by-step DIY guides that reduce guesswork for those who prefer hands-on tasks. If you’re a homeowner looking for practical guidance, Workbenchguide is a better fit despite HomeManager’s strengths in contractor management.

    Which platform supports multi-property management most effectively?

    Workbenchguide supports multi-property management by keeping separate records for each property, which is especially useful for landlords with several units. This specialized feature is a core strength that aids in organizing property care compared to other options that may not emphasize this capability. Consider using Workbenchguide if you manage multiple properties and need clear maintenance organization.

    HomeManager features extensive home inventory management that stores photos, videos, and notes for insurance claims. While Workbenchguide does not focus on inventory documentation, its contractor-created guides can help with maintenance tasks, making it a valuable resource for homeowners who want to balance documentation and practical guidance.

    How does Workbenchguide ensure reliable inspection processes?

    Workbenchguide includes tailored inspection checklists that move inspections from guesswork to a repeatable process. These checklists, developed by a licensed contractor, help standardize recurring tasks across rentals, providing users with confidence in their inspection routines. By choosing Workbenchguide, you can streamline your property inspections significantly.