

Starting a home renovation without a clear plan is one of the most expensive mistakes a homeowner can make. You buy materials before measuring twice, skip the permit process, or gut a bathroom before realizing the plumbing underneath needs a full replacement. The excitement of a fresh space clouds the judgment that keeps projects on budget and on schedule. This guide walks you through every phase of the renovation process, from defining your vision and setting a realistic budget to pulling permits, swinging a sledgehammer safely, and finishing strong with a punch list that catches what others miss. Follow this roadmap and you will avoid the most common pitfalls that derail DIY projects.
Table of Contents
- Define your vision and build your renovation roadmap
- Establish your budget and build in a contingency
- Inspect your home for structural issues and potential surprises
- Secure permits and schedule professional help, then start demolition
- Rebuild: Rough-ins, insulation, drywall, paint, flooring, and fixtures
- Our take: What most DIY guides get wrong about home renovation
- Next steps: Organize your renovation with expert tools and guidance
- Frequently asked questions
Key Takeaways
| Point | Details |
|---|---|
| Have a clear plan | Start your renovation with a vision and step-by-step roadmap so you don’t get lost or overwhelmed. |
| Budget with buffer | Always include a 10-20% contingency in your budget for unexpected costs, even if your estimates seem solid. |
| Inspect before you demo | Thoroughly check for structural issues and hidden surprises before starting demolition to avoid costly mistakes. |
| Get permits for major work | Obtain all necessary permits and professional help for structural, electrical, or plumbing projects. |
| Follow step sequence | Stick to the proven order—rough-ins, insulation, drywall, finishing, fixtures, walkthrough—to achieve quality results. |
Define your vision and build your renovation roadmap
Before you buy a single nail or watch a single tutorial, you need to get clear on what you actually want and why. Renovations fail when homeowners start with a vague idea like “update the kitchen” without knowing whether that means new cabinet hardware or a full gut renovation. The outcome looks very different, and so does the price tag.
Start by writing down your renovation objectives. Are you modernizing an outdated space? Expanding square footage? Fixing a persistent problem like water damage or poor insulation? Trying to increase resale value before listing? Each goal shapes every decision that follows. A homeowner remodeling to sell will prioritize neutral finishes and broad appeal. A homeowner staying for 20 years can invest in personal preferences and high-durability materials.
Once your goals are clear, prioritize your projects by three factors: impact, necessity, and budget fit. A leaking roof beats a cosmetic kitchen upgrade every time. Use design blogs, manufacturer showrooms, and how the system works on organized planning platforms to gather inspiration before committing to any direction. The standard renovation process always starts with this kind of structured planning and vision definition, and skipping it is what separates frustrating projects from successful ones.
Draft a rough project roadmap that lists each task, estimated duration, and who is responsible for completing it. This does not need to be a formal document. A spreadsheet or even a printed checklist works fine as long as it exists and you actually refer to it.
Full renovation vs. partial renovation: Which approach fits your project?
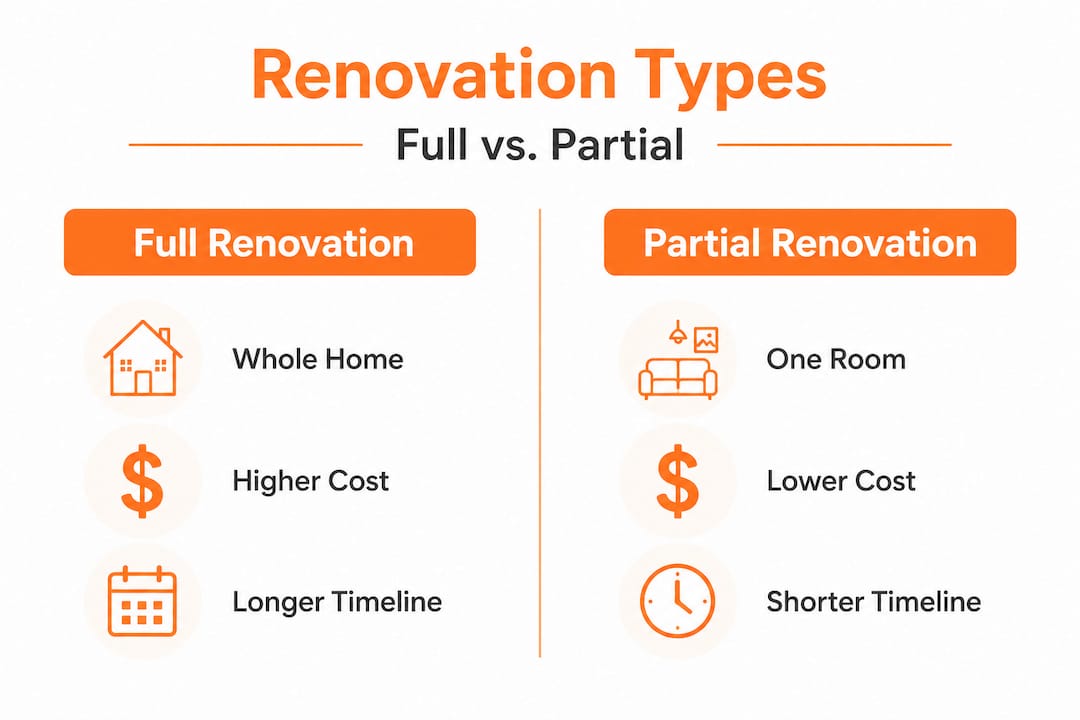
| Factor | Full renovation | Partial renovation |
|---|---|---|
| Scope | Entire home or floor | One or two rooms |
| Cost | Higher upfront investment | More manageable budget |
| Disruption | Major, often requires temporary relocation | Minimal, one area at a time |
| Best for | Older homes needing full updates | Targeted upgrades or resale prep |
| Timeline | Months to a year or more | Weeks to a few months |
Pro Tip: Use free tools like SketchUp or even room-layout apps on your phone to visualize your space before committing to a layout. Seeing a new kitchen island on screen before buying materials saves both money and regret.
With your goals in mind, the next step is nailing down your budget and anticipating expenses.
Establish your budget and build in a contingency
Nothing derails a renovation faster than running out of money halfway through. And it happens more often than you’d expect, not because homeowners are careless, but because renovation costs have layers that are easy to underestimate.
The visible costs are easy to spot: tile, paint, appliances, labor quotes. The hidden costs are where budgets collapse. Think permit fees, dumpster rentals, subfloor replacement after you pull up old flooring, or outdated wiring that must be updated before any wall can close. Budgeting with a 10-20% contingency is not optional padding; it is essential protection for the unexpected.
Break your project down by room or task, then estimate each line item individually. Vague totals like “kitchen: $15,000” are harder to track and easier to blow through. Specific line items like “cabinet installation labor: $1,800” give you checkpoints to measure against. Use the DIY budget guidelines available through organized planning tools to benchmark your estimates against real project costs.
Sample renovation cost ranges with contingency
| Project area | Estimated cost range | Suggested contingency |
|---|---|---|
| Kitchen remodel | $10,000 to $50,000 | 15-20% |
| Bathroom remodel | $5,000 to $20,000 | 15-20% |
| Flooring (per room) | $1,500 to $6,000 | 10-15% |
| Roof replacement | $7,000 to $15,000 | 10% |
| Electrical panel upgrade | $1,500 to $4,000 | 15% |
Steps to build your renovation budget:
- List every task in your project scope, down to small items like outlet covers and caulk.
- Research material costs online and at local suppliers. Get at least two quotes.
- Contact two to three contractors for labor estimates on any work you will not do yourself.
- Add up all line items and apply your contingency percentage on top of the total.
- Compare your total to your actual available funds. Adjust scope if needed before starting.
- Set a monthly or weekly spending ceiling and track all expenses against it.
Pro Tip: Track every single expenditure in a spreadsheet from day one, not after the fact. Weekly reviews catch overruns early, when you still have room to adjust, rather than at the end when the damage is done.
Once your finances are mapped out, it is time to check your home’s condition before any demolition begins.
Inspect your home for structural issues and potential surprises
Opening a wall and finding mold, outdated knob-and-tube wiring, or a cracked floor joist is not just stressful. It is expensive, and it can stop your project cold for weeks. A thorough inspection before any demo work is one of the most protective things you can do for your budget and timeline.
A structured home inspection before renovation is a crucial step that many DIY guides gloss over because it is not as exciting as picking tile. But catching a problem before you open walls costs far less than discovering it mid-project.
Common issues to check before renovation begins:
- Foundation cracks or settling, especially in basements and crawl spaces
- Roof condition: missing shingles, sagging areas, deteriorated flashing
- Windows and exterior doors: drafts, failed seals, rotting frames
- Plumbing: slow drains, discoloration in water, visible corrosion on pipes
- Electrical: double-tapped breakers, ungrounded outlets, aluminum wiring
- HVAC: age of system, filter condition, ductwork leaks
- Mold or moisture: staining on ceilings, musty odors, soft drywall
Use the roof inspection checklist before any exterior or attic work. For a broader view of preventing costly repairs before they become renovation budget busters, small checks now save thousands later. If you are a newer homeowner, the new homeowner inspection tips for the first 90 days offer a solid baseline for understanding your home’s condition.
Warning: Never assume electrical and plumbing are “probably fine” just because the home looks solid. Outdated systems hidden behind walls are among the most common and costly surprises in home renovation. Skipping electrical or plumbing inspection before starting work can result in failed inspections, required demolition, and thousands in unplanned expenses.
If anything on your inspection list raises a red flag, call a licensed professional before proceeding. A $300 inspection fee is cheap compared to discovering structural damage after you have already ordered $8,000 worth of cabinetry.
After inspection and addressing any issues, you can move on to the permit process and professional help.
Secure permits and schedule professional help, then start demolition
Skipping permits is tempting. They take time, cost money, and feel like bureaucratic friction standing between you and your renovation. But unpermitted work creates real problems: failed home sales, voided insurance claims, and potentially having to tear out completed work to satisfy inspectors. The risk is simply not worth it.
Hiring professionals, obtaining permits, and then beginning demolition follow a deliberate sequence that protects both your safety and your investment. Electrical, plumbing, HVAC, and structural modifications almost always require permits and licensed contractors in most jurisdictions. Cosmetic work like painting or replacing flooring typically does not, but always verify with your local building department.
Steps to secure permits and schedule contractors:
- Contact your local building and planning department to identify which tasks require permits.
- Submit permit applications with your project plans, including dimensions and material specs where required.
- Get contractor quotes while permits are pending so work can begin as soon as approval arrives.
- Confirm contractor availability and lock in a schedule before permits expire.
- Post your permit visibly on site as required, and keep a copy of your project plans accessible for inspectors.
- Schedule required inspections at the right intervals: rough-in, framing, insulation, and final.
Once permits are secured and contractors are scheduled, demolition can begin. Organize your demo work before you swing anything. Wear safety glasses, gloves, and a dust mask rated for fine particles. Shut off power and water to the affected areas. Work in a logical sequence: remove fixtures and cabinetry first, then surface materials like flooring and drywall, and structural elements last. Use the step-by-step repair guides to understand what lies behind walls in common renovation areas before cutting into them.
Pro Tip: Photograph and document every wall cavity, junction box, and pipe layout before closing anything up. Inspectors appreciate clear documentation, and you will be glad you have it when a future repair requires knowing what is behind a wall.
With the site prepared, the next phase is rebuilding and finishing your new spaces.
Rebuild: Rough-ins, insulation, drywall, paint, flooring, and fixtures
This is the phase most homeowners picture when they imagine a renovation. But it only goes smoothly when everything before it was done right. Rebuilding follows a strict sequence that you cannot shortcut without creating problems downstream.

The standard home renovation rebuild sequence runs from rough-ins through final walkthrough, and each step depends on the one before it being inspected and approved.
Rebuilding phase in order:
- Rough-in electrical: run new circuits, place outlet and switch boxes, pull wire to panel
- Rough-in plumbing: set drains, supply lines, and vent stacks before walls close
- Rough-in HVAC: ductwork, vents, and any new equipment from your HVAC maintenance guide plan
- Schedule rough-in inspections and get sign-off before proceeding
- Install insulation in exterior walls, ceilings, and any soundproofing areas
- Hang drywall, tape, mud, and sand to a smooth finish
- Prime and paint walls and ceilings before cabinetry and flooring go in
- Install flooring: hardwood, tile, or luxury vinyl plank depending on the room
- Set cabinets, countertops, and appliances
- Install fixtures: lights, outlets, switches, faucets, hardware
- Conduct a thorough punch list walkthrough and address every incomplete or defective item
Tools and supplies to have ready before rebuilding starts:
- Drywall screws, joint compound, and corner bead
- Paint rollers, brushes, and painter’s tape
- Level, tape measure, and chalk line
- Flooring installation tools specific to your material (tapping block, pull bar, spacers)
- Drill, circular saw, and jigsaw for cuts and installations
- Caulk and grout for tile and fixture sealing
Keep an emergency repairs guide nearby during this phase, especially for plumbing connections where leaks can appear hours after installation.
Pro Tip: Walk your project site every evening before leaving and update your punch list with anything incomplete, damaged, or misaligned. Small issues caught daily take five minutes to fix. The same issues caught on final walkthrough can take five days.
With your renovation complete, it is time to review what makes a truly effective DIY project.
Our take: What most DIY guides get wrong about home renovation
Most renovation guides are written as if every project goes according to plan, in exactly the right order, with zero surprises. That version of renovation exists in magazines. Real projects are messier.
The biggest gap in standard renovation advice is the assumption that a rigid checklist is enough. In practice, the homeowners who finish projects successfully are not the ones who followed a list perfectly. They are the ones who built flexibility into their plan from the start and were willing to reassess constantly. When a contractor runs two weeks late, when a material is back-ordered, or when an inspection reveals an issue that requires rerouting a drain, your plan needs to bend without breaking.
Another overlooked ingredient is the daily check-in habit. Most guides tell you to plan before you start and inspect when you finish. What they skip is the middle: consistent, brief daily reviews of what was completed, what is next, and whether anything has changed. This habit catches sequencing errors before they become expensive. It also keeps you sane in a project that can otherwise feel like it is spiraling.
Here are some counterintuitive lessons that separate successful DIY renovations from stressful ones:
- Slower planning always means faster execution. Every hour spent on the roadmap saves three hours of backtracking mid-project.
- The most dangerous phrase in renovation is “we’ll figure it out as we go.” Improvising on the fly usually means paying someone to undo what you just did.
- Budget friction is healthy. If setting a budget feels painfully restrictive, that friction is protecting you from a worse feeling later.
- Inspections are not obstacles. They are checkpoints that confirm your work is sound before you hide it behind drywall permanently.
Follow the home renovation insights from homeowners who have navigated real projects to build a more realistic picture of what the process actually looks like in practice.
Pro Tip: Build a deliberate “adjust week” into any project longer than one month. This is a buffer window with no scheduled tasks, just time to handle the surprises that have accumulated and recalibrate your plan for the next phase.
Next steps: Organize your renovation with expert tools and guidance
Knowing the steps is one thing. Staying organized through a live renovation while managing contractors, tracking expenses, and keeping your household running is another challenge entirely. That is where having the right system behind you makes a real difference.
Workbench Guide gives homeowners the DIY guides and checklists to plan and execute projects without guessing what comes next. Every phase of your renovation has a corresponding checklist to keep you on track. You will also find preventative maintenance tips that protect your newly renovated spaces long after the final walkthrough is done. Start with the home maintenance checklist to understand what ongoing care your home needs by season. Your renovation is an investment. The right tools help you protect it.
Frequently asked questions
What is the first step in home renovation?
Always start by defining your renovation goals and creating a clear project roadmap before you spend money or begin any work. The renovation process consistently begins with planning and vision definition for good reason.
How much contingency should I include in my renovation budget?
Include a 10-20% contingency on top of your total estimated costs to cover unexpected issues, price changes, or hidden problems discovered mid-project.
Do I need permits for DIY home renovation?
You need permits for structural, electrical, or plumbing changes, so always check with your local authority before starting. Permits and professional help are standard requirements for any renovation that affects your home’s core systems.
How should I sequence renovation tasks for best results?
Follow a methodical order from rough-ins through final walkthrough: electrical, plumbing, and HVAC rough-ins first, then insulation, drywall, paint, flooring, fixtures, and a final punch list review.