Author: Sean C

  • Top 4 havenledger.app Home Maintenance Alternatives 2026

    Top 4 havenledger.app Home Maintenance Alternatives 2026

    Keeping up with home maintenance across multiple properties quickly becomes chaotic when reminders, checklists, and expense records are trapped in isolated apps or not tailored to real-world repair workflows. Many home maintenance management tools either hide task guidance behind a paywall, lack contractor-vetted checklists, or stop short of combining maintenance schedules with inventory and budgeting features in a single interface. This head-to-head review covers guidance, reminder systems, inventory support, and payment structures for four alternatives so you can pick the home maintenance management platform that best fits your routines, budget, and detail needs.

    Table of Contents

    WorkbenchGuide

    https://workbenchguide.com

    At a Glance

    Created by a licensed contractor, WorkbenchGuide embeds real-world maintenance know-how into its workflows. That origin shows up in task notes, realistic checklists, and DIY guides that avoid theory and focus on what works on a job site.

    • Contractor-created content that guides common repairs and inspections.
    • Recurring schedules and property records for multiple homes or rentals.

    Pick it if you want maintenance processes written by someone who’s done the work.

    Core Features

    WorkbenchGuide centralizes the practical pieces of property care so you can stop chasing paperwork and dates. The app groups guides, schedules, and records around each property and task.

    • Step-by-step DIY guides with photos and notes to walk you through repairs.
    • Maintenance scheduling with recurring tasks and reminders to avoid missed upkeep.
    • Inspection checklists tailored to seasonal and routine needs.
    • Task entries that accept photos, notes, and status updates.

    Use the checklists to move inspections from guesswork to a repeatable process.

    Key Differentiator

    What separates WorkbenchGuide is that its guides and workflows were developed by a licensed contractor rather than a generic product team. That leads to checklists and task sequences that match real repair order and timing instead of abstract task lists.

    The result is fewer surprises during inspections and clearer next steps when a repair is needed.

    Pros

    • Practical guidance reduces guesswork. The contractor perspective means checklists and DIY steps read like a field guide, not a textbook.
    • Multi-property support keeps records for each address separately, which helps landlords and property managers who juggle several units.
    • Reminders and recurring scheduling cut down on forgotten maintenance, lowering the risk of emergency repairs.
    • Task entries accept photos and notes so you build a usable repair history for contractors or future inspections.
    • The structured approach helps standardize recurring tasks across rentals, saving time during turnover.

    Cons

    • Pricing tiers range widely; starting costs may be a barrier for budget-conscious users who only need basic reminders.

    Who It’s For

    Homeowners who prefer a hands-on approach, landlords managing a few rentals, and property managers wanting a repeatable maintenance system will find the product useful. It fits people who will regularly log tasks and follow checklists rather than those who want fully automated device integrations.

    Unique Value Proposition

    The contractor-authored guides are embedded directly into scheduled tasks, so when a reminder arrives you can open the exact repair steps you need. That changes the work from searching for how to fix something to performing the fix with confidence and fewer calls to outside help.

    This tight coupling of guidance plus schedule shortens the time between spotting an issue and resolving it.

    Real World Use Case

    A property manager consolidates maintenance schedules, inspection checklists, and repair logs for a ten-unit portfolio. Instead of piecemeal spreadsheets and emails, the team runs seasonal inspections from saved checklists and logs photos for every repair, reducing repeat visits and emergency calls.

    Pricing

    Plans start at $7/month for homeowners and scale up to $99/month for larger property management needs. Pricing varies by number of properties and feature set, so compare tiers against how many units you manage before committing.

    Website: https://workbenchguide.com

    HomeManager

    https://homemanager.io

    At a Glance

    HomeManager offers a free basic plan and a HomeManager Plus upgrade at $8 per month or $80 per year. The app bundles maintenance reminders, an insurance-ready inventory, DIY videos, and a contractor portal aimed at keeping documents and service contacts in one place.

    Core Features

    • Automated maintenance reminders with customizable notifications and seasonal scheduling so tasks do not slip through the cracks.
    • Extensive checklists paired with a DIY video library to guide common home tasks and simple repairs.
    • Home inventory management that stores photos, video, and notes for insurance claims and resale planning.
    • Financial summaries showing ownership costs and a replacement budget calculator to forecast future appliance and system expenses.
    • HomeTeam contractor portal for managing service professionals and exchanging documents and job notes.

    Key Differentiator

    What separates HomeManager from single-purpose apps is the way reminders, inventory, financials, and contractor relationships live together. Having the contractor portal linked to scheduled tasks and an insurance-ready inventory reduces the friction of coordinating repairs and documenting claims.

    Pros

    • The free tier gives homeowners a low-friction way to start tracking maintenance and warranties without upfront commitment.
    • The combination of checklists and a DIY video library helps confident DIYers complete routine tasks with fewer calls to contractors.
    • HomeTeam contractor portal centralizes contacts and service history so you can find past receipts, warranties, and contractor notes quickly.
    • The replacement budget calculator frames longer term costs, which helps planning for major appliance or system replacements over several years.
    • Custom reminders and seasonal planning support steady preventive habits rather than ad hoc repairs.

    Cons

    • Public reviews and third-party validation are sparse, which makes it harder to judge long term reliability for high-stakes issues.
    • Feature set is basic compared with professional property management platforms, so estate portfolios or large rental portfolios may outgrow it.
    • Available descriptions do not deeply document the user interface or workflow, so real-world ease of use is unclear before you try it.
    • The system depends on accurate user input for inventories and schedules, so results vary with the time you invest in setup.

    When It May Not Fit

    If you manage dozens of units or run large renovation projects, HomeManager’s core feature set may feel limited. Professional property managers who need tenant billing, batch scheduling, or advanced reporting will likely require a dedicated property management platform. If independent verification of uptime or support quality matters for commercial portfolios, the current paucity of third-party reviews is a valid concern.

    Who It’s For

    HomeManager fits homeowners who want a single place to keep maintenance reminders, manuals, and contractor contacts. First-time buyers setting routines will find the checklist and video guidance useful. Small landlords or single-property owners who prefer a simple digital manual will also benefit.

    Real World Use Case

    A homeowner uses HomeManager to schedule monthly HVAC filter replacements, store appliance manuals, and keep photos and receipts for a jewelry-scale home inventory. When a leak occurs, the homeowner pulls the inventory, shared contractor contact, and maintenance history to accelerate the repair and the insurance claim process.

    Pricing

    Free basic plan available. HomeManager Plus costs $8 per month or $80 per year and adds document storage, maintenance history tracking, and premium features. The vendor also offers gifting and annual discount options.

    Website: https://homemanager.io

    HomeKeep

    https://homekeep.com

    At a Glance

    Free on iOS and Android, HomeKeep pairs step-by-step home maintenance guidance with document and inventory organization so homeowners can stop guessing what to do next. The app centers on scheduled reminders tied to the items you register.

    Start by adding one appliance to see how reminders reduce missed maintenance.

    Core Features

    • Step-by-step maintenance guidance that walks you through seasonal and item-specific tasks.
    • Organized home records and warranties for receipts, manuals, and service documentation.
    • Home inventory management to track appliances, systems, and their details.
    • Contact management for contractors and service providers, plus reminder alerts for scheduled tasks and services.

    Use the mobile app to add items on the spot and set the first reminder in under two minutes.

    Key Differentiator

    HomeKeep’s angle is being an all in one home management app that blends organization, guided maintenance, and device-synced reminders into a single experience. That combined approach reduces the tracking friction that usually scatters records across email, paper, and photos.

    If you prefer a central place for warranties, contacts, and recurring tasks, HomeKeep makes the bookkeeping feel manageable.

    Pros

    • Convenient document storage. You can attach warranties and receipts to specific items so paperwork is searchable when you need it.
    • Practical reminders. Scheduled alerts tied to items help you do small maintenance before it becomes an emergency.
    • Simple setup. The app is easy to use on mobile, which matters when you add new appliances during a home walkthrough.
    • Helps protect property value. Keeping maintenance records in one place makes resale conversations smoother.

    Add a few high-value items first and you’ll see the benefit within months.

    Cons

    • Limited integration details. The vendor does not list third-party partners, so automatic data syncing is minimal.
    • Basic automation only. Reviews show the app relies on manual entry and lacks advanced conditional automations.
    • Not designed for complex diagnostics. HomeKeep focuses on preventative tasks rather than troubleshooting multi-component failures.

    When It May Not Fit

    If you want automated system monitoring, push alerts from smart sensors, or advanced automation workflows, HomeKeep will feel too manual. Large properties with sophisticated HVAC, solar, or smart-home ecosystems will likely need a specialist tool.

    Who It’s For

    HomeKeep fits homeowners who want an affordable, straightforward way to organize warranties, inventory, and routine maintenance reminders. New homebuyers and owners working with builders or contractors will find the guided checklists especially useful.

    Real World Use Case

    A homeowner catalogs major appliances with purchase dates and warranty scans, then sets quarterly reminders for maintenance tasks. After following the reminders for a year, the homeowner avoided an emergency repair on the water heater and has documentation ready for a future buyer.

    Website: https://homekeep.com

    HavenLedgers

    https://havenledgers.com

    At a Glance

    A single £99 one-time payment unlocks lifetime access plus cloud synchronization across multiple properties and currencies. That pricing model removes recurring fees for owners who split time between homes and need straightforward expense records rather than subscription complexity.

    Core Features

    HavenLedgers focuses on a compact set of tools that cover multi-property expense needs.

    • Multi-currency expense tracking for logging costs in local currencies and viewing consolidated totals.
    • Multiple property management so each home keeps its own ledger and combined reports remain easy to consult.
    • PDF report exports for sharing tidy statements with accountants or mortgage services.
    • Cloud backup and browser access make the app device agnostic without installations.

    Key Differentiator

    The product’s central claim is lifetime access via a one-off fee paired with automatic sync across devices and properties. That setup is aimed at owners who prefer paying once over subscribing annually and who want portable records for taxes or rental accounting.

    Pros

    A compact list of strengths, based on the vendor’s feature set and positioning.

    • The one-time payment model eliminates subscription renewals and billing headaches for owners who rarely use software year to year.
    • Built-in support for multiple properties and currencies simplifies bookkeeping when you own homes in different countries.
    • PDF exports make handing records to an accountant quick and predictable without chasing CSV workarounds.
    • Browser-based access means you can view ledgers from any device without installing apps, which helps during travel.
    • Emphasis on data privacy with cloud sync reduces the friction of backing up records across locations.

    Cons

    Known shortcomings drawn from the available product information.

    • Public feedback and third-party reviews are sparse, which makes external validation of usability and reliability difficult.
    • The vendor provides limited detail on advanced features and no clear app ecosystem, so integrations with banks or bookkeeping tools are unclear.
    • There is no mentioned subscription tier or ongoing support plan, which may leave buyers uncertain about future updates or help channels.

    When It May Not Fit

    If you rely on automatic bank imports, multi-account reconciliation, or an established integration ecosystem, HavenLedgers may feel too minimal. Teams or property managers who need shared multiuser permissions, audit trails, or vendor portals will likely outgrow it.

    Who It’s For

    Second home owners who want a simple, self-contained ledger for several properties and do not want recurring fees. Ideal when you need clear PDF reports for tax time and prefer a browser-accessible tool rather than a full accounting suite.

    Real World Use Case

    A UK owner with a French cottage and a Swiss chalet records expenses in euros and francs, syncs entries across laptop and phone, then produces monthly PDF summaries for a local accountant. That workflow replaces scattered receipts and manual currency conversion spreadsheets.

    Pricing

    The vendor lists a single purchase price of £99 one-time payment for lifetime access. There are no subscription tiers described and no mention of trials or refunds in the provided information.

    Website: https://havenledgers.com

    Comparing Home Maintenance Management Options

    Selecting the right home maintenance management platform involves assessing practicality, usability, and value. We explore how WorkbenchGuide, HomeManager, HomeKeep, and HavenLedgers stack up in their unique offerings.

    Practical Guidance for Repairs and Maintenance

    WorkbenchGuide excels in providing DIY guides deeply rooted in real-world contractor experience. Its task lists and repair guides directly correspond to user needs during home maintenance. In contrast, HomeManager offers DIY videos that cater to tackling common repairs, making it a strong candidate for visual learners. HomeKeep streamlines setup by allowing users to start with just one appliance and expand gradually, which could appeal to new homeowners. For users seeking detailed and localized expense management, HavenLedgers offers support for multiple properties and currencies in a single log.

    Cost Considerations and Value

    When evaluating cost structures, HavenLedgers stands out with its one-time £99 fee, offering lifetime access without recurring charges, catering to budget-conscious property managers. On the opposite spectrum, WorkbenchGuide begins at $7/month, scaling to $99/month, aligning with broad feature sets designed for multi-property management. Meanwhile, HomeManager provides a free tier to introduce its platform to potential users, facilitating experimentation before subscribing to its $8/month plan. On the other hand, HomeKeep focuses on being a free app with optional services, making it an attractive choice for users prioritizing affordability.

    Best Fit Scenarios

    • WorkbenchGuide is recommended for property owners requiring structured and contractor-authored guidance to maintain multiple properties efficiently.
    • HomeManager suits those who value accessible home maintenance videos and wish to centralize insurance and maintenance data affordably.
    • HomeKeep meets the needs of new homeowners seeking a minimally invasive approach to organizing warranties and setting simple, itemized maintenance schedules.
    • HavenLedgers is an excellent solution for property owners needing a one-time purchase solution designed for international multi-property financial management.

    Our Pick

    For dedicated property owners focused on minimizing maintenance surprises and maintaining detailed service records, WorkbenchGuide is an excellent match. Its professional-built systems offer reliability and practicality. Users needing broader automation or solution-specific integrations might find HomeKeep an appealing option.

    Home Maintenance Management Comparison

    Choosing the right home maintenance platform depends on balancing needs for practical workflows, user-friendly interfaces, and pricing.

    Product Core Feature Key Differentiator Best For Pricing Notable Limitation
    WorkbenchGuide Step-by-step DIY guides and scheduling Contractor-created for practical workflows Homeowners and property managers $7–99/month Higher starting cost for small-scale needs
    HomeManager Maintenance reminders and inventory Contractor portal integration First-time buyers and small landlords Free or $8/month Sparse independent reviews
    HomeKeep Maintenance guidance and document storage All-in-one home management experience New homebuyers Free Basic automation and manual data entry
    HavenLedgers Multi-property expense tracking Lifetime access with a one-time fee Multi-homeowners £99 one-time payment Minimal automation and no subscription support

    Simplify Home Maintenance Beyond Havenledger.app Alternatives

    If managing multiple homes or tracking expenses across currencies feels limited by havenledger.app alternatives, consider a more hands-on solution designed for homeowners who want practical maintenance guidance. Workbenchguide offers smart reminders, step-by-step DIY instructions, and detailed checklists crafted by a licensed contractor. This approach helps you avoid costly surprise repairs by providing clear action plans when issues arise.

    Take control of your home’s upkeep with an organized system that combines scheduling, repair notes, and contractor help when needed. Visit Workbenchguide to start building a reliable maintenance routine today. Get started by exploring comprehensive guides and project checklists that empower you to handle repairs confidently and reduce emergency calls.

    Frequently Asked Questions

    How does Workbenchguide’s maintenance scheduling feature stand out?

    Workbenchguide offers maintenance scheduling with recurring tasks and reminders to help you avoid missed upkeep. This feature is designed to centralize maintenance processes, making it easier to keep track of property care compared to competitors. Users can expect improved organization and fewer emergency repairs as a result.

    What is the difference between Workbenchguide and HomeManager?

    HomeManager provides a free basic plan along with a contractor portal that centralizes contacts and service history effectively. In contrast, Workbenchguide focuses on contractor-created checklists and step-by-step DIY guides that reduce guesswork for those who prefer hands-on tasks. If you’re a homeowner looking for practical guidance, Workbenchguide is a better fit despite HomeManager’s strengths in contractor management.

    Which platform supports multi-property management most effectively?

    Workbenchguide supports multi-property management by keeping separate records for each property, which is especially useful for landlords with several units. This specialized feature is a core strength that aids in organizing property care compared to other options that may not emphasize this capability. Consider using Workbenchguide if you manage multiple properties and need clear maintenance organization.

    HomeManager features extensive home inventory management that stores photos, videos, and notes for insurance claims. While Workbenchguide does not focus on inventory documentation, its contractor-created guides can help with maintenance tasks, making it a valuable resource for homeowners who want to balance documentation and practical guidance.

    How does Workbenchguide ensure reliable inspection processes?

    Workbenchguide includes tailored inspection checklists that move inspections from guesswork to a repeatable process. These checklists, developed by a licensed contractor, help standardize recurring tasks across rentals, providing users with confidence in their inspection routines. By choosing Workbenchguide, you can streamline your property inspections significantly.

  • How to Plan Home Upgrades Without Costly Mistakes

    How to Plan Home Upgrades Without Costly Mistakes

    Most homeowners figure out how to plan home upgrades the hard way: a kitchen remodel that runs 40% over budget, a bathroom project stalled for six weeks waiting on a permit, or a contractor who disappears after demo day. These are not rare horror stories. They are what happens when good intentions skip the planning phase. This guide walks you through every stage of home improvement planning, from assessing your systems to managing contractors, so your next project runs on your terms instead of improvised chaos.

    Table of Contents

    Key takeaways

    Point Details
    Start with a systems assessment Document the age and condition of every major system before deciding what to upgrade first.
    Budget with a real contingency Set aside 15% to 30% above your estimate to cover hidden issues and permit delays.
    Sequence work in the right order Structural and mechanical work must come before finishes to avoid expensive rework.
    Lock decisions before demolition Finalize cabinets, appliances, and fixtures early so material lead times do not stall your project.
    Manage contractors with documentation Use written contracts, decision logs, and a communication plan to prevent scope creep.

    How to plan home upgrades: start with a full assessment

    Before you touch a single wall, you need to know what you are actually working with. A documented systems assessment captures the age, condition, and history of every major component in your home. Think roof, HVAC, plumbing, electrical panel, foundation, and windows. Most homeowners skip this step because it feels tedious. That is exactly why so many projects blow up mid-renovation when a contractor opens a wall and finds 40-year-old knob-and-tube wiring that now requires a full rewire.

    The right tools for this stage are simpler than you think. A smartphone camera, a home upgrade checklist, and a folder for invoices and warranties will get you most of the way there. Photos and checklists create a phased plan that prioritizes what is actually failing, not just what looks dated. Walk every room and document what you see, note any moisture stains, soft spots in flooring, flickering outlets, or drafty windows.

    Once you have that picture, you can sort your list into priority tiers:

    • Must fix now: Active leaks, structural concerns, failing electrical, or anything that affects safety and habitability
    • Should address soon: Systems within five years of their expected lifespan, outdated plumbing, poor insulation
    • Dream upgrades: Cosmetic improvements, additions, and aesthetic renovations that depend on the above being solid

    This three-tier system prevents you from spending $25,000 on a gorgeous kitchen only to discover the crawl space has moisture damage that now requires $15,000 in structural work. Cosmetic changes always come last.

    Pro Tip: Pull your home’s permit history from your local building department. It tells you what work was done, when, and whether it was properly inspected. This one step can save you from inheriting someone else’s unpermitted problem.

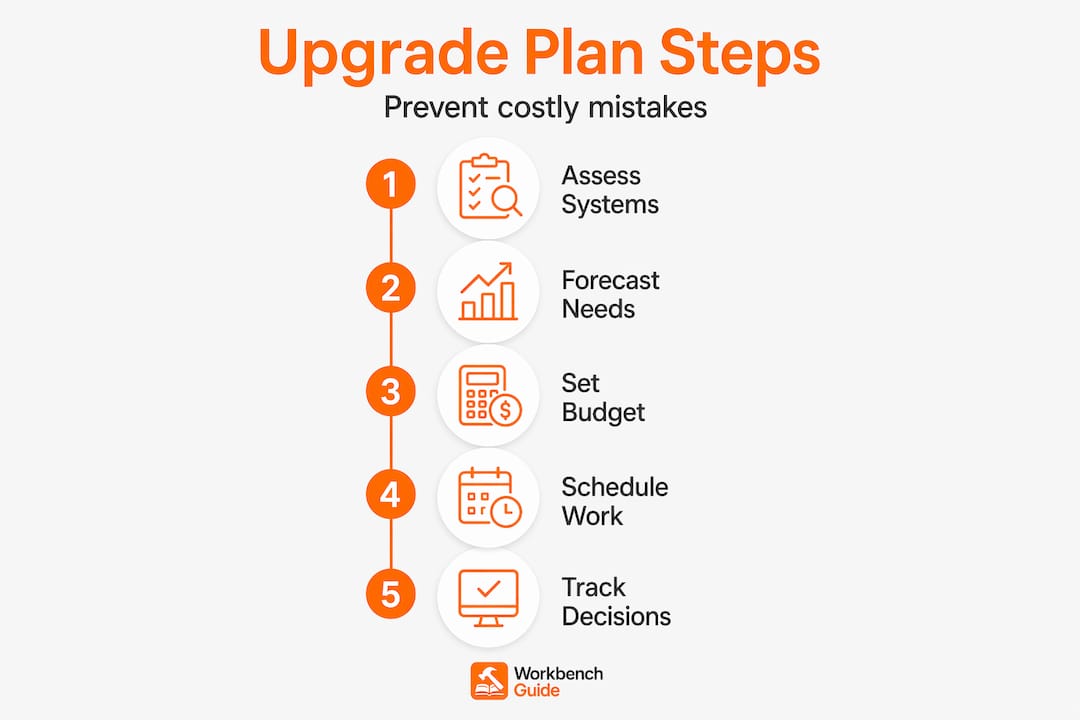
    Infographic displaying home upgrade planning steps

    Create a long-term forecast while you are at it. If your HVAC is 12 years old and furnaces typically last 15 to 20 years, schedule that replacement in your three to five-year plan now, before it fails in January and forces a rushed, expensive decision.

    Building a budget that actually holds

    The average homeowner wildly underestimates renovation costs. Cost overruns of 20% or more are common, and the primary culprits are hidden mechanical and structural issues discovered only after work begins. The fix is not to estimate better. It is to plan for uncertainty from the start.

    Couple reviewing renovation budget in kitchen

    Here is a practical breakdown of how to structure your home upgrade budget:

    Budget category Typical share Notes
    Materials 40% to 50% Includes fixtures, finishes, and appliances
    Labor 30% to 40% Often underestimated, especially in skilled trades
    Permits and fees 2% to 5% Varies widely by municipality and project scope
    Contingency fund 15% to 30% Non-negotiable; higher for older homes

    A 15% to 30% contingency is not pessimism. It is risk management. Use the lower end for newer homes with documented systems and straightforward projects. Go higher for homes built before 1980, anything with known moisture history, or projects that touch plumbing and electrical simultaneously. Think of contingency as a required line item, not optional padding.

    On the question of where to splurge versus save: put money into things you cannot easily change later and items that take daily wear. Subflooring, windows, and plumbing rough-in work deserve your full budget. Cabinet hardware, light fixtures, and paint colors can be upgraded affordably in three years if your taste changes.

    Pro Tip: Get three itemized bids, not just three total numbers. When bids are broken down by labor, materials, and scope, you can compare them accurately and spot where one contractor is cutting corners or padding margins.

    Permit fees deserve special attention. Many homeowners forget to budget for them, and they are not trivial. A full bathroom addition in a major metro can require $1,500 to $3,000 in permits alone. Factor this in before you finalize your numbers, not after.

    Sequencing and timeline management

    The order you tackle work is not a preference. It is a technical requirement. Doing things out of sequence causes rework, inspection failures, and costs that dwarf what you saved by rushing ahead.

    The correct sequence for most home upgrades follows this logic:

    1. Structural work first: Foundation repairs, framing corrections, load-bearing adjustments
    2. Water management: Roofing, waterproofing, drainage, exterior moisture barriers
    3. Mechanical and electrical rough-in: HVAC ducts, plumbing supply and drain lines, electrical wiring
    4. Inspections before closing walls: Rough-in approvals from building inspectors must happen before drywall goes up
    5. Insulation: Installed only after rough-ins are inspected and approved
    6. Drywall, then finishes: Painting, flooring, tile, trim work
    7. Cabinetry and fixtures: Installed after flooring is set and walls are complete
    8. Final landscaping and exterior: Addressed last to avoid damage from construction traffic

    Long-lead items are where projects stall most predictably. Custom cabinetry takes 6 to 12 weeks to fabricate and deliver. Some specialty appliances require 12 to 20 weeks. If you do not order these on day one of planning, you will end up with a gutted kitchen and no cabinets for two months.

    Build your critical path calendar backward from your cabinet and appliance delivery dates. Schedule demolition to align with those windows, not around your schedule or your contractor’s availability. This single habit eliminates the most common source of project stalls.

    Permits add another timing layer. Some municipalities require work to begin within six months of permit issuance, and inspection scheduling must be built into your timeline with deliberate buffer days. Do not assume inspections happen the day after you call. Add one to two weeks for each inspection gate when building your calendar.

    Working effectively with contractors

    Choosing a contractor on price alone is one of the most reliable ways to regret a renovation. The contractor who bids 30% below everyone else is either cutting scope, planning to use cheaper materials, or underestimating the job and hoping to recover the difference through change orders. Interview at minimum three contractors and ask beyond price: How do you handle unexpected conditions? Can I see references from projects similar to mine? Who specifically will be on site daily?

    Once you have selected your contractor, the contract is your protection. It should specify:

    • Exact scope of work, including what is explicitly excluded
    • Materials by brand, model number, and specification where relevant
    • Payment schedule tied to milestone completions, not arbitrary dates
    • Start and completion dates with defined consequences for delays
    • A process for handling change orders in writing before work proceeds

    A decision log is something most homeowners have never heard of but wish they had used. Tracking your design choices with a rationale and date creates an audit trail that prevents disputes. When your contractor says you approved a substitution for a different tile, you can check your log and respond with facts, not memory.

    Preferred communication channels should be agreed on before work starts. Text for quick site questions, email for formal change orders and approvals. Set an expectation that any change to scope, materials, or cost requires written approval before work proceeds. This single rule eliminates most contractor disputes.

    Pro Tip: Never pay more than 10% upfront as a deposit for any project. A contractor who demands 50% before starting has a cash flow problem, and that problem will become your problem.

    Preparing your home for the renovation

    The physical preparation of your home before work begins is a step most guides skip. It directly affects how livable your space is during the project and how efficiently your contractor can work.

    Practical preparation steps that make a real difference include:

    • Clear work zones completely, removing furniture, art, and personal items at least three feet beyond the work area
    • Cover floors in adjacent rooms and hallways with heavy-duty paper or drop cloths to manage dust migration
    • Create sealed plastic barriers between active construction and living areas to contain dust and debris
    • Designate a separate entry and exit path for your crew to avoid tracking debris through the house
    • Schedule a dumpster or junk removal service before demolition begins, not after
    • Plan for dust control proactively, because fine drywall and concrete dust penetrates everything

    If you are living in the home during construction, be realistic about which rooms will be unusable and for how long. Set up a temporary kitchen if yours will be out of service. Book short-term accommodations for the weeks when multiple trades are working simultaneously and the disruption is at its peak. The cost of a week in a rental is far less than the stress of living in a construction site with two kids and a dog.

    After work wraps, build a post-renovation maintenance plan. New systems need their first service sooner than you expect. A home maintenance checklist that tracks when filters, caulking, and mechanical systems need attention protects the investment you just made.

    My honest take on home upgrade planning

    I have watched homeowners approach renovations in two very different ways, and the gap in outcomes is not subtle. The ones who spend two to three months in the planning phase before swinging a single hammer almost always finish close to budget and on time. The ones who skip to execution within weeks of getting the idea spend the back half of their project firefighting problems that were entirely predictable.

    What surprises people most is how much of good planning comes down to patience with decisions. Underestimating the time needed to finalize design selections is one of the most consistent causes of delays and cost increases in renovations. Choosing tile, fixtures, and appliances sounds fast until you are on your fourth Saturday at the showroom and still undecided. Lock those choices before demolition, every time.

    My other strong conviction is about contingency budgeting. Treating it as optional is not a risk tolerance decision. It is wishful thinking. Every older home has something behind its walls that was not visible during your initial walk-through. The contingency does not make you pessimistic. It makes you ready.

    The homeowners who handle contractor relationships best treat them as professional partnerships, not adversarial negotiations. Respect your contractor’s expertise, communicate clearly in writing, and respond to questions quickly. Delays caused by an owner who cannot make a decision in time are just as costly as delays caused by a slow crew.

    — Sean

    Plan smarter with Workbenchguide

    Workbenchguide exists for exactly the situation this article describes: a homeowner with a real project, a real budget, and no interest in making expensive mistakes. The platform gives you project checklists and step-by-step guides that walk you through every phase of a renovation, from initial assessment through final inspection. Use the home maintenance checklist to track system ages, upcoming service needs, and seasonal tasks so nothing falls through the cracks. Whether you are planning a room refresh or a whole-house makeover, Workbenchguide keeps your project organized, your budget visible, and your next step clear.

    FAQ

    What is the first step in planning a home upgrade?

    Start with a full systems assessment. Document the age and condition of your roof, HVAC, plumbing, and electrical before prioritizing any cosmetic or structural changes.

    How much contingency should I budget for a home renovation?

    Set aside 15% to 30% of your total project budget as a contingency. Older homes and projects involving plumbing or electrical work warrant the higher end of that range.

    Why does renovation sequencing matter?

    Working in the wrong order causes rework and failed inspections. Rough plumbing and electrical must pass inspection before walls close, and structural work must be complete before mechanical systems are installed.

    How far in advance should I order custom cabinets and appliances?

    Order custom cabinets and specialty appliances as early as possible in your planning phase. Lead times commonly run 6 to 12 weeks for cabinets and up to 20 weeks for certain appliances.

    What should a contractor agreement include?

    A solid contract specifies exact scope, material specifications, a milestone-based payment schedule, start and completion dates, and a written process for approving any changes to scope or cost before work begins.

  • Your Water Heater Maintenance Guide for 2026

    Your Water Heater Maintenance Guide for 2026

    Most homeowners don’t think about their water heater until they step into a cold shower or find a puddle on the basement floor. By then, the damage is done. A solid water heater maintenance guide can help you avoid both of those moments entirely. Regular maintenance can reduce your energy costs by up to 30% and add years to a system most people completely ignore. This guide covers every key task for both tank and tankless units, with safety steps, tool lists, and the kind of specific detail that actually gets the job done.

    Table of Contents

    Key takeaways

    Point Details
    Flush annually, more in hard water Flushing once a year removes sediment and extends tank life significantly.
    Check the anode rod every 3 years A failing anode rod is the leading cause of tank corrosion and early replacement.
    Test the T&P valve every year The pressure relief valve is your last line of defense against a dangerous tank rupture.
    Tankless units need descaling too Mineral buildup inside tankless heaters cuts efficiency fast without annual descaling.
    DIY maintenance saves real money Professional servicing runs $150 to $350 annually; most of these tasks cost you a few hours.

    Your water heater maintenance guide starts with preparation

    Before you touch anything on your water heater, you need the right tools and a clear safety plan. Skipping this step is how people get burned, literally.

    Tools and materials you need

    Gather these before you start:

    • Garden hose (long enough to reach a drain or outdoors)
    • Flat-head and Phillips screwdrivers
    • Pipe wrench or socket wrench
    • Replacement anode rod (magnesium or aluminum)
    • Sediment bucket
    • Teflon tape
    • Safety gloves and eye protection
    • Multimeter (for electric units)

    Safety steps before any task

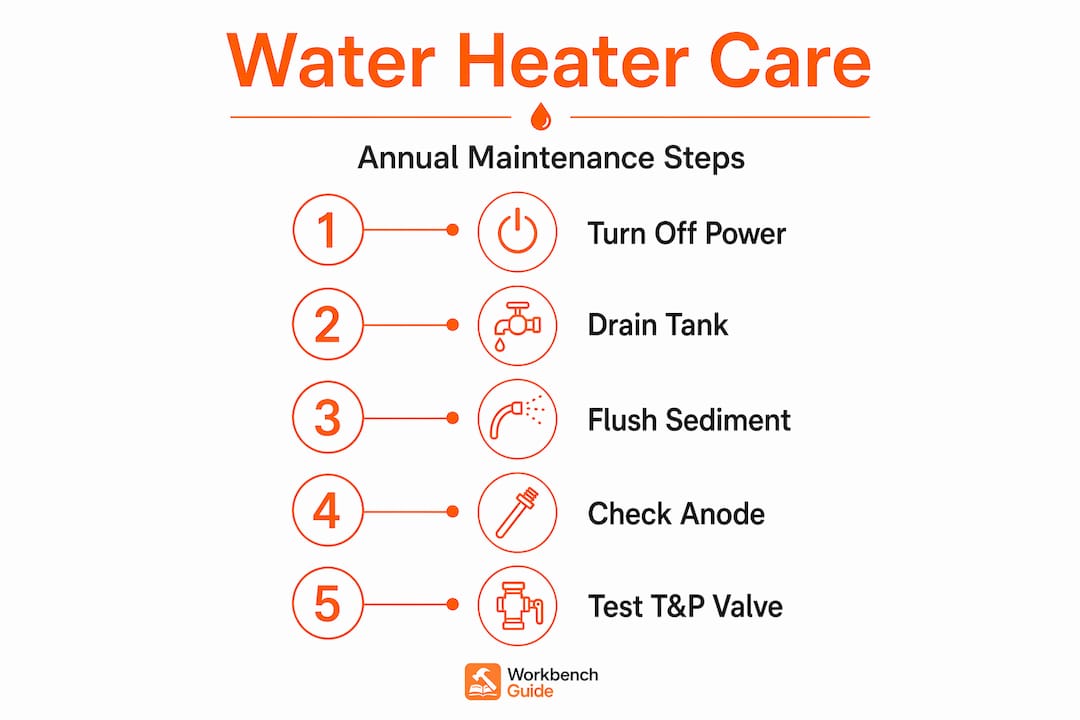
    Turn off the power to an electric unit at the breaker box. For gas heaters, set the burner to the “pilot” position. Shut off the cold water supply valve at the top of the tank. Then, wait. Water can stay scalding for hours after the unit shuts off, so plan to let it cool for at least two hours before flushing. Overnight is even better.

    Understanding which type of unit you have matters too. Tank water heaters store and heat a fixed volume of water, usually 40 to 80 gallons. Tankless units heat water on demand with no storage tank. The maintenance steps differ between them, and this guide covers both.

    Pro Tip: Pull out your water heater’s manual before starting. The manual lists exact thermostat settings, valve locations, and model-specific warnings your neighbor’s unit might not share.

    How to flush sediment from a tank water heater

    Sediment is the biggest silent threat to your tank unit. Minerals in your water supply, mostly calcium and magnesium, settle at the bottom of the tank every time the water heats up. Over time, that layer acts like insulation between the burner and the water, forcing the system to work harder and costing you more on your energy bill.

    Flushing takes 30 to 45 minutes annually, but if you live in a hard water area, doing it every six months is the smarter call.

    Step-by-step flushing procedure

    1. Turn off power or set gas to “pilot.” Shut off the cold water inlet valve.
    2. Connect a garden hose to the drain valve at the base of the tank.
    3. Run the other end of the hose to a floor drain, utility sink, or outdoors. Keep the path downhill.
    4. Open a hot water faucet somewhere in your home. This prevents a vacuum from forming and speeds drainage.
    5. Open the drain valve slowly. Water will begin flowing out. Watch for sediment in the stream.
    6. Once the tank is empty, briefly turn the cold water supply back on to flush remaining sediment through the drain valve. Repeat until the water runs clear.
    7. Close the drain valve, disconnect the hose, and close the hot water faucet you opened earlier.
    8. Refill the tank by opening the cold water supply valve. Wait until water flows steadily from that open hot water faucet before restoring power or relighting the burner.

    Pro Tip: Let the tank cool overnight before flushing. Residual hot water can cause serious burns even after the unit has been off for an hour or two.

    A few common mistakes to avoid:

    • Never restore power to an electric heater before the tank is completely full. Dry firing destroys the heating element fast.
    • Don’t force a stuck drain valve open with excessive pressure. If it hasn’t moved in years, it may break and cause a leak.
    • If the water runs discolored even after several flushes, that rusty or discolored water can signal internal tank corrosion, which means it’s time to call a professional.

    Inspecting and replacing the anode rod

    The anode rod is a metal rod, usually magnesium or aluminum, suspended inside your tank. It corrodes so your tank doesn’t. That’s its only job, and it does it quietly until it runs out of material to sacrifice. When that happens, the tank itself starts to corrode from the inside out.

    Inspecting anode rod on water heater

    Anode rod failure is the primary cause of tank corrosion, especially in hard water areas. Most rods last three to five years, but hard water accelerates their breakdown considerably.

    Signs the rod needs replacement

    • The rod is less than half an inch thick
    • You can see the steel core wire running through it
    • Heavy calcium deposits coat the surface
    • Your hot water smells faintly like rotten eggs (a sign the rod is depleted and bacteria are thriving)

    To replace it, locate the anode rod at the top of the tank. It’s usually under a plastic cap or directly accessible with a 1 1/16-inch socket. Apply the wrench and turn counterclockwise. These rods can seize up over years of inactivity, so you may need a breaker bar for extra leverage. Once removed, compare it against the signs above.

    When buying a replacement, match the type to your water. Magnesium rods work best in soft water. Aluminum rods handle hard water better. If sulfur smells are already a problem, a zinc/aluminum alloy rod can suppress the odor. Wrap the threads in Teflon tape before threading in the new rod. Tighten firmly, but don’t overtorque. Restore water and power, then check for leaks at the rod fitting.

    Pro Tip: Check the anode rod every three years as part of your regular water heater service guide. Catching a depleted rod early is one of the cheapest repairs you’ll ever make.

    Testing the T&P relief valve

    The temperature and pressure relief valve, called the T&P valve, is the most critical safety feature on your tank water heater. It opens automatically if pressure or temperature inside the tank exceeds safe limits. Without it, a malfunctioning heater can build enough pressure to rupture the tank. A stuck T&P valve risks exactly that outcome.

    Testing the T&P valve annually takes about two minutes and should be on every homeowner’s calendar.

    How to test the T&P valve

    1. Make sure you know where the discharge pipe points. It should run down toward a floor drain or discharge safely away from people.
    2. Place a bucket under the discharge pipe end.
    3. Lift the test lever on the valve for about three seconds, then release it.
    4. Water should flow out while the lever is open, then stop completely when you let go.

    If water keeps dripping after you release the lever, the valve is faulty and needs replacement. If no water comes out at all when you lift the lever, the valve may be stuck or corroded.

    Pro Tip: For annual safety checks on any home system, add the T&P valve test to your list right next to smoke detector battery replacement. Both take under five minutes and prevent disasters.

    A leaking or non-functional T&P valve is not a wait-and-see situation. Replacement valves cost $15 to $30 at any hardware store. If you’re uncomfortable replacing it yourself, this is a worthwhile call to a plumber.

    Maintaining a tankless water heater

    Tankless units don’t store water, so they don’t collect sediment the same way. But they have their own maintenance needs, and skipping them causes a different kind of problem: scale buildup inside the heat exchanger. When hard water minerals coat the inside of those small passages, the unit works harder, heats less efficiently, and eventually fails early.

    Vertical steps for water heater maintenance

    Tankless units need annual descaling with a food-grade descaling solution, plus inlet filter cleaning every three to six months.

    Descaling your tankless unit step by step

    1. Turn off power or gas to the unit.
    2. Shut off both the hot and cold water isolation valves on the unit.
    3. Connect a submersible pump and hose to the service ports on each valve (most modern units have these).
    4. Fill a five-gallon bucket with a food-grade white vinegar solution or a manufacturer-approved descaler.
    5. Run the pump to circulate the solution through the heat exchanger for 45 to 60 minutes.
    6. Flush the system with clean water to clear the descaling solution completely.
    7. Restore water flow, restore power, and check for leaks.

    Cleaning the inlet filters

    Tankless units have small mesh filters on the cold water inlet and sometimes on the hot water outlet. These catch debris before it enters the heat exchanger.

    • Shut off the water supply.
    • Locate the filter screens at the inlet connections.
    • Pull them out with needle-nose pliers or your fingers.
    • Rinse under running water and use a soft brush to remove buildup.
    • Reinsert and restore water flow.

    Here’s how the two types of heaters compare on maintenance:

    Task Tank water heater Tankless water heater
    Sediment flushing Annually (or every 6 months) Not needed
    Descaling Not needed Annually
    Anode rod inspection Every 3 years Not applicable
    Filter cleaning Not applicable Every 3 to 6 months
    T&P valve testing Annually Annually (if equipped)

    My honest take on water heater care

    I’ve talked to a lot of homeowners who treat their water heater like a household appliance that runs forever and asks for nothing. I completely understand that mindset. It sits in a utility closet or garage corner, does its job without complaint, and gets zero attention. Until it floods your floor.

    What I’ve seen consistently is that the homeowners who avoid expensive replacements are not doing anything complicated. They’re flushing the tank once a year and checking the anode rod every three years. That’s it. Those two tasks alone are what separates a water heater that lasts 12 to 15 years from one that gives out at nine.

    The thing most people overlook is the thermostat setting. I see units set to 140°F all the time, and it’s unnecessary for most households. Setting it to 120°F saves roughly 5% in energy costs per 10 degrees you lower it, and it slows scale buildup. That one change costs you nothing.

    My other piece of advice: build a simple maintenance schedule and stick to it. Not because each task is urgent on its own, but because they work together. A clean tank with a healthy anode rod and a functioning T&P valve is a system that won’t surprise you. Preventive maintenance isn’t exciting, but an emergency plumber call at 6 p.m. on a Friday is even less exciting.

    — Sean

    Stay on top of every home maintenance task

    Water heater care is one piece of a much larger picture. The homeowners who avoid expensive, unexpected repairs are the ones who track what needs to be done and when. Workbenchguide makes that easy with step-by-step DIY guides, maintenance reminders, and project checklists built for real homeowners who don’t want surprises. Start with a year-round maintenance checklist to organize every seasonal task in one place, including your water heater. If you want to go deeper, the full home maintenance schedule breaks down what to check each month so nothing slips through the cracks. Small habits now mean fewer disasters later.

    FAQ

    How often should I flush my water heater?

    Flush a tank water heater at least once a year. In hard water areas, every six months is better to prevent heavy sediment buildup.

    What are the signs your water heater needs maintenance?

    Rusty or discolored water, longer heat-up times, unusual popping or rumbling sounds, and water that smells like sulfur are all signs your water heater needs attention.

    How long does a water heater last with proper maintenance?

    With annual maintenance including flushing and valve inspections, a tank water heater can last 12 to 15 years compared to 8 to 10 years with no care.

    Can I do water heater maintenance myself?

    Yes. Most tasks in this water heater service guide, including flushing, anode rod replacement, and T&P valve testing, are straightforward DIY jobs that require basic tools and an afternoon.

    How much does professional water heater servicing cost?

    Professional servicing runs $150 to $350 annually. DIY maintenance costs a fraction of that, mostly the price of a replacement anode rod every few years.

  • What Is Home Weatherization? Save Energy and Money

    What Is Home Weatherization? Save Energy and Money

    Home weatherization is one of the most cost-effective upgrades a homeowner or renter can make, yet most people assume it’s only available to low-income households through government programs. That’s a myth worth busting. What is home weatherization, really? It’s the process of improving your home’s ability to retain heat in winter, stay cool in summer, and use less energy year-round. Through sealing gaps, upgrading insulation, and tuning up mechanical systems, weatherization reduces your monthly bills, improves comfort, and protects your health. Anyone can benefit, regardless of income.

    Table of Contents

    Key takeaways

    Point Details
    Weatherization covers more than insulation Air sealing, window upgrades, and HVAC tune-ups are all part of a complete weatherization plan.
    Savings are real and measurable Weatherized homes can cut HVAC energy use by 20% or more with a payback period of 3 to 7 years.
    Free programs exist for eligible households The federal Weatherization Assistance Program helps qualifying families save $372 to $437 annually on energy costs.
    DIY steps deliver immediate relief Sealing window gaps and adding weatherstripping can lower drafts and bills while you wait for bigger upgrades.
    Weatherization is a permanent fix Unlike fuel assistance programs, weatherization addresses root causes so savings continue for years without reapplying.

    What home weatherization actually involves

    Many people picture weatherization as simply stuffing insulation into an attic. The reality is broader and, honestly, more effective when treated as a whole-home system.

    Insulation: the foundation of energy retention

    Good insulation slows the movement of heat through your home’s walls, ceiling, and floor. Attic insulation typically delivers the biggest return because heat rises and escapes through the roof if left unchecked. Fiberglass batts, blown-in cellulose, and rigid foam boards are the most common home insulation techniques used in residential projects. Attic and wall insulation consistently rank as the most common improvements performed in professionally weatherized homes.

    One thing most guides skip: simply adding insulation inside walls without addressing thermal bridging through wall studs wastes a portion of your investment. Construction experts emphasize exterior continuous insulation as the most effective way to eliminate this problem, especially when you are already replacing siding or roofing. Timing exterior insulation upgrades with scheduled renovations saves labor costs significantly.
    Air sealing: the most underrated step

    You can have perfect insulation and still lose enormous amounts of conditioned air through invisible gaps. Electrical outlets on exterior walls, gaps around pipes, attic hatches, recessed lights, and the joint where your foundation meets the framing are all common leak points. Sealing these with caulk, weatherstripping, or spray foam before you add insulation makes every other upgrade work harder.

    Pro Tip: When sealing window and door frames with caulk, run your hand around the perimeter on a cold, windy day first. You’ll feel the air movement immediately and can target your sealing precisely instead of guessing.

    Window, door, and mechanical system upgrades

    Weatherstripping worn door seals, installing door sweeps, and adding storm windows are practical steps with fast payback. For heating and cooling systems, weatherization also includes HVAC tune-ups, duct sealing, and water heater inspections. Leaky air ducts in a forced-air system can waste 20% to 30% of your conditioned air before it ever reaches a room. Sealing those ducts with mastic or foil tape is one of the fastest ways to improve comfort and lower bills at the same time. You can learn more about how these upgrades work together in this HVAC efficiency guide from Workbenchguide.

    Person applying weatherstripping to front door

    The real benefits of home weatherization

    People focus on the energy bill, and that is fair. But weatherization delivers more than a lower number at the bottom of your utility statement.

    Energy savings and lower bills

    Professional air sealing and insulation reduce HVAC energy consumption by 20% or more, with payback typically achieved in 3 to 7 years. Weatherized homes use 10% to 20% less natural gas on average. Over a decade, that’s thousands of dollars back in your pocket.

    Infographic shows key weatherization energy savings statistics

    Weatherization measure Estimated annual savings Typical payback period
    Attic insulation upgrade $200 to $600 2 to 5 years
    Air sealing (whole home) $150 to $400 1 to 3 years
    Duct sealing and insulation $100 to $300 2 to 4 years
    Weatherstripping and door sweeps $50 to $150 Less than 1 year
    Storm window installation $75 to $200 3 to 7 years

    Health and indoor air quality

    This benefit gets far too little attention. When your home is properly sealed and ventilated, outdoor pollutants, allergens, and moisture have fewer pathways inside. The federal Weatherization Assistance Program helps households save $514 annually on medical expenses because of improved indoor air quality. Reducing drafts also eliminates the cold spots that aggravate respiratory conditions in winter.

    “Weatherization addresses the root causes of high energy bills, delivering permanent savings unlike temporary fuel assistance programs. Once weatherized, a home saves energy for years without requiring follow-up applications.”

    Comfort and home value

    Drafty rooms, uneven temperatures between floors, and windows that sweat in winter are quality-of-life issues, not just efficiency problems. Weatherization eliminates most of those complaints. Homes with documented energy efficiency upgrades also tend to sell faster and at higher prices, because buyers recognize lower operating costs as a genuine financial advantage.

    How to weatherize your home: DIY and professional options

    You do not need a contractor for every step. Here’s a practical breakdown of what you can tackle yourself and when to call in a pro.

    DIY steps you can do this weekend

    1. Inspect and seal door frames. Run your hand around every exterior door on a windy day. Add weatherstripping where you feel air movement, and install a door sweep if light is visible at the bottom.
    2. Caulk window frames. Check where the window frame meets the wall, both inside and outside. Apply silicone caulk to any gaps larger than a hairline crack.
    3. Seal electrical outlets on exterior walls. Remove the cover plate, install a foam outlet gasket (available at hardware stores for about $1 each), and replace the cover. Fast, cheap, and surprisingly effective.
    4. Add attic hatch insulation. If your attic access hatch has no insulation on top of it, you have a direct heat escape route. Attach rigid foam to the top of the hatch with construction adhesive.
    5. Check and add attic insulation. Most older homes are underinsulated. The U.S. Department of Energy recommends R-38 to R-60 for most attic zones in colder climates.

    Pro Tip: Most DIYers fail at rigid foam insulation by cutting boards too tight. Cut each board about a quarter inch narrower than the opening, then seal the gap with spray foam. You’ll get a more airtight barrier than a board forced in snugly.

    When to hire a professional

    Whole-home air sealing, spray foam in wall cavities, and mechanical system upgrades (furnace, water heater, duct systems) benefit significantly from a certified energy auditor or weatherization contractor. A professional blower-door test identifies leaks you simply cannot find by feel alone. Homes built between the 1940s and 1970s often have complex air sealing challenges due to older construction methods, and diagnostic work before any insulation installation is strongly recommended.

    For a step-by-step starting point, the Workbenchguide article on winterizing your home covers the most common beginner tasks clearly.

    Costs, programs, and financial assistance

    Understanding the cost of home weatherization upfront helps you plan realistically and find available help.

    What it actually costs

    DIY weatherization basics, such as caulk, weatherstripping, outlet gaskets, and attic hatch covers, typically run $100 to $500 for most homes. A professional whole-home weatherization project is a different scale. Typical costs range from $6,000 to $10,000 for low-income households served through assistance programs, with government-funded projects averaging $7,669. Private market projects can run higher depending on home size and the scope of insulation and mechanical upgrades.

    The Weatherization Assistance Program

    The federal Weatherization Assistance Program (WAP) is funded through the U.S. Department of Energy and administered by states. It provides free weatherization services to eligible low-income households. For every $1 invested, the program returns $2.78 in health and safety benefits alone.

    Eligibility generally requires:

    • Income at or below 200% of the federal poverty level
    • Proof of income, utility bills, and legal residency
    • Priority consideration for elderly residents, people with disabilities, and households with young children
    • Property owner approval if you are a renter

    One honest limitation: many regions face backlogs with wait times stretching several months. If you qualify but are waiting, start with the DIY steps above. They deliver real relief while you wait for the bigger upgrades.

    Other funding options

    Beyond WAP, many state and local utility companies offer rebates for insulation, air sealing, and HVAC upgrades. The federal Inflation Reduction Act created tax credits covering up to 30% of weatherization-related home energy improvements through 2032. Search your state’s energy office website or ask your utility company about home energy efficiency rebates in your area.

    My take: weatherization is undervalued, and air sealing is the reason why

    I’ve spent years advising homeowners on maintenance and repairs, and weatherization is consistently the area where I see the biggest gap between what people know and what they should do. Most homeowners go straight to insulation quotes when they hear “weatherization.” Air sealing almost never comes up until a professional mentions it.

    That’s a problem because insulation alone without air sealing leaves a significant portion of your energy savings on the table. Think of it this way: insulation slows heat transfer, but unsealed gaps let heat move freely. You are padding your walls while leaving the windows open.

    I’ve also seen how health benefits from weatherization surprise people the most. A client in an older home was dealing with chronic dust and allergy symptoms for years. After a professional air sealing job, the issue dropped dramatically. No medication change. Just a tighter building envelope.

    My advice: don’t wait for the perfect budget or a program approval to start. The $20 you spend on weatherstripping and caulk this weekend will pay back faster than almost any other home improvement. Treat weatherization as a series of small, permanent decisions rather than one big project, and the results compound over time in ways that feel genuinely satisfying.

    — Sean

    Start protecting your home with Workbenchguide

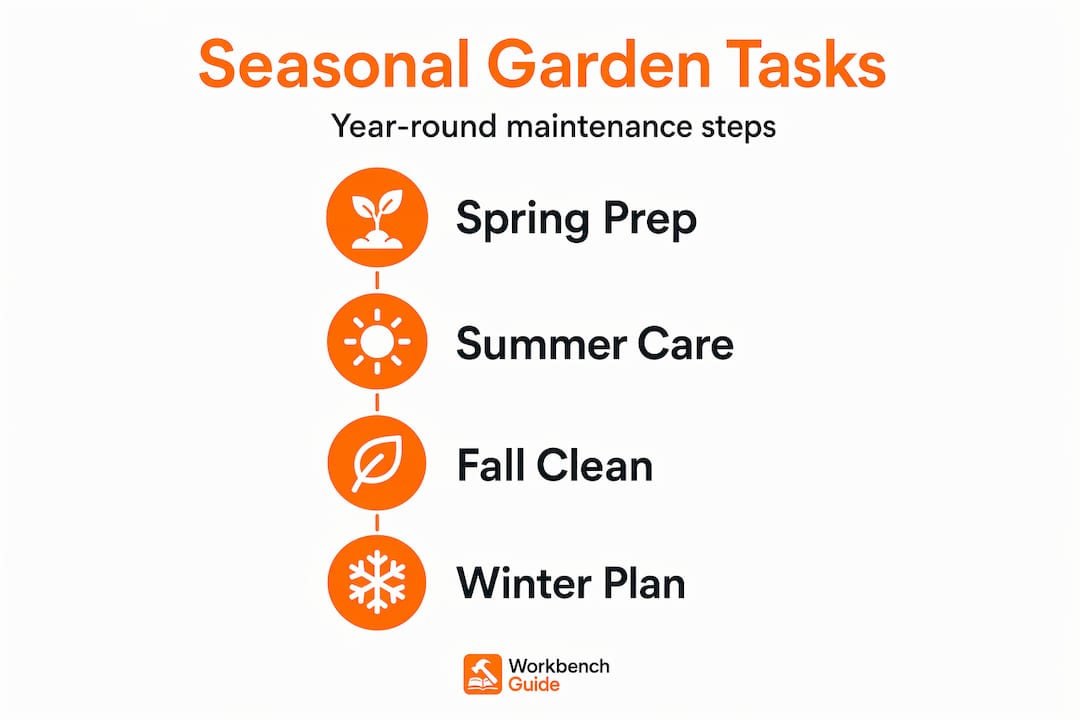
    Weatherizing your home is one part of a broader maintenance plan that keeps costs down year-round. Workbenchguide gives you the tools to stay on top of every season: step-by-step DIY guides, seasonal checklists, and reminders so nothing slips through the cracks. Whether you are ready to tackle a weekend sealing project or plan a full insulation upgrade, the home maintenance checklist at Workbenchguide walks you through what to do and when. You can also explore preventative maintenance strategies that pair naturally with weatherization to protect your home’s value for the long term.

    FAQ

    What is home weatherization in simple terms?

    Home weatherization is the process of improving your home to reduce energy waste, lower heating and cooling costs, and increase year-round comfort through insulation, air sealing, and system upgrades.

    How much can weatherization reduce my energy bills?

    Professional air sealing and insulation can reduce HVAC energy consumption by 20% or more, and the federal Weatherization Assistance Program saves households $372 to $437 annually on heating and cooling costs.

    Can renters apply for weatherization assistance?

    Yes, renters can apply for weatherization programs, but they typically need written approval from their property owner before any work begins, as outlined in program eligibility requirements.

    What is the easiest DIY weatherization step?

    Adding weatherstripping to exterior doors and caulking window frames are the fastest and cheapest steps, often costing under $50 and paying back within the first heating season.

    How long does professional weatherization take?

    A whole-home professional weatherization project typically takes one to three days on site, though scheduling and program approval can extend the overall timeline, especially in areas with program backlogs.

  • What Is a Home Warranty? What Homeowners Need to Know

    What Is a Home Warranty? What Homeowners Need to Know

    Most homeowners assume their homeowners insurance covers everything. Then the HVAC stops working on a July afternoon, and they get the news: that breakdown is not covered. A home warranty is the product designed to fill exactly that gap, yet most people buying or selling a home have only a fuzzy sense of what it actually does. This article breaks down the home warranty definition, explains the types of home warranties available, walks through real costs, and gives you an honest take on whether it is worth your money.

    Table of Contents

    Key takeaways

    Point Details
    Home warranty vs insurance A home warranty covers wear-and-tear breakdowns; homeowners insurance covers sudden damage from disasters or accidents.
    What it covers Most plans cover major systems like HVAC, plumbing, and electrical, plus built-in appliances.
    How you pay You pay an annual or monthly fee plus a service call fee each time a technician visits.
    Is it worth it? Value depends on your home’s age, appliance condition, and how often you expect to file claims.
    Read the fine print Coverage limits, exclusions, and service fees vary widely. Reviewing contracts carefully prevents surprises.

    What is a home warranty, exactly

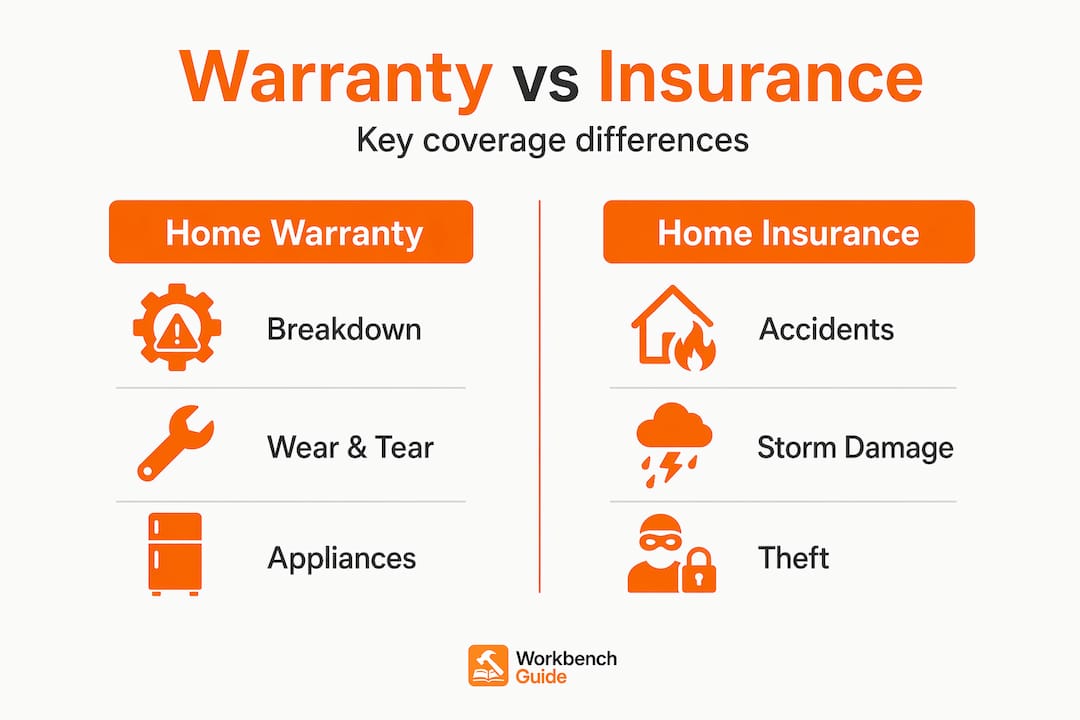
    A home warranty is a service contract between you and a warranty company. When a covered system or appliance breaks down due to normal use and age, you call the company, pay a service fee, and a contractor comes out to diagnose and fix the problem. The warranty company pays the repair or replacement cost up to the contract limits. That is it. No storm damage, no flooding, no theft. Just the predictable wear that happens to every home over time.

    Home warranties cover the diagnosis, repair, or replacement of major components due to normal use, which makes them fundamentally different from homeowners insurance. Think of it this way: your insurance company cares about what happened to your home. Your warranty company cares about how long your appliances have been running.

    The payment structure works in two layers. First, you pay an annual or monthly premium to keep the contract active. Second, every time you request a repair, you pay a service call fee per visit. That fee applies even if the technician determines the problem is not covered. Knowing this upfront changes how you think about when to file a claim.

    Pro Tip: Before signing any contract, ask what the service call fee is and whether it changes based on the type of repair. Some providers charge different rates for appliance calls versus HVAC calls.

    • Coverage kicks in after a waiting period, usually 30 days from contract start
    • The warranty company selects the contractor, not you
    • Coverage has per-item and annual caps that limit total payout
    • Pre-existing conditions are generally excluded from coverage

    Types of home warranties and what they cover

    Not every plan is built the same. The three most common plan types give you a starting point for comparison.

    Plan Type What It Covers Best For
    Systems only HVAC, plumbing, electrical, water heater Homes with new appliances but aging infrastructure
    Appliances only Dishwasher, oven, washer, dryer, refrigerator Homes with older built-in appliances
    Combination Both systems and appliances Most homeowners wanting broader protection

    Coverage typically includes major systems and built-in appliances, but the specifics vary significantly by provider and plan tier. A “systems plan” at one company might include the water heater while another lists it as an add-on. Always confirm what is in writing before assuming something is covered.

    Common add-ons you can pay extra for include:

    • Pool and spa equipment (pumps, heaters, filters)
    • Roof leak repair
    • Well pump coverage
    • Septic system pumping
    • Additional refrigerators or standalone freezers

    Pool coverage deserves special attention. Pool plans cover mechanical equipment like pumps and filters, not structural components like liners or tiles. Many pool owners assume they are fully covered and get an unwelcome surprise when a liner cracks. That kind of nuance shows up across nearly every add-on category.

    Home warranties also have clear exclusions. Windows and the physical structure of the home are commonly excluded, as are cosmetic issues and problems caused by improper installation or lack of maintenance.

    Pro Tip: Ask the warranty company to send you the full sample contract before you pay anything. Read the exclusions section first. That section tells you more about the real value of a plan than the marketing summary ever will.

    Home warranty vs homeowners insurance

    These two products protect your home in completely different ways, and confusing them is one of the most expensive misunderstandings a homeowner can have.

    Homeowners insurance exists to cover you against sudden, unexpected events: a fire, a burst pipe from a storm, a tree falling through your roof, or liability if someone is injured on your property. A home warranty covers wear-and-tear breakdowns not covered by insurance, meaning the refrigerator that quit after 12 years or the furnace that finally gave out.

    Infographic comparing home warranty with insurance

    Here is a side-by-side breakdown:

    Feature Home Warranty Homeowners Insurance
    Trigger for coverage Normal wear and tear Sudden, accidental damage
    What it protects Systems and appliances Structure, personal property, liability
    Typical annual cost $400–$1,000+ $1,500–$2,000+
    Required by lenders No Yes (if you have a mortgage)
    Contractor selection Warranty company chooses You choose (usually)

    You need both products for complete protection, but they serve different purposes. Your lender requires homeowners insurance. A home warranty is optional but can make financial sense depending on your home’s condition and age.

    Is a home warranty worth it for your home

    This is the real question, and the honest answer is: it depends. But you can make a smarter decision by running through a few specific factors.

    1. Check your home’s age. Newer homes may have less need for a home warranty because builder warranties and manufacturer warranties on new appliances often cover early failures. A home built in the last three to five years with new appliances has much less to gain from a warranty in year one.

    2. Add up the real costs. Pricing varies by state and plan tier. In Texas, for example, plans run roughly $45 to $85 per month, plus service fees of $75 to $150 per technician visit. If you file two claims in a year, your out-of-pocket cost could easily hit $800 before the warranty company pays a dollar toward parts.

    3. Think about your appliances realistically. A 10-year-old HVAC system, an aging water heater, and a dishwasher on its last legs all represent real risk. A warranty starts looking attractive when you can identify multiple items that are likely to need service in the next few years.

    4. Understand that a home warranty manages risk of service costs, not a guarantee of complete repairs. Coverage caps mean a company might pay $1,500 toward a $3,000 HVAC replacement. You cover the rest.

    5. Research provider reputation. Read actual customer reviews, not just advertised claims. Look at how companies handle denied claims and how quickly contractors are dispatched.

    6. Consider your comfort with DIY repairs. If you handle minor fixes yourself and know how to vet contractors, you might do better putting the annual premium into a dedicated home repair savings account.

    The peak value scenario for a home warranty is an older home with aging systems, a buyer who prefers predictable expenses over surprise repair bills, and a plan with reasonable service fees and verified coverage for the specific items most likely to fail.

    What homeowners get wrong about home warranties

    Maintenance technician servicing furnace in older home

    The biggest source of frustration with home warranties is not the product itself. It is the gap between what people expect and what the contract actually delivers.

    BBB complaints about warranties frequently stem from misunderstandings about coverage and claim processes. Warranty companies have flexibility in how they calculate payouts, and that flexibility rarely benefits the homeowner. Being aware of that going in changes how you shop.

    A few things that trip people up repeatedly:

    • Assuming all repairs are covered without reading the exclusions
    • Not knowing the service fee applies even for denied claims
    • Expecting coverage for items that were already malfunctioning at purchase
    • Believing the warranty company will always approve the repair the technician recommends

    “Plans vary significantly in coverage; buyers should confirm exactly what systems and appliances are covered rather than assume blanket protection.”

    The best defense against disappointment is treating the contract like a legal document, not a marketing brochure. Reviewing contract terms thoroughly before signing and asking pointed questions about denial rates and coverage caps puts you in a much stronger position than most buyers.

    My take on home warranties after years of watching homeowners use them

    I have seen home warranties deliver real value and I have seen them leave homeowners frustrated, and the difference almost always comes down to one thing: expectations.

    When a homeowner buys a warranty thinking it is a catch-all protection plan, they end up disappointed. When someone buys it specifically to manage the risk of a few aging systems, understands the service fee structure, and has read what is excluded, it often pays off. The product works best as a financial planning tool, not a safety net you never think about.

    Where I think warranties fall short is when they become a substitute for actual home maintenance. A well-maintained HVAC lasts years longer than a neglected one, and no warranty covers damage from lack of upkeep. I have watched homeowners skip regular home inspections and routine servicing because they assumed the warranty had them covered. It does not work that way.

    My honest advice: if your home is more than 10 years old and you have not replaced major systems or appliances recently, a combination plan is worth a serious look. But pair it with proactive maintenance. Know your appliances, schedule service on your HVAC annually, and use the warranty for what it actually is: a managed cost-sharing contract, not a replacement for caring for your home.

    — Sean

    Protect your home beyond the warranty

    A home warranty handles breakdowns after they happen. Workbenchguide helps you prevent them in the first place. With smart maintenance reminders, step-by-step DIY guides, and project checklists built for homeowners, Workbenchguide keeps you ahead of the repairs that warranties often deny because of missed upkeep.

    Start with the yearly maintenance checklist to build a simple routine that protects every major system in your home. If you want to go further, the preventative maintenance guide walks you through how to extend appliance lifespans and avoid the kind of wear that even a good warranty will not cover. When you know your home, you make smarter decisions about when a warranty is worth it and when your maintenance habits are doing the job already.

    FAQ

    What is a home warranty in simple terms?

    A home warranty is a service contract that pays for the repair or replacement of major home systems and appliances when they break down due to normal wear and age. It is not insurance and does not cover damage from accidents or natural events.

    What does a home warranty typically cover?

    Most plans cover HVAC systems, plumbing, electrical systems, water heaters, and built-in kitchen appliances like dishwashers and ovens. Coverage specifics vary by provider and plan tier, so reviewing the contract is critical.

    How is a home warranty different from homeowners insurance?

    Homeowners insurance covers sudden damage from events like fires, storms, and theft. A home warranty covers mechanical breakdowns from everyday use and age, making the two products complementary rather than interchangeable.

    How much does a home warranty cost?

    Costs include an annual or monthly premium plus a service fee per technician visit. Depending on the state and plan, you might pay between $400 and $1,000 per year in premiums, plus $75 to $150 per service call.

    Is a home warranty worth buying?

    It depends on your home’s age and the condition of your systems and appliances. Older homes with aging HVAC, plumbing, or appliances often see real value from a combination plan, while newer homes with manufacturer warranties in place may see less benefit.

  • Top 4 Gethousewise.com Alternatives 2026

    Top 4 Gethousewise.com Alternatives 2026

    Keeping home and rental property maintenance organized often leads to missed repairs, lost inspection records, and unclear task assignments when managing multiple units. Many options either rely on unpredictable reminders or require disconnected tools that do not sync DIY guidance, maintenance tracking, and communication in one platform. This comparison details four home maintenance management solutions so you can match features, price, and workflow to your property type and decide which fits your approach to upkeep and recordkeeping.

    Table of Contents

    WorkbenchGuide

    https://workbenchguide.com

    At a Glance

    Created by a licensed general contractor, WorkbenchGuide combines step-by-step DIY instructions with maintenance schedules and inspection checklists into a single workflow homeowners and landlords can follow. The platform emphasizes practical, trades‑level guidance meant to reduce surprise repairs and paperwork.

    Core Features

    Guided DIY instructions with stepwise procedures and photos help you tackle common repairs without guesswork.

    Maintenance schedules and reminders keep recurring tasks visible so seasonal jobs do not slip through the cracks.

    Inspection checklists record history and notes, while task management accepts photos, comments, and follow up dates for each job.

    Property records and multi property support let landlords and managers keep service history organized across units and addresses.

    Mobile access and customizable maintenance plans let you run inspections, assign work, and checklists from the field.

    Key Differentiator

    The product’s single strongest claim is its combination of preventive maintenance schedules, DIY guidance, and task tracking all built on real contractor experience. That design makes recommendations that read like a tradesperson wrote them rather than an abstract checklist.

    Pros

    • The contractor background makes the DIY instructions practical and prioritizes what actually fails first, which reduces wasted trips to the hardware store.

    • Maintenance schedules with reminders reduce the chance of deferred work and the repairs that follow, useful for older homes with known weak points.

    • Inspection checklists record a trail of photos and notes so you can show service history to tenants, buyers, or insurers without digging through email.

    • Multi property features let landlords coordinate recurring tasks across units and track which building still needs attention.

    • Mobile app accessibility means crews or tenants can upload photos and comments on the spot, speeding repair triage.

    Cons

    • Relies heavily on accurate user input for property details and task completion; incomplete entries reduce the platform’s predictive value and historical usefulness.

    Who It’s For

    Homeowners who prefer hands on maintenance, landlords managing multiple units, and property managers who need a predictable inspection and repair record. It fits users who want guidance that reads like field experience rather than high level theory.

    Unique Value Proposition

    Created by a licensed general contractor, the platform turns contractor habits into a repeatable maintenance system. That means the schedules and repair steps reflect how tradespeople actually assess risks and prioritize work, which changes how you budget and plan maintenance cycles.

    Real World Use Case

    A property manager uses WorkbenchGuide to schedule quarterly inspections across five apartment buildings, capture photos of minor issues, and assign repairs with due dates. Tenants receive reminders and the manager retains a searchable service history to show during turnover.

    Pricing

    The product data lists pricing as informational only and does not provide tier or fee details. Contact WorkbenchGuide for current plans or trial access.

    Website: https://workbenchguide.com

    RentRedi

    https://rentredi.com

    At a Glance

    Starts at $5/month for the basic plan, making RentRedi one of the cheapest entry points for property management software. The platform bundles rent collection, tenant screening, maintenance tracking, and simple accounting into a mobile-friendly interface aimed at small portfolios.

    Core Features

    • Effortless rent collection with auto-pay and automated reminders that reduce late payments.
    • Listing syndication to major rental sites including Zillow and Realtor.com for faster vacancy fills.
    • Centralized messaging so tenant communications, notices, and threads live in one place.
    • Maintenance request tracking with vendor assignment and status updates to close tickets faster.
    • Tenant screening via a TransUnion partnership offering credit, criminal, and eviction checks.

    Key Differentiator

    RentRedi’s angle is the all-in-one platform that keeps day to day landlord tasks inside a single app. The mobile-first design means you can collect rent, review screening reports, and respond to maintenance requests from a phone without switching tools.

    Pros

    • The interface is easy to navigate. New users report faster task completion during the first week compared with cluttered systems.
    • Mobile app functionality lets you manage listings, collect rent, and approve repairs while offsite.
    • Customer support is responsive and claims 24/7 availability in product materials; response times vary by issue and user report.
    • Built-in tenant screening and financial reporting cut down on manual reconciliation and spreadsheet work.
    • Maintenance tools centralize vendor info and request history, which speeds repairs and keeps tenants informed.

    Cons

    • Some users report glitches or delays in payment processing that complicate reconciliation during busy billing cycles.
    • Customer support experiences vary; a responsive rep is common but not guaranteed for every issue.
    • Onboarding and initial setup can feel incomplete for users migrating large historical records.
    • Occasional issues with payment reconciliation create extra accounting steps for portfolios with many units.

    When It May Not Fit

    Large portfolios that require enterprise accounting, multiuser permissions, or custom reporting will find RentRedi limited. If flawless payment processing and detailed trust accounting are nonnegotiable, the occasional payment glitches and reconciliation gaps above could be a deal breaker.

    Notable Integrations

    • TransUnion for tenant screening reports, including credit, criminal, and eviction checks. This integration keeps background checks inside the RentRedi workflow rather than forcing separate vendor logins.

    Who It’s For

    Independent landlords and small to medium property management firms that want a straightforward, mobile-first system to automate rent, screening, and maintenance. Ideal for owners managing between a few and a few dozen units who value simplicity over enterprise features.

    Real World Use Case

    A landlord with 10 rental units automates rent collection and uses screening reports to vet applicants. Maintenance tickets and vendor contacts live in the same app, and monthly income and expense summaries cut bookkeeping time by several hours.

    Pricing

    Plans start at $5/month billed monthly for the basic tier. The growth plan is $12/month billed annually. Custom pricing is available for larger portfolios that need more features or white glove onboarding.

    Website: https://rentredi.com

    PropUp

    https://gopropup.com

    At a Glance

    PropUp connects directly to Yardi, RealPage, AppFolio, and other property systems so vacancy and turnover workflows pull live lease and unit data into day-to-day operations. The platform focuses on unit turnovers, inspections, and work order flow for multifamily portfolios rather than homeowner how-to content.

    Core Features

    • End-to-end vacancy management and unit turnover workflows that tie tasks to unit and lease records.
    • Customizable inspection templates with photo and video capture for move‑outs and move‑ins.
    • Work order processing with real-time updates and offline mode for field technicians.
    • Asset inventory tracking, damage logging, and reporting tools that surface repair needs.

    Key Differentiator

    PropUp delivers a customizable vacancy and maintenance workflow that plugs into existing property management systems. Where GetHousewise.com targets homeowners with DIY guidance, PropUp is built for operators who need data synchronized between their PMS and field teams across many units.

    Pros

    • Integration-first approach reduces duplicate data entry when you already run a PMS like Yardi or AppFolio. That lowers admin time for leasing and maintenance teams.
    • The interface is straightforward so coordinators and vendors learn core flows quickly and complete inspections or work orders on a phone or tablet.
    • Real-time sync plus offline capabilities keep field crews productive when connectivity drops, which limits work stoppage during turnover windows.
    • Custom templates let you standardize unit condition checks and attach photos or videos to each task for dispute resolution with residents.
    • Built-in asset tracking links damages and repairs back to units, helping you prioritize work orders by turnover deadlines.

    Cons

    • Buyers report frequent feature updates, which can require retraining and short-term friction for teams used to stable workflows.
    • Pricing varies with portfolio size; very small owners seeking a fixed low monthly fee may find the model less transparent.
    • Some analytics features like dashboard integrations and bulk data exports are still in development, limiting advanced reporting today.

    When It May Not Fit

    According to the vendor, implementation can take up to 2 to 3 weeks depending on portfolio complexity. If you need instant, out-of-the-box reporting or you operate a handful of single-family rentals, the onboarding window and per-unit pricing model may not match your needs.

    Notable Integrations

    • Yardi, RealPage, AppFolio
    • ResMan, Entrata, Fortress, Buildium, RentManager

    Who It’s For

    Multifamily property owners, operators, and management firms managing many units who need operational visibility across turnovers and maintenance. Property teams that already use a PMS and rely on vendors or in-house crews will get the most value.

    Real World Use Case

    Elmington Property Management used PropUp’s inspection and task flows to speed unit turnovers and reduce vacancy downtime by coordinating cleaners, vendors, and leasing in one timeline. The case shows how centralized task assignment cuts handoffs between teams.

    Pricing

    The company advertises pricing that typically starts at $1 per unit per month and asks buyers to contact them for a custom quote based on portfolio size and feature needs.

    Website: https://gopropup.com

    Comparing Home Maintenance Management Solutions

    Managing properties effectively requires tools that cater to diverse needs, from hands-on maintenance schedules to tenant communications. This analysis examines the tradeoffs between WorkbenchGuide, RentRedi, and PropUp.

    Maintenance Guidance and Predictive Insights

    WorkbenchGuide excels in practical DIY maintenance instructions that integrate preventative schedules and task tracking. Its focus on guidance reflects real-world contractor expertise, offering a sophisticated approach for property owners seeking to lower repair costs through informed prevention and hands-on management. By contrast, RentRedi and PropUp provide tools that streamline administrative tasks and tenant interactions but do not emphasize DIY knowing and property optimization as extensively.

    Administration for Multitenant Properties

    For property managers of multifamily units, PropUp offers strong integration capabilities with platforms like Yardi and AppFolio, enabling synchronization of data between systems. This feature benefits users overseeing transitions and tenant records within expansive portfolios. RentRedi, on the other hand, emphasizes tenant payment processing and rent collection features, making it particularly suitable for smaller-scale landlords focusing on streamlined tenant screening and rent handling processes. Both represent strong administrative solutions in their respective niches.

    Best Fit Recommendations

    • WorkbenchGuide: Ideal for homeowners or managers of diverse properties needing preventative maintenance insights and step-by-step DIY support for better upkeep.
    • RentRedi: Suitable for smaller landlords requiring efficient rent collection, tenant screening, and basic maintenance request tracking.
    • PropUp: Best for multifamily property managers benefiting from system integrations to handle inspections, maintenance coordination, and property transitions effectively.

    Our Pick

    WorkbenchGuide is recommended for property managers and homeowners desiring a contractor-informed system to optimize property upkeep and minimize unexpected repairs. Its distinctive combination of predictive maintenance scheduling, DIY repair guidance, and task tracking addresses the needs of proactive property caretakers. However, for those prioritizing tenant payment processes or large-scale integration operations, RentRedi and PropUp respectively provide specialized alternatives to consider.

    Home Maintenance Management Solutions Comparison

    Selecting the right home maintenance management solution depends on combining preventive workflows, accessibility, and tailored features for different property management needs.

    Product Key Differentiator Best For Pricing Notable Limitation
    WorkbenchGuide DIY guidance integrated with contractor-level maintenance tools Homeowners and landlords Not disclosed Relying on accurate user input for optimal effectiveness
    RentRedi Mobile-first app consolidating rental management functions Small landlords and property managers Starts at $5/month Occasional payment processing and reconciliation difficulties
    PropUp Property Management System integration for turnovers workflows Multifamily portfolio managers $1/unit/month, custom quotes Updates may require frequent team retraining, causing disruptions

    Discover a Straightforward Alternative to Gethousewise.com for Home Maintenance

    Managing your home upkeep can feel overwhelming when you face constant repair surprises and scattered paperwork. Workbenchguide offers a solution designed by a licensed general contractor to help you take control with practical DIY guidance, smart maintenance schedules, and organized inspection checklists. This hands-on approach targets exactly the pain points highlighted in the “Top 4 Gethousewise.com Alternatives 2026” article, focusing on reducing guesswork and costly repairs.

    If you want to stop guessing what needs attention around your house and create a clear routine that fits your schedule, Workbenchguide is built for you. Visit our site, explore the step-by-step instructions, and start managing your home maintenance confidently today.

    Frequently Asked Questions

    How does Workbenchguide help with preventive maintenance?

    Workbenchguide provides structured maintenance schedules and reminders that keep recurring tasks visible, reducing the chance of deferred work. This feature is especially useful for managing older homes with known weak points and ensures that seasonal jobs do not slip through the cracks. Users looking to keep their properties in good condition should consider leveraging this functionality.

    What is the difference between Workbenchguide and RentRedi in terms of mobile access?

    RentRedi offers a mobile-friendly interface that simplifies tasks such as rent collection and tenant screening, while Workbenchguide’s core strength lies in its combination of DIY guidance and maintenance tracking. RentRedi is ideal for independent landlords focusing solely on rent and maintenance management, whereas Workbenchguide is better suited for homeowners and landlords wanting detailed maintenance workflows with contractor-level insights.

    Which platform is better for property managers handling multiple properties?

    For property managers, Workbenchguide excels due to its multi-property support that allows for organized service history across various units and addresses. This capability makes it easier to track inspections and repairs for several properties efficiently. Property managers should evaluate their specific oversight needs when choosing between platforms.

    Can I use Workbenchguide effectively if I’m managing just a single property?

    Yes, Workbenchguide can still be effectively used for single property management, as it provides practical DIY instructions and maintenance schedules that can benefit any homeowner. Users managing just one property can take advantage of its organized task management to maintain their home efficiently.

    Does Workbenchguide offer features that support inspection checklists?

    Yes, Workbenchguide includes inspection checklists that allow users to record history and notes while managing tasks with the ability to add photos and comments. This feature helps create a clear service history that homeowners and landlords can refer back to when needed. This capability is essential for those wanting to keep detailed records of property maintenance.

  • Attic Maintenance Checklist for Homeowners

    Attic Maintenance Checklist for Homeowners

    Your attic quietly affects your energy bills, your air quality, and the structural integrity of your roof every single day. Most homeowners only think about it when something goes wrong. That’s a costly mistake. A solid attic maintenance checklist catches small problems like minor moisture buildup or a blocked vent before they become major repairs worth thousands of dollars. This guide walks you through every key inspection task, common problems to watch for, and a seasonal schedule you can actually follow. No guesswork, no jargon.

    Table of Contents

    Key takeaways

    Point Details
    Inspect twice a year Schedule attic checks in late fall and early spring to catch seasonal damage early.
    Ventilation and insulation work together Poor ventilation traps moisture even when insulation is new, so you need to manage both.
    Moisture is the real threat Mold growth begins when wood moisture content exceeds 19 to 20 percent, making moisture control your top priority.
    Air sealing matters more than you think Sealing attic penetrations before adding insulation can improve thermal performance by up to 50%.
    Safety gear is non-negotiable Proper lighting, protective equipment, and stable footing make every attic inspection safer and more effective.

    1. Your attic maintenance checklist starts with safety

    Before you touch anything in the attic, get your safety setup right. This step gets skipped constantly, and it’s the most important one on the list.

    Wear an N95 respirator to protect against mold spores, fiberglass particles, and dust. Safety glasses, long sleeves, and gloves are also worth wearing every time. Bring a strong flashlight or a headlamp so both hands stay free. Set up a stable ladder before you go up, and always step only on joists or a piece of plywood laid across them. Stepping between joists means going through the ceiling below.

    • Wear an N95 respirator, safety glasses, and gloves
    • Use a headlamp so your hands stay free
    • Step only on joists or a plywood board, never between them
    • Keep a phone on you in case you need help
    • Check that the hatch or pull-down stairs are stable before climbing

    Pro Tip: Lay a sheet of plywood across the joists near the hatch before you start. It gives you a stable platform and makes the whole inspection much less stressful.

    Worth noting: FHA appraisal policy now acknowledges that unsafe attic access may exempt an inspector from entering at all. If a trained professional skips it when conditions are unsafe, so should you.

    2. Check insulation for coverage, condition, and placement

    Insulation is one of the first things to assess because it affects your heating and cooling costs directly. You are looking for three things: even coverage, no compression, and clear vent channels.

    Walk the perimeter carefully and check that insulation reaches the full recommended depth for your climate zone. Common targets are R-38 to R-60 for most of the U.S. Compressed or wet insulation loses much of its thermal value. If it looks matted, discolored, or smells musty, it needs replacing.

    The biggest mistake people make here is letting insulation pile up against the eaves. Blocking soffit vents with insulation is the most common ventilation mistake in American homes, and it leads directly to moisture buildup and roof damage. Rigid foam or cardboard baffles installed above the insulation at the eaves keep those airflow channels open. If you do not see baffles, add them before adding more insulation.

    3. Inspect your ventilation system thoroughly

    Attic ventilation is one of those systems where “close enough” is not good enough. The standard requires 1 square foot of ventilation area per 300 square feet of attic floor space, assuming a balanced system with 40 to 50 percent of intake coming from low soffit vents. Without that balance, the system loses much of its effectiveness.

    Here is what to check on every inspection:

    1. Look at each soffit vent from inside and confirm no insulation, debris, or pest material is blocking the opening
    2. Check ridge vents along the roof peak for debris, damaged sections, or improper weatherstripping
    3. Look at gable vents if your home has them and clear any nests or blockages
    4. Confirm that soffit and ridge vents are working as a matched intake and exhaust system
    5. Check any powered attic fans for proper operation and clean the blades if accessible

    Annual inspection of attic vents is the baseline recommendation. If you live somewhere with heavy snow or lots of trees, do it twice a year.

    Pro Tip: On a cold day, open the attic hatch slightly and hold your hand near the soffit area. You should feel a gentle flow of cool air moving toward the ridge. No airflow means something is blocked.

    4. Look for moisture, stains, and early mold signs

    Moisture is the root cause of most serious attic problems. The good news is that it almost always leaves visible clues before it becomes structural damage.

    Scan every rafter, ridge board, and sheet of roof sheathing with your flashlight at an angle. Water stains show up as brown or gray discoloration. Active mold looks fuzzy and is typically black, green, or white. Mold colonizes quickly once wood moisture content climbs above 19 to 20 percent, so finding stains early gives you a real window to act.

    Person scans attic rafters for water stains

    Use a moisture meter on roof sheathing during your inspection. Readings above 19 percent are a red flag even if you cannot see mold yet. This tool costs about $20 to $40 at any hardware store and it pays for itself the first time it helps you catch a hidden problem. A proper attic inspection guide will tell you the same thing: what you cannot see can still hurt you.

    5. Check exhaust ducts from bathrooms and kitchens

    This one surprises a lot of homeowners. Your bathroom exhaust fan and kitchen range hood have ducts that need to terminate outside the house. Not into the attic. Exhausting into the attic dumps warm, moist air directly onto your roof sheathing, which creates exactly the conditions mold needs to grow.

    Trace each duct from the fan to its exit point. The duct should pass through the attic and exit through the roof, soffit, or gable wall with a proper exterior cap. If you find a duct that just ends inside the attic or vents into a flexible hose that has come loose and disconnected, fix it before your next heating season. This is one of the most common causes of attic mold that homeowners do not connect to its source.

    6. Air seal every penetration before adding insulation

    Air sealing is where most homeowners leave serious energy savings on the table. Every gap around light fixtures, plumbing stacks, electrical wires, and HVAC ducts that passes through the attic floor is a direct pathway for conditioned air to escape your living space.

    Sealing attic penetrations before insulating can improve the effective performance of your insulation by up to 50 percent. Use canned spray foam for small gaps and fire-rated caulk around light fixtures rated for insulation contact. This work is tedious but it makes every dollar you spend on insulation work harder. If you add new insulation without air sealing first, you are leaving most of the benefit behind.

    7. Look for pest activity and structural damage

    Rodents and insects treat attics like a hotel. They are warm, quiet, and rarely disturbed. Look for droppings along joists and near the eave areas, shredded insulation used as nesting material, and gnaw marks on wood framing or wiring.

    Check roof sheathing and framing for soft spots, which indicate rot, and for dark fuzzy patches, which indicate mold. Press a screwdriver gently into any suspect area. Good wood is firm. Rotted wood gives way with almost no pressure. Also inspect the ridge board along the peak of the roof and the rafters where they meet the exterior walls. These areas absorb the most stress and are the first to show structural wear.

    8. Common attic problems and how to prevent them

    Understanding why problems happen lets you stop them before they start. Here are the most frequent issues and what drives them:

    • Blocked soffit vents: Insulation pushed against the eaves cuts off airflow. Always install baffles during any insulation work.
    • Improperly vented exhaust fans: Bathroom and kitchen fans venting into the attic deposit moisture directly on wood surfaces. Reroute them outside.
    • Air leaks at penetrations: Gaps around plumbing, wiring, and light fixtures let conditioned air escape and humid outside air enter. Seal them with foam or caulk.
    • Ice dams in winter: Ice dams form when heat escapes through the roof and melts snow unevenly. They almost always signal a ventilation or insulation gap.
    • Humidity without an obvious source: If moisture persists after fixing exhaust fans and ventilation, check for a crawl space vapor barrier issue below.
    Problem Primary cause Prevention
    Mold on sheathing Moisture above 19% Fix exhaust ducts, add ventilation
    Ice dams Heat loss through roof Improve insulation and air sealing
    Blocked soffit vents Insulation without baffles Install foam or cardboard baffles
    Pest infestation Gaps in exterior envelope Seal entry points at eaves and vents
    High energy bills Air leaks at penetrations Air seal before insulating

    9. Seasonal attic maintenance schedule

    A consistent schedule keeps your attic in good shape without turning it into a major project every time. Two inspections per year cover most situations well.

    Late fall (October to November):

    • Complete the full inspection checklist before heating season starts
    • Check insulation depth and air sealing condition
    • Clear all vent openings before snowfall
    • Look for signs of pest entry before cold weather drives animals indoors
    • Review your fall maintenance checklist to coordinate attic work with other seasonal tasks

    Early spring (March to April):

    • Inspect for any moisture or staining that developed over winter
    • Check for ice dam damage on sheathing or rafters
    • Verify exhaust duct connections survived any settling or movement
    • Recheck vent baffles after any winter insulation disturbance
    • Note any repairs needed before summer heat arrives

    Keeping a simple log with the date, what you checked, and what you found makes each inspection faster. You will spot trends over time that a single visit never reveals.

    What I have learned from years of attic inspections

    I have been in a lot of attics. The ones in the worst shape almost always had the same story: the homeowner added insulation at some point thinking that would fix everything, and never touched anything else. What I have found consistently is that insulation without ventilation just traps problems.

    The single biggest shift in my own approach was learning to check moisture levels before I looked at anything else. If the wood is wet, everything downstream is already compromised. A $25 moisture meter changed how I think about the whole space.

    I also stopped underestimating the exhaust duct issue. I have seen bathroom fans vented into attics in homes that were only ten years old. Nobody caught it. The mold was already substantial. Catching it on a preventative attic inspection would have cost almost nothing to fix.

    My honest advice: keep a maintenance log, do two inspections per year, and buy the moisture meter. Those three habits will do more for your attic than any single repair project.

    — Sean

    Stay on top of every maintenance task with Workbenchguide

    An attic maintenance checklist is one piece of a much larger home care picture. Workbenchguide brings all of it together in one place. From step-by-step DIY guides to seasonal reminders, you get clear direction on what to do and when to do it. No more wondering if you missed something critical.

    Start with the home maintenance checklist at Workbenchguide to build out your full year of planned upkeep. It covers attic care alongside roofing, plumbing, HVAC, and more. If you want to go deeper on scheduling, the year-round maintenance guide breaks tasks down by month so nothing slips through the cracks.

    FAQ

    How often should I inspect my attic?

    Inspect your attic twice a year, ideally in late fall before heating season and in early spring after winter. This schedule catches seasonal moisture damage, pest activity, and ventilation issues before they become expensive repairs.

    What are the signs of poor attic ventilation?

    Look for moisture stains on roof sheathing, mold growth, ice dams forming along roof edges in winter, and unusually high heating or cooling bills. These all point to a ventilation system that is not moving air effectively.

    How do I know if my attic has enough insulation?

    Check the depth of your insulation against the recommended R-value for your climate zone, which is typically R-38 to R-60 for most U.S. homes. If you can see the tops of the joists, you almost certainly need more insulation.

    Can I do attic inspections myself?

    Yes, most homeowners can handle attic inspections safely with the right gear. Wear an N95 respirator, bring a headlamp, and always step on joists or a plywood board. If the space is very tight or you suspect structural damage, call a professional.

    What causes mold in the attic?

    Mold grows when wood moisture content exceeds 19 to 20 percent, which typically results from blocked ventilation, exhaust fans venting into the attic instead of outside, or air leaks allowing humid interior air into the space. Fixing the moisture source is the required first step before treating any mold.

  • Your Complete Garden Maintenance Guide for Every Season

    Your Complete Garden Maintenance Guide for Every Season

    Most homeowners don’t lose their garden to one bad decision. They lose it to fifty small ones: skipped pruning, irregular watering, fertilizer applied at the wrong time. This garden maintenance guide exists to fix that pattern. You’ll find a clear framework covering tools, seasonal task schedules, watering strategy, and how to build a realistic routine that doesn’t take over your weekends. Whether you have a compact backyard or a sprawling yard, the principles here translate directly to healthier plants and far less frustration.

    Table of Contents

    Key takeaways

    Point Details
    Start with the right tools A kit of 8 to 10 well-chosen tools is enough for most home gardens up to 400 square meters.
    Organize tasks by season Breaking garden work into seasonal blocks prevents missed windows and keeps plants on track all year.
    Water deeply, not frequently Checking soil moisture at 6 inches beats any fixed weekly watering schedule for plant health.
    Time amendments in the fall Adding lime or sulfur in fall gives soil 3 to 6 months to adjust before spring planting begins.
    Build a weekly zone routine Dividing your garden into 30-minute work zones keeps maintenance steady without burning you out.

    Your garden maintenance guide starts with the right tools

    Before you plant a single seed or pull a single weed, you need to know what you’re working with. Not just the plants. The tools and the soil underneath them.

    The tools worth owning

    You don’t need a garage full of equipment. According to garden maintenance research, a minimum kit of 8 to 10 well-chosen tools covers most domestic gardens up to 400 square meters. The non-negotiables: a quality spade, hand trowel, garden fork, pruning shears, loppers, a hoe, a watering can or hose with adjustable nozzle, a rake, and a wheelbarrow. Gloves don’t feel like a tool, but your hands will disagree after one session without them.

    Garden tools hanging on garage wall

    Buy durable over cheap. A steel-headed spade with a solid ash handle outlasts three flimsy discount versions. When a tool breaks mid-task, the job doesn’t get finished.

    Organizing your garden space

    Think of your garden in zones, not as one big area you deal with all at once. A typical backyard divides naturally: lawn, beds, borders, containers, and any utility areas like compost or tool storage. Each zone has its own rhythm and needs. Mapping this out before peak season means you’re never standing in the yard trying to decide what to tackle first.

    Soil testing: the step most homeowners skip

    Most vegetables and ornamentals thrive in soil with a pH between 6.0 and 7.0, with 6.5 being the sweet spot. If your soil pH is off, plants can’t absorb nutrients properly, no matter how much fertilizer you apply. Professional lab soil tests cost between $15 and $100 and are worth every cent for long-term results. Test your soil every 2 to 3 years, especially before establishing new beds.

    Pro Tip: Take soil samples from at least three different spots in each bed, then mix them together before sending the sample. This gives you an accurate average reading rather than a misleading result from one spot.

    Seasonal garden tasks: your year-round schedule

    Getting your timing right is what separates a garden that thrives from one that just survives. Seasonal garden tasks aren’t suggestions. Miss a window and you’ll spend the next season compensating.

    Year-round garden maintenance steps infographic

    Spring: the setup season

    Spring is when the whole year gets decided. Start with a thorough yard walkthrough to assess winter damage. Pruning in late winter, specifically February and March before new growth pushes out, is critical for most shrubs and roses. Miss this window and you get chaotic, unstructured growth instead of the strong flowering framework you want.

    Here’s what to prioritize in spring:

    1. Prune dormant shrubs and roses before new buds break
    2. Edge all beds and borders to define growing zones clearly
    3. Turn and refresh compost piles built over fall and winter
    4. Apply a balanced slow-release fertilizer to borders and lawn areas
    5. Divide overcrowded perennials that finished blooming last year
    6. Set up supports for climbers and tall perennials before they need them

    Summer: the maintenance season

    Summer is about keeping everything going. The workload is lighter on tasks but heavier on monitoring. Watering becomes the main event, and early morning watering is most effective because it reduces evaporation and lowers the risk of fungal disease on leaves and stems.

    Watch for pests, particularly aphids, slugs, and spider mites in dry spells. Deadhead flowering plants regularly to extend blooming. If you’re growing vegetables, harvest frequently because leaving ripe produce on the plant signals it to stop producing.

    Pro Tip: In mid-summer, check whether your mulch layer has thinned below 2 inches. Top it up rather than waiting until fall. A thinning mulch layer means soil moisture drops faster during heat spikes.

    Fall: the investment season

    Fall is underrated by most homeowners. The work you do now pays dividends for the next two seasons. Fall is the optimal time to apply major soil amendments like lime and sulfur, which need 3 to 6 months to fully integrate before spring planting. Plant spring bulbs between September and November, clean up diseased plant material, and cut back perennials after the first hard frost.

    Use your seasonal home prep window in fall to cover perennial roots with a protective mulch layer before freezing temperatures arrive.

    Winter: the planning season

    Winter is for planning, repairing tools, ordering seeds, and reviewing what worked and what didn’t. Sketch out any bed changes you want to make. Check stored bulbs for rot. A garden that gets thought about in winter starts spring six weeks ahead of one that gets ignored until March.

    Watering and soil care: where most gardens go wrong

    Watering is where homeowners cause the most unintentional damage. 85% of homeowners overwater their gardens without realizing it. The fix isn’t a stricter schedule. It’s learning to read your soil.

    How to water correctly

    Push your finger or a wooden dowel into the soil to a depth of 6 inches. If it comes out damp, your plants don’t need water yet. If it’s dry at that depth, water deeply and thoroughly. This method is more accurate than any timer-based system because it accounts for actual conditions: recent rain, temperature spikes, and soil composition.

    For established roses specifically, 5 to 10 liters per plant weekly during dry spells is the target, delivered as one deep watering rather than a daily trickle. Deep, infrequent watering trains roots to grow down where moisture is stable, which makes plants more drought-tolerant over time.

    The case for mulch

    Mulch is one of the most underused tools in home garden care. Applied correctly, it suppresses weeds, retains moisture, moderates soil temperature, and slowly improves soil structure as it breaks down. Mulch should be 3 to 4 inches deep around plants, with a gap of at least 4 to 6 inches between the mulch and any trunk or woody stem. Mulch piled against trunks traps moisture against bark and causes rot over time.

    Good mulching in late spring and again in early fall dramatically reduces the time you spend watering and weeding throughout the season.

    Soil amendments beyond pH

    Beyond pH, your soil may be lacking in organic matter, drainage structure, or key nutrients. Compost remains the best all-around amendment. Adding 2 to 3 inches of compost to beds each fall improves nearly every soil type whether it’s clay, sandy, or somewhere in between. For container plants and high-demand vegetable beds, established plants need feeding only when deficiencies appear or when they’re working harder than in-ground plants. Routine feeding without diagnosis wastes money and can burn roots.

    Common garden maintenance mistakes to avoid

    Even experienced gardeners make these errors. Recognizing them early saves significant time and plant loss.

    • Overwatering. The single most common mistake. Yellow leaves, drooping despite wet soil, and root rot all point to too much water rather than too little.
    • Mistimed pruning. Pruning late-flowering shrubs in spring removes the buds that would have bloomed. Know your plants’ bloom timing before cutting.
    • Late-season fertilizing. Applying nitrogen fertilizer in late summer or fall pushes tender new growth that gets hit hard by first frosts. Timing and plant condition must guide every feeding decision.
    • Ignoring soil pH. Plants can look nutrient-deficient even in well-fertilized soil if the pH prevents absorption. Always test before you amend.
    • Reactive weed control. Pulling weeds after they set seed means you’re fighting the next generation before this one is gone. Weed before flowering, and mulch to prevent germination.

    “Fighting your local climate is the most expensive thing you can do in a garden. Work with it, not against it.” — Professional landscaping principle cited by garden professionals

    Building a realistic garden maintenance routine

    The goal isn’t a perfect garden on a single weekend. It’s a livable routine that fits your schedule and keeps the garden healthy without becoming a second job.

    A 300 to 400 square meter garden requires about 2 to 3 hours of weekly maintenance during peak season when you organize it into focused 30-minute zones. That’s a manageable commitment when it’s structured, and it’s an overwhelming mess when it isn’t.

    Here’s how to set up a workable backyard upkeep guide for yourself:

    • Divide your garden into 4 to 6 zones and rotate through them across the week
    • Set one specific task per zone per session (weeding, deadheading, watering checks) rather than trying to do everything everywhere
    • Keep a simple gardening checklist on your phone or posted in your tool shed for each zone and season
    • Build one longer session, 60 to 90 minutes, into your schedule each month for bigger tasks like soil amendment, deep pruning, or replanting

    Pro Tip: Native plants adapted to your local climate require significantly less water, feeding, and pest control than exotic species. Replacing even a quarter of your non-native plantings with locals cuts maintenance noticeably within two seasons.

    Track what you do and when. A simple notes app entry after each session gives you a history that’s genuinely useful when something goes wrong or when you’re trying to remember what worked last year. Check the home maintenance checklist at Workbenchguide to layer your garden tasks into a broader home upkeep schedule.

    My honest take on garden maintenance

    I’ve watched a lot of homeowners approach their gardens the same way they approach a messy inbox. They ignore it until it’s overwhelming, then spend one intensive weekend trying to fix everything at once, then go back to ignoring it. That cycle doesn’t produce a great garden. It produces an exhausted homeowner and a garden that’s always catching up.

    What I’ve learned is that the single biggest factor in garden success isn’t knowledge of plants. It’s the consistency of small actions. Fifteen minutes of weeding before it becomes an infestation. Checking soil moisture before assuming the plant needs water. Noting what bloomed and when so you remember to prune at the right time next year.

    The seasonal structure in this article isn’t just a schedule. It’s a way of paying attention. Gardens respond to observation more than intervention. When you slow down and actually look at what’s happening in each zone, you stop making reactive mistakes and start making decisions based on real conditions.

    My one piece of advice: get through two full seasons before you judge whether your approach is working. One season isn’t enough data. The garden that looks rough in June might be spectacular by September, and you’ll only know if you stayed consistent.

    — Sean

    How Workbenchguide keeps your garden on track

    Staying consistent with garden care is easier when you have a system behind you. Workbenchguide is built exactly for that. The platform gives homeowners smart maintenance reminders, step-by-step DIY guides, and structured checklists so you always know what needs doing and when. Instead of relying on memory to catch every seasonal window, you get a clear schedule adapted to your property.

    Whether you’re following a detailed gardening checklist or tracking repairs across your whole property, Workbenchguide keeps everything in one place. Start building your home and garden maintenance routine today and stop losing ground to missed tasks.

    FAQ

    What are the most important seasonal garden tasks?

    Pruning in late winter, soil amendments in fall, and consistent watering in summer are the three most impactful. Missing the late winter pruning window leads to chaotic growth rather than healthy, structured plants.

    How often should I test my garden soil?

    Test your soil every 2 to 3 years, or before establishing any new planting beds. Most vegetables and ornamentals need a pH between 6.0 and 7.0 for proper nutrient absorption.

    How deep should mulch be around plants?

    Apply mulch 3 to 4 inches deep around plants, keeping it 4 to 6 inches away from any trunks or woody stems. Mulch piled against bark traps moisture and causes rot over time.

    How do I know when to water my garden?

    Check soil moisture at a depth of 6 inches rather than following a fixed schedule. If the soil is dry at that depth, water deeply. If it’s still moist, wait and check again in 24 hours.

    How much time does garden maintenance actually take?

    A well-organized garden of 300 to 400 square meters takes roughly 2 to 3 hours per week during peak growing season. Breaking the garden into 30-minute work zones keeps that time manageable and productive.

  • Why Maintain Chimney: Safety and Cost Benefits

    Why Maintain Chimney: Safety and Cost Benefits

    Most homeowners never think about their chimney until something goes wrong. That instinct is expensive. 75% of home heating fires trace back to chimney fires caused by creosote buildup, a combustible residue that forms every time you burn wood. Understanding why maintain chimney is not optional knowledge for a safety-conscious homeowner. It is the foundation of keeping your family safe, your heating system efficient, and your house structurally sound for decades.

    Table of Contents

    Key takeaways

    Point Details
    Fire risk is real Creosote buildup causes the majority of home heating fires and must be cleared annually.
    Carbon monoxide is invisible Blocked chimneys trap CO gas indoors, making ventilation checks life-saving, not optional.
    Moisture destroys masonry Water and acidic soot compounds accelerate structural decay if not addressed each year.
    Clean chimneys save money Proper airflow improves combustion efficiency, reducing fuel waste and heating costs.
    Proactive care beats reactive repairs Annual inspections catch small cracks and blockages before they turn into four-figure repair bills.

    Why maintain chimney: the fire hazard reality

    Creosote is the core threat. Every fire you burn deposits a layer of it on the inside of your flue. It starts as a light, flaky residue. Left unaddressed, it hardens into a thick, tar-like coating that is extremely flammable. Creosote ignition can crack flue tiles and compromise the entire chimney structure before you notice a single warning sign from inside the house.

    Debris compounds the problem. Birds, squirrels, and raccoons treat an uncapped chimney as an ideal nesting site, especially during spring and fall. Leaves, twigs, and nesting material pile up inside the flue, creating a second layer of combustible material directly in the path of rising heat.

    Here is what makes a neglected chimney particularly dangerous:

    • Creosote is self-reinforcing. A thin layer restricts airflow, which lowers burn temperature, which produces more creosote.
    • Fires burn hotter than you expect. A chimney fire can reach temperatures above 2,000 degrees Fahrenheit, far beyond what most flue liners are built to handle.
    • Damage is often invisible. Cracks in the liner are hidden from view, meaning a compromised chimney can look completely normal from the outside.
    • Dormant chimneys are not safe chimneys. If you have not used your fireplace in a season or two, animals may have already moved in.

    Pro Tip: Schedule your chimney cleaning in late summer or early fall, before your first fire of the season. You avoid the rush, and you know the flue is clear before temperatures drop.

    “A clean chimney is not a luxury. It is the single most effective thing a homeowner can do to prevent a house fire caused by their heating system.” — Chimney Safety Institute guidance, echoed by professional sweeps across the country.

    Professional cleaning matters because specialized tools and camera inspections catch hidden damage that no homeowner can spot from a flashlight check. This is not a job where good enough is actually good enough.

    Carbon monoxide and ventilation risks

    Carbon monoxide poisoning is the risk most homeowners underestimate with chimneys. CO is colorless, odorless, and fast-acting. A blocked or damaged chimney does not just create a fire hazard. It can redirect combustion gases back into your living space, with potentially fatal results.

    Annual maintenance is the only reliable way to stop carbon monoxide risks before they develop. Here is how blockages lead to poisoning and what you should watch for:

    • Partial blockages are the most dangerous type. A full blockage often produces visible smoke that alerts you immediately. A partial blockage allows CO to seep through gradually while combustion appears normal.
    • Symptoms of CO exposure include headache, dizziness, nausea, and confusion. These are frequently mistaken for the flu, especially in winter when windows are closed.
    • Nesting material is a common culprit. A bird or squirrel nest can block enough of the flue to disrupt safe venting without shutting airflow entirely.
    • Older masonry chimneys carry extra risk. Flue liner integrity in older homes is often compromised in ways that are invisible without professional inspection, even if the chimney appears clean.

    A chimney safety inspection addresses all of these issues by confirming the flue is clear, the liner is intact, and combustion gases have a clean path out of your home. Pair that with a working carbon monoxide detector on every floor of your home. The detector is your backup. The inspection is your primary defense.

    Structural damage from chimney neglect

    A chimney looks like a permanent fixture. It is actually one of the most vulnerable parts of your home’s exterior because it faces moisture, freeze-thaw cycles, acidic byproducts, and extreme heat simultaneously. Neglect accelerates deterioration faster than most homeowners expect.

    Aging chimney with cracked mortar and moss

    Soot combined with moisture creates acidic compounds that eat through mortar and liner materials year over year. Once mortar begins to fail, water gets inside the masonry. In cold climates, that water freezes and expands, widening cracks and loosening bricks with every winter cycle.

    Maintenance approach Typical outcome at 10 years
    Annual cleaning and inspection Minor touch-ups, full structural integrity maintained
    Every 3 to 5 years Moderate mortar repair, possible liner damage
    No maintenance Major structural repair or full rebuild required

    The cost difference is dramatic. A professional sweep runs between $150 and $300 per visit. A full chimney rebuild can cost $10,000 or more. Routine sweeping and cap installation extend chimney lifespan by decades by removing creosote, managing moisture, and stopping animal obstructions before they cause lasting damage.

    Pro Tip: Ask your chimney sweep to check the chimney cap condition during every visit. A damaged or missing cap is one of the fastest ways to introduce water and animal damage, and replacing a cap costs a fraction of what moisture damage repairs run.

    One more factor homeowners often overlook: homeowner insurance often requires documented chimney maintenance to honor claims related to fires. Skipping maintenance could mean a denied claim at the worst possible moment. Keeping records of your annual inspections protects you on that front as well.

    How chimney cleanliness improves heating efficiency

    You do not just maintain a chimney to prevent disasters. You maintain it because a dirty chimney costs you real money every heating season. Here is how the efficiency loss works in practice.

    1. Soot and creosote restrict airflow. When the flue is partially coated, draft suffers. Weak draft means your fire does not burn as hot or as completely, and more heat escapes through the firebox instead of radiating into the room.
    2. Poor combustion produces more smoke. A clogged chimney reduces draft and leads to smoke infiltration, poor combustion, and wasted fuel. That smoke contains particulates that lower indoor air quality and deposit more creosote, compounding the problem.
    3. Wood burns less completely. An inefficient fire requires more wood to generate the same warmth, which increases your fuel costs and the frequency of restocking.
    4. Your heating system works harder. If your fireplace or wood stove is supplementing your central heat, reduced efficiency means your HVAC system picks up the slack. That drives up energy bills beyond just the firewood cost. A well-maintained chimney works in coordination with your annual HVAC service to keep your whole heating system running at its best.
    5. Spring maintenance removes acidic deposits before summer humidity cycles allow them to accelerate masonry decay. Cleaning after winter use preserves efficiency for the next heating season while protecting the structure during the off-months.

    The efficiency case for regular chimney care is straightforward. A clean, well-drafted chimney burns wood better, produces less smoke, and costs you less to operate over the course of a heating season.

    My take on chimney maintenance

    Infographic compares chimney safety and cost benefits

    I have talked with hundreds of homeowners about home maintenance priorities, and chimneys come up in a predictable pattern. People either ignore them completely or assume that because their fireplace “works fine,” nothing needs attention.

    What I have learned is that the chimney problems that hurt homeowners most are the ones they never saw coming. A couple burns three cords of wood every winter for six years without a single cleaning. The chimney looks fine. The fire draws well. Then one night a chimney fire starts inside the walls, and the damage is severe enough to require a full liner replacement and partial masonry repair. The total bill runs close to $8,000. Six annual sweeps at $200 each would have cost them $1,200.

    The pattern I have seen repeat itself is that proactive annual care is genuinely the best insurance you can buy for a fireplace system. It is not about being overly cautious. It is about recognizing that your chimney is working hard under conditions that are genuinely hard on materials. Heat, cold, water, acid, and combustion gases are attacking it every season.

    My honest opinion: treat chimney maintenance the way you treat your smoke detector batteries. Not optional, not seasonal, and not something you remember only when something smells wrong. Set a calendar reminder, book it annually, and keep the receipt. You will sleep better, and your house will thank you.

    — Sean

    Keep your chimney safe with Workbenchguide

    Knowing why you should maintain your chimney is the first step. Actually doing it consistently, year after year, is where most homeowners struggle. That is exactly what Workbenchguide is built to solve.

    The Workbenchguide platform gives you maintenance reminders, step-by-step task guides, and project checklists so chimney care never slips through the cracks. You can track your inspection history, follow seasonal maintenance schedules, and access DIY guidance for routine checks between professional visits. When a job calls for a contractor, the platform helps you find and manage that too.

    Start with the home maintenance checklist to build a full-year schedule that includes chimney sweeping, cap inspection, and seasonal fire safety checks. Every task in one place means nothing gets missed and no costly surprises catch you off guard.

    FAQ

    What happens if you never clean your chimney?

    Creosote builds up and becomes a serious fire hazard, and blockages can redirect carbon monoxide into your home. Over time, moisture and acidic deposits also break down the masonry, leading to structural damage that is expensive to repair.

    How often should a chimney be inspected?

    Most fire safety organizations recommend a chimney safety inspection at least once per year, ideally before the start of each heating season. Homes with heavy fireplace use may benefit from more frequent cleaning.

    Is chimney maintenance necessary if you rarely use the fireplace?

    Yes. Dormant chimneys face unique risks including animal nesting and accelerated moisture damage, even without regular fires. An annual inspection catches these issues before they become costly problems.

    Can a dirty chimney affect your heating bills?

    A restricted flue reduces combustion efficiency and draft, which means more wood burned for less heat. The indirect effect on your HVAC system adds to the cost as well, since your furnace works harder when supplemental heating underperforms.

    Does homeowner insurance cover chimney fires?

    Coverage depends on your policy, but documented maintenance records are often required for claims related to chimney fires to be honored. Skipping inspections can give your insurer grounds to deny a claim.

  • What Is HVAC Efficiency? A Homeowner’s Guide

    What Is HVAC Efficiency? A Homeowner’s Guide

    Most homeowners assume that understanding what is HVAC efficiency means memorizing a few numbers on a spec sheet. In reality, that rating on the label tells you less than half the story. Your actual energy bills and home comfort depend on a whole system working together, not just the appliance’s advertised score. This guide breaks down what the ratings actually mean, why real-world performance often falls short of those numbers, and what you can do right now to close that gap without necessarily buying new equipment.

    Table of Contents

    Key takeaways

    Point Details
    Ratings are just a starting point SEER, HSPF, and AFUE scores reflect lab conditions, not the real performance of your installed system.
    System factors matter as much as equipment Dirty filters, leaky ducts, and poor insulation can cancel out gains from a high-efficiency unit.
    Maintenance beats replacement for most homes Regular upkeep can restore 15 to 25% of lost efficiency before you spend a dollar on new equipment.
    Upgrade payback depends on your climate Moving from 16 to 20+ SEER2 costs thousands more upfront with a 10 to 15 year payback period.
    Easy wins exist right now Smart thermostats and duct sealing are low-cost improvements that deliver measurable savings quickly.

    What is HVAC efficiency and how is it measured?

    HVAC system efficiency is a measure of how much useful heating or cooling your system produces for every unit of energy it consumes. The higher the ratio, the less electricity or fuel your system burns to reach your target temperature. SEER, EER, and HSPF are the primary metrics for cooling and heat pump systems, while AFUE handles gas and oil furnaces.

    Here is what each rating actually tells you:

    • SEER2 (Seasonal Energy Efficiency Ratio 2): Measures how efficiently a central air conditioner or heat pump cools your home over an entire season. Think of it like miles per gallon averaged across a year of driving, not just on the highway.
    • EER (Energy Efficiency Ratio): Measures cooling efficiency at a single, fixed outdoor temperature (typically 95°F). It reflects peak-day performance rather than seasonal averages.
    • HSPF2 (Heating Seasonal Performance Factor 2): Applies to heat pumps in heating mode. HSPF2 measures BTU output divided by watt-hours consumed over a season, with higher numbers meaning less electricity used per unit of heat delivered.
    • AFUE (Annual Fuel Utilization Efficiency): Expressed as a percentage, this tells you how much of your furnace’s fuel becomes actual heat. An 80% AFUE furnace loses 20 cents of every energy dollar up the flue.
    Rating System type What it measures Minimum standard ENERGY STAR threshold
    SEER2 Central AC / heat pump Seasonal cooling efficiency 13.4 (north), 14.3 (south) ≥ 15.2
    EER Room AC / central AC Peak cooling efficiency Varies by unit size Varies
    HSPF2 Heat pump Seasonal heating efficiency ≥ 7.5 ≥ 7.8 (split systems)
    AFUE Gas / oil furnace Annual fuel conversion rate 80% (most regions) ≥ 95%

    SEER2 minimum standards vary by region and were updated for 2023 and again for 2026, so older equipment installed even a few years ago may already fall below current baselines. If you are shopping for new equipment, ENERGY STAR certification is the clearest signal that a unit clears the bar.

    Infographic comparing cooling and heating efficiency ratings

    What actually affects your system’s real-world performance

    This is where most homeowners get surprised. You can install a top-rated, high-SEER unit and still see disappointing energy bills if the rest of your system has problems. System performance depends on the weakest component. A high-efficiency heat pump paired with leaky ducts performs no better than a mid-grade system running through airtight ones.

    Here are the most common efficiency killers hiding in plain sight:

    • Dirty filters: A clogged filter forces your blower to work harder, increases energy consumption, and reduces airflow to your living spaces. Filters should typically be replaced every one to three months depending on the type and your household.
    • Leaky ductwork: Gaps, loose connections, and unsealed joints in your duct system can bleed up to 30% of conditioned air into your attic or crawlspace before it reaches a single room. That is conditioned air you paid for heating or cooling empty space.
    • Poor attic or wall insulation: Even a perfectly tuned system fights a losing battle against a poorly insulated envelope. Heat moves through walls and ceilings constantly, forcing your system to run longer cycles.
    • Outdated or manual thermostats: A traditional thermostat set once and forgotten wastes energy during empty hours and overnight without any intelligence to adjust.
    • Oversized equipment: Contractors often oversize systems by 50% to 100% to avoid callbacks. The result is short-cycling, where the unit turns on, quickly hits the thermostat setpoint, shuts off, and repeats. Short-cycling wastes energy, causes humidity problems, and shortens equipment life.

    Pro Tip: Never seal duct leaks with standard cloth “duct tape” from the hardware store. It fails within a year under heat and vibration. Use mastic sealant or UL-listed foil tape for joints that stay airtight for decades.

    Duct sealing deserves special attention because it is consistently underestimated. Proper sealing can prevent up to 30% of conditioned air loss, which is a larger efficiency gain than jumping one or two SEER ratings on a new unit.

    Homeowner checking HVAC ductwork in attic

    How to improve HVAC efficiency without replacing the system

    The good news is that most homes have substantial efficiency gains available before anyone needs to talk about replacement. Fixing fundamental issues like dirty filters and duct leaks provides faster and more economical efficiency gains than buying new equipment. Here is a practical sequence to follow:

    1. Change the air filter. Start with the most overlooked task. A fresh filter immediately restores airflow and reduces strain on the blower motor. Set a recurring reminder in your phone or on a home maintenance platform.
    2. Schedule a professional coil cleaning. Dirty evaporator and condenser coils reduce heat transfer efficiency significantly. Regular maintenance restores 15 to 25% of lost efficiency in neglected systems.

    3. Seal duct leaks. Walk your attic or basement and look for disconnected flex duct, gaps at registers, and loose connections at the air handler. Apply mastic sealant at joints and use UL-listed foil tape for seams.
    4. Install a smart thermostat. Devices with adaptive scheduling and occupancy sensing cut HVAC energy use by 10 to 20% by eliminating heating and cooling during hours when nobody is home. Most pay for themselves within a year.
    5. Check refrigerant levels. Low refrigerant does not just affect cooling output. It forces the compressor to work overtime and can lead to compressor failure. This step requires a licensed technician.
    6. Add attic insulation if it is below current standards. The Department of Energy recommends R-38 to R-60 for most attic floors in the U.S. Topping up insulation is one of the highest-return investments in home energy efficiency.
    7. Consider HVAC zoning if you have unused rooms. Directing conditioned air only where it is needed reduces runtime and energy consumption. Read more about how zoning boosts efficiency before deciding if it fits your home.

    Pro Tip: Before calling for refrigerant service, check that all registers are open and that furniture or rugs are not blocking return air vents. Restricted airflow mimics low refrigerant symptoms and wastes a service call.

    When upgrading to high-efficiency equipment actually makes sense

    At some point, maintenance and repairs hit diminishing returns. Understanding where that threshold sits will save you from both premature replacement and throwing money at a failing system.

    The clearest financial decision tool is the $5,000 rule. Multiply your system’s age by the repair cost. If the result exceeds $5,000, replacement is typically the smarter investment. A 12-year-old system needing a $500 repair scores 6,000, which suggests it is time to start planning for replacement rather than continuing to patch it.

    When you do reach that point, efficiency upgrade math deserves careful attention. Moving from 14.3 to 16 SEER2 saves roughly 10% on cooling costs annually. That is real money and the payback period is usually reasonable. Jumping from 16 to 20+ SEER2 can save another 20%, but the upfront premium runs $2,000 to $4,000 more with a payback stretching 10 to 15 years.

    Upgrade scenario Estimated annual savings Additional upfront cost Approximate payback
    13 to 14.3 SEER2 (code minimum) Baseline Baseline N/A
    14.3 to 16 SEER2 ~10% cooling cost reduction $500 to $1,000 3 to 6 years
    16 to 18 SEER2 ~12% additional savings $1,000 to $2,000 6 to 10 years
    18 to 20+ SEER2 ~8% additional savings $2,000 to $4,000 10 to 15 years

    Climate matters significantly here. If you live in Phoenix and run the AC nine months a year, a higher SEER2 unit pays back faster than the same unit in Minneapolis. Your annual HVAC service records can also reveal how much efficiency your current system has already lost, which sharpens the repair vs. replace calculation.

    The 2026 ENERGY STAR heat pump updates raised the bar for certification, and federal tax credits under the Inflation Reduction Act still apply to qualifying high-efficiency heat pumps. These incentives can shift the payback calculation meaningfully, so check eligibility before purchasing.

    My honest take on where homeowners go wrong

    I have talked with dozens of homeowners who bought 20+ SEER2 systems and then called wondering why their bills barely budged. Every single time, the culprit was the same: they upgraded the equipment without touching the ductwork, insulation, or controls. They paid premium prices for efficiency that the rest of their system was physically incapable of delivering.

    The rating on the box describes potential, not guarantee. In my experience, a 16 SEER2 unit in a tight, well-insulated, properly ducted home outperforms a 20 SEER2 unit in a leaky one every time. The obsession with chasing the highest efficiency number is understandable, but it skips the most important question: is your home ready to take advantage of it?

    What I have found actually works is a sequenced approach. Fix the envelope first. Seal the ducts. Add insulation. Then address controls with a smart thermostat. Only after that should you seriously consider upgrading the mechanical equipment. This order is not just logical. It saves real money because each upstream fix reduces the size and cost of the equipment you end up needing.

    The other overlooked area is maintenance frequency. Most homeowners change filters once a year, if that. I would argue that filter changes every 60 days, combined with one professional tune-up annually, deliver more consistent comfort and savings than a rating bump from 16 to 18 SEER2 ever will.

    — Sean

    Get more from your HVAC system with Workbenchguide

    Understanding efficiency ratings is a great start. Putting that knowledge into a consistent maintenance routine is where the real savings show up on your bills. Workbenchguide is built exactly for that. The platform gives you step-by-step HVAC maintenance guides, seasonal checklists, and smart reminders so nothing gets skipped between tune-ups.

    Whether you want a full year-round maintenance checklist or guidance on when to call a contractor instead of going DIY, Workbenchguide keeps it organized and simple. You can track tasks, set reminders, and know exactly what to do next. The homeowners who see the biggest efficiency gains are not always the ones with the newest equipment. They are the ones who actually stay on top of upkeep. Start building that habit at workbenchguide.com.

    FAQ

    What does SEER2 mean for my energy bill?

    SEER2 measures how efficiently your cooling system runs across an entire season. A higher SEER2 number means lower electricity consumption for the same amount of cooling, which translates directly to lower monthly bills.

    How do I know if my HVAC system is running efficiently?

    Signs of an efficient system include consistent temperatures across rooms, humidity levels between 30 and 50%, steady energy bills month over month, and cycles that run for 10 to 15 minutes rather than turning on and off every few minutes.

    What is the quickest way to improve HVAC efficiency?

    Replacing a dirty air filter and sealing visible duct leaks with mastic or UL-listed foil tape are two of the fastest improvements, often restoring measurable efficiency without any professional service call.

    When should I replace my HVAC system instead of repairing it?

    Use the $5,000 rule: multiply the system’s age in years by the cost of the current repair. If the result exceeds $5,000, replacement typically delivers better long-term value than continued repairs.

    Does a higher SEER rating always mean better savings?

    Not necessarily. A high-SEER unit in a home with leaky ducts or poor insulation will underperform its rating. Fixing the supporting system first, including sealing ducts and improving insulation, is what allows a high-efficiency unit to actually deliver its rated performance.