

The fastest fix for a drafty window depends on where the air is getting in. Stationary gaps between the frame and wall take caulk. Moving sashes need weatherstripping. Large voids behind trim call for backer rod plus low-expansion foam. And if you just need to get through one cold winter without a full repair, shrink film or rope caulk buys you time. Department of Energy](https://www.energy.gov/energysaver/air-sealing-your-home). Caulk handles stationary joints under ¼ inch and weatherstripping handles anything that moves — that one rule covers most window leaks in most homes.
Quick decision guide:
- Stationary frame gaps (under ¼ inch): caulk (silicone, polyurethane, or acrylic-latex)
- Moving sashes or operable windows: weatherstripping (V-strip, foam tape, or bulb/kerf)
- Large voids behind trim or rough opening: backer rod + caulk, or low-expansion window foam
- Temporary or seasonal fix: shrink-film kit or rope caulk
- One caution: never seal weep holes at the window sill, and never use standard high-expansion construction foam on an installed window frame — it can bow the frame inward and bind the sash
Key Takeaways
Proper window sealing starts with diagnosing the leak type — frame, sash, or glazing — and matching the right material to each problem before buying anything.
| Point | Details |
|---|---|
| Diagnose before you buy | Identify whether the leak is at the frame, sash, or glass — each requires a different fix. |
| Match material to joint | Use caulk for stationary gaps under ¼ inch; weatherstripping for moving sashes; low-expansion foam for large voids behind trim. |
| Up to 10% energy savings | ENERGY STAR data shows air sealing and insulation can cut annual energy bills by up to 10%. |
| Never seal weep holes | Keep drainage slots at the exterior sill open — blocking them traps water inside the frame. |
| Workbenchguide tracks it all | Use Workbenchguide’s checklists, photo logs, and seasonal reminders to schedule and document every window sealing project. |
Table of Contents
- How do you find where air is leaking from your windows?
- Is the leak at the frame, the sash, or the glass itself?
- What materials do you actually need to seal a window?
- How to caulk a window: step-by-step
- Weatherstripping options for operable windows
- How to seal large gaps and the rough opening behind trim
- Fast temporary fixes for immediate draft reduction
- When should you repair, replace, or call a pro?
- Why the evidence on window sealing is stronger than most homeowners realize
- The part most DIY guides skip
- Workbenchguide keeps your window projects on track
- Sources
How do you find where air is leaking from your windows?
You can’t seal what you can’t find. The good news: most window leaks announce themselves with a few simple tests that cost nothing.
The paper test is the quickest. Slide a sheet of paper between the closed sash and the frame. If it pulls out easily, the seal is weak there. Do this at the top, bottom, and both sides of the sash.
The candle or incense test works well on calm days. Hold a lit stick of incense or a candle near the window perimeter — corners, meeting rails, and the junction between frame and wall. Smoke that wavers or pulls toward the window indicates airflow. Keep it away from curtains.

Thermal camera or IR accessory is the most reliable option for a whole-house sweep. Phone-mounted IR accessories (like the FLIR ONE) cost under $200 and show cold spots in real time. On a cold day, blue patches around window edges are air infiltration, not just cold glass.
Visual inspection catches the obvious stuff: daylight visible around the frame, paint that’s cracked along the sill, or gaps where caulk has shrunk away from the trim.
Water infiltration check: during a light rain or with a garden hose on a low setting, watch the interior sill and jamb for any moisture. Water and air often share the same path.
Tools to have on hand:
- Incense sticks or a candle
- A sheet of paper or tissue
- Tape measure and screwdriver
- Putty knife (for probing old caulk)
- Phone-mounted IR camera or handheld thermal imager
- Flashlight
Pro Tip: Run the paper test on a windy day with the heat or AC on — the pressure differential makes weak spots much easier to detect.
For a full inspection checklist, the window maintenance tips guide on Workbenchguide walks through every component worth checking before you buy a single tube of caulk.
Is the leak at the frame, the sash, or the glass itself?
Getting this right saves you a wasted trip to the hardware store. The fix for a leaky frame joint is completely different from the fix for a worn sash seal — and neither one addresses a failed insulated glass unit.
Frame and jamb leaks show up as drafts near stationary parts of the window: the corners where the frame meets the wall, the junction between the sill and the interior trim, or the gap between the window unit and the rough opening behind the drywall. The paper test will catch these. The fix is caulk or, for larger gaps, backer rod plus caulk.
Sash and hardware leaks feel like drafts when the window is closed but the sash itself is the source. Paper slides easily between the sash and the stop. The window may rattle in wind. The fix is weatherstripping — or, if the sash is warped or the hardware is worn, a hardware adjustment before adding any new material.
Glazing and insulated unit failures look different: condensation or fogging between the panes (not on the surface), cold radiating through the glass even when the frame is tight, or a visible crack in the glass. These are not sealing problems. A fogged insulated glass unit (IGU) has a failed seal inside the unit itself. Replacing the IGU or the full window is the only real fix — misted double-glazed units require professional glass replacement, not caulk.
Diagnostic shortcut:
- Draft near stationary trim or wall → caulk or foam
- Draft when sash is closed, paper test fails → weatherstripping or hardware adjustment
- Fogging between panes, cold glass, visible crack → IGU replacement or new window
- Difficulty latching or sash sticks → hardware repair first, then weatherstrip
What materials do you actually need to seal a window?
Picking the wrong product is the most common mistake in DIY window sealing. Here’s what each material does and where it belongs.
Caulks and sealants
- Silicone caulk: long lifespan (20+ years), excellent adhesion on glass and metal, fully waterproof. Not paintable. Best for exterior glass-to-frame joints.
- Polyurethane caulk: bonds to almost anything, handles movement well, resists weathering. Paintable after cure. Slightly harder to tool than silicone. Good for exterior wood and masonry joints.
- Acrylic-latex caulk: easy to apply and clean up, paintable within hours, but shorter lifespan outdoors (5–10 years). Best for interior joints or painted trim.
- Butyl rubber caulk: excellent for metal-to-metal or metal-to-masonry joints, very sticky, messy to work with. Used on flashing and exterior metal frames.
Per the DOE’s caulking guidance, caulk is designed for cracks and joints under ¼ inch. Anything wider needs backer rod first.
Gap fillers and backing
- Backer rod: closed-cell foam rope that fills a gap before caulk goes over it. Choose a diameter slightly larger than the gap so it compresses into place. This gives the caulk the right depth-to-width ratio and prevents it from cracking.
- Low-expansion window and door foam: for gaps too large for caulk alone but where backer rod won’t fit. Use only low- or no-expansion formulas around installed window frames — standard construction foam expands with enough force to bow a frame inward.
Weatherstripping
- V-strip (tension seal): thin folded metal or plastic that springs open to fill the gap between sash and stop. Durable, nearly invisible, and excellent for double-hung windows.
- Adhesive foam tape: the easiest install, but compresses over time and typically lasts one to three seasons. Good for low-traffic windows or temporary use.
- Bulb/kerf weatherstripping: a rubber or vinyl bulb that presses into a routed groove (kerf) in the sash or stop. Long-lasting and effective, but requires a kerf to already exist or a router to cut one.
- Spring metal strips: similar function to V-strip, slightly more durable, nailed in place.
Temporary and seasonal options
- Rope caulk: a soft, putty-like cord pressed into gaps by hand. Peels off in spring with no damage. Perfect for winterizing windows you don’t open.
- Shrink-film window insulation kits: double-sided tape holds a plastic film over the interior window opening; a hair dryer shrinks it tight. ENERGY STAR recommends these for older or single-pane windows as a seasonal measure.
Tools checklist:
- Caulk gun (ratchet-style dripless preferred)
- Utility knife and putty knife
- Denatured alcohol or mineral spirits (surface cleaning)
- Painter’s tape
- Measuring tape and scissors
- Gloves and safety glasses
- Ladder for exterior work
Pro Tip: Buy about 10% more weatherstripping than your measurements suggest — the DOE recommends this buffer to account for corners, waste, and cutting errors.
How to caulk a window: step-by-step
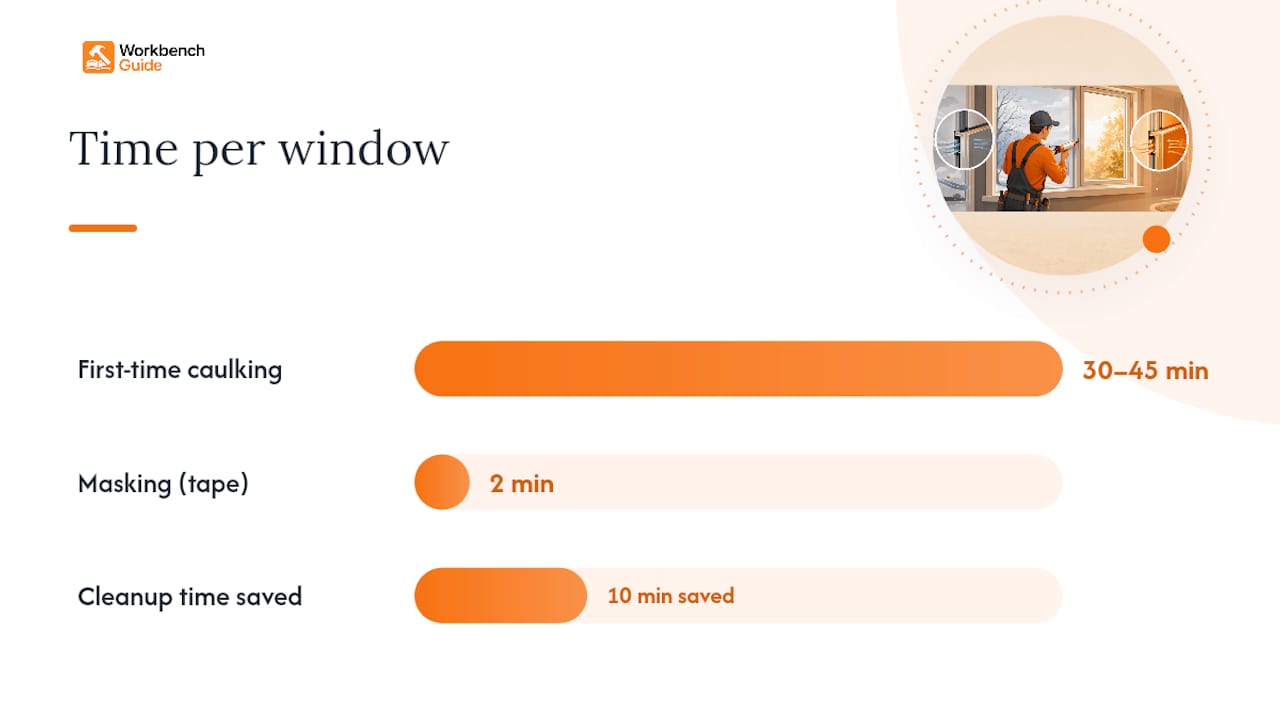
This process works for both interior and exterior joints. Budget about 30–45 minutes per window the first time.
- Identify the correct joints. Caulk where the window frame meets the wall or trim, and where the sill meets the frame. Never caulk weep holes — those small slots at the bottom of the exterior frame drain water and must stay open.
- Remove old caulk. Use a putty knife or utility knife to cut and peel away any existing caulk. Flexible silicone often peels off in strips. Brittle old caulk may need a caulk remover solvent.
- Clean the surface. Wipe the joint with denatured alcohol and let it dry completely. Any dust, oil, or moisture will prevent adhesion.
- Mask with painter’s tape. Run tape along both sides of the joint for a clean line. This step takes two minutes and saves ten minutes of cleanup.
- Cut the nozzle at 45°. Cut closer to the tip for a smaller bead. Puncture the inner foil seal with a nail or the gun’s built-in poker.
- Apply in one steady pass. Hold the gun at a 45° angle to the joint, press the trigger steadily, and pull the gun along the joint in one continuous motion. Consistent speed = consistent bead.
- Tool the bead immediately. Wet your finger or a caulk tool and smooth the bead into the joint in one pass. This forces caulk into the gap and creates a concave profile that sheds water.
- Remove the tape while the caulk is still wet. Pull it at a 45° angle away from the joint. If you wait until it cures, the tape pulls the caulk with it.
- Allow to cure before painting or exposing to rain. Acrylic-latex caulk can be painted in as little as one hour but takes 24 hours to fully cure. Silicone needs 24–48 hours. Apply only when temperatures are above 45°F (7°C) and humidity is low — cold or wet conditions prevent proper adhesion and cure.
Common mistakes to avoid:
- Caulking over loose or peeling paint (the paint fails, and the caulk goes with it — scrape and prime first)
- Using silicone where you need to paint (it won’t hold paint)
- Applying too thick a bead (it skins over but stays soft underneath)
- Skipping the cleaning step (the most common reason caulk fails early)
Pro Tip: A ratchet-style dripless caulk gun gives you far more control than a standard squeeze gun — the rod releases pressure when you stop squeezing, so you don’t get caulk drooling out between strokes.
Weatherstripping options for operable windows
Weatherstripping works on the parts that move. The right type depends on your window style and how much wear the strip will take.
V-strip (tension seal)
Best for double-hung windows. Cut the strip to length and slide or nail it into the channel between the sash and the window stop, with the open side of the “V” facing the gap. It springs open to fill the space as the sash closes. Lasts five to ten years with normal use and doesn’t noticeably affect how the window operates.
Adhesive foam tape
Peel-and-stick foam compresses against the sash when the window closes. Install it on the stop or the sash face — clean the surface with alcohol first, or the adhesive won’t hold. Expect one to three seasons before it compresses flat and needs replacing. Good for casement windows with a flat, even closing surface.
Bulb or kerf weatherstripping
A rubber or vinyl bulb that snaps into a groove routed into the sash or stop. If your window already has a kerf, this is the most durable option. If it doesn’t, you’ll need a router — at that point, a hardware store or window shop can often cut the kerf for a small fee.
Spring metal strips
Similar to V-strip but nailed in place. Slightly more durable for high-traffic windows. Requires a hammer and finishing nails, and the strip must be set flush so the sash doesn’t bind.
Installation notes for all types:
- Clean and dry the surface before installing anything adhesive
- Measure the full perimeter and add 10% before cutting
- Test the sash operation after installation — it should close firmly but not require force
- If the sash sticks or binds after adding weatherstripping, the strip is too thick for the gap; switch to a thinner profile
When weatherstripping isn’t the answer: if the sash is warped, the frame is out of square, or the hardware is worn, adding more material won’t fix the underlying problem. Adjust or replace the hardware first, then reassess whether weatherstripping is still needed.
How to seal large gaps and the rough opening behind trim
The gap between the window unit and the rough framing behind the drywall is often the biggest air leak in the whole assembly — and most homeowners never look there.
- Remove the interior trim carefully. Score the paint line with a utility knife first, then use a putty knife and a pry bar to work the casing off without splitting it. Set the nails aside so you can reuse the trim.
- Inspect the gap. You’ll typically find a space ranging from ¼ inch to over an inch between the window jamb and the rough framing. Look for old fiberglass insulation stuffed in there — it blocks heat conduction but does not stop airflow.
- Choose your fill material. For gaps under ½ inch, backer rod plus caulk works well. For gaps from ½ inch to about 3 inches, low-expansion window and door foam is the right call. Per Building America guidance, seal toward the interior edge of the frame to protect drainage paths on the exterior side.
- Apply backer rod for uniform gaps. Press the rod into the gap so it sits about ¼ inch below the surface, then run a bead of caulk over it. The rod gives the caulk a backing to bond to and prevents it from sinking into a deep void.
- Apply low-expansion foam for larger voids. Shake the can, insert the straw, and apply in short bursts. Fill the gap about halfway — the foam will expand to fill the rest. Do not pack it solid on the first pass.
Pro Tip: Test any expanding foam on a scrap piece of wood first and let it fully cure before trimming. This tells you exactly how much it expands so you don’t overfill the gap and bow the jamb.
- Reinstall the trim. Once the foam or caulk has cured, nail the casing back in place, fill the nail holes with spackling compound, sand smooth, and paint.
- Test the sash. Open and close the window to confirm the frame hasn’t shifted. If the sash binds, the foam expanded too much — score it with a utility knife and trim back.
Fast temporary fixes for immediate draft reduction
Sometimes the heat is already on and you need results tonight. These options don’t require prep work or curing time.
- Shrink-film window insulation kits: apply double-sided tape around the interior frame, press the film over it, and use a hair dryer to shrink it taut. Creates a dead-air layer that noticeably reduces cold radiation from the glass. Lasts one season; removes cleanly in spring. ENERGY STAR recommends these specifically for older single-pane windows.
- Rope caulk: a soft, putty-like strip you press into gaps by hand. No tools, no mess, no damage to the window. Peel it off when the weather warms. Best for windows you won’t be opening all winter.
- Draft snakes: fabric tubes filled with sand or rice, placed along the interior sill. They block floor-level cold air from pooling near the window. Not a seal, but effective for comfort on very cold nights.
- Removable foam strips: similar to adhesive foam tape but designed to be peeled off without residue. Good for a single season on a window where you don’t want a permanent fix yet.
- Styrofoam inserts: cut-to-fit rigid foam panels placed inside the window opening for non-critical windows (a basement utility window, for example). Effective insulation but blocks light and ventilation entirely.
Every one of these is a bridge, not a repair. If the same window needs a temporary fix two winters in a row, that’s a signal to schedule the permanent fix before the third. For a full winterizing your home plan that covers windows and more, Workbenchguide has a step-by-step guide.
When should you repair, replace, or call a pro?
Most window sealing jobs are straightforward DIY work. A few situations aren’t.
Inspect annually. Check caulk and weatherstripping before each heating and cooling season — early fall and late spring are the natural checkpoints. Caulk that has cracked, shrunk away from the joint, or turned chalky needs to be replaced, not patched over.
Signs that sealing won’t fix it:
- Condensation or fogging between the panes (failed IGU seal — requires glass replacement)
- Soft or rotted wood at the sill, jamb, or frame (structural repair before any sealing)
- Frame visibly out of square or window that won’t latch (frame or structural issue)
- Repeated hardware failures on the same window (worn or incompatible hardware)
- Water staining on the interior wall below the window (flashing or sill pan failure, not a caulk problem)
The cost-benefit math: ENERGY STAR data shows that sealing air leaks and adding insulation can cut annual energy bills by up to 10%. For most homes, a full caulking and weatherstripping project costs a modest amount in materials and often pays back within a single heating season. Replacing an IGU costs $150–$400 per unit depending on size and glass type; a full window replacement runs $300–$1,000 or more per window. The ROI on replacement is real but takes longer — typically two to five years depending on energy costs and window performance.
When to hire a pro:
- Structural rot at the sill or jamb
- Water infiltration that persists after sealing (likely a flashing or drainage failure)
- Windows that won’t operate after repeated adjustment attempts
- Whole-house air sealing as part of an energy audit (a blower-door test identifies leaks a candle test misses)
For older timber sash windows specifically, a sash window refurbishment specialist can often restore the original window to better-than-new performance at a fraction of the cost of full replacement.
Why the evidence on window sealing is stronger than most homeowners realize
The energy savings from proper air sealing aren’t theoretical. ENERGY STAR’s air sealing guidance puts the potential savings at up to 10% on annual energy bills from caulking and weatherstripping alone — without touching insulation levels or upgrading equipment.
The This Old House practical air sealing guide reinforces the same workflow that professionals use on older homes: identify the leak, match the material to the joint type, and verify the fix. That sequence matters because skipping the diagnosis step is what leads to homeowners caulking the wrong surface and wondering why the draft is still there.
A practical workflow you can repeat every season:
- Inspect: run the paper test and visual check on every operable window
- Document: photograph gaps, failed caulk, and any moisture staining before you start
- Prioritize: fix the worst leaks first — large gaps at the rough opening beat hairline cracks at the trim
- Seal: match the material to the joint type using the decision guide at the top of this article
- Verify: re-run the paper test and check for drafts after curing
Workbenchguide’s photo documentation and reminder tools fit directly into this workflow. You can log the condition of each window with photos, set a reminder to re-check caulk the following fall, and track which windows still need permanent fixes versus which ones are done.
The part most DIY guides skip
Most articles on how to seal windows treat every gap the same. They don’t. The single biggest mistake I see homeowners make is reaching for a can of spray foam before they’ve confirmed what kind of gap they’re dealing with. Standard construction foam — the orange-can stuff — expands with enough force to bow a window frame inward. That turns a $5 draft problem into a $400 frame repair. Low-expansion window and door foam exists for exactly this reason, and it costs the same.
The second thing worth saying plainly: temporary fixes are fine, but they have a way of becoming permanent by default. Rope caulk pressed in during November is still there in April, then October again, then the next November. Meanwhile, the actual gap behind the trim keeps getting worse. Document what you’ve done and set a reminder to do the real fix before the next cold season. That one habit — writing it down and scheduling it — is what separates a well-maintained home from one that’s always one bad winter away from a bigger problem.
Workbenchguide keeps your window projects on track
Sealing windows is one of the highest-return maintenance tasks a homeowner can do, and it’s also one of the easiest to let slip through the cracks year after year. Workbenchguide gives you a structured way to stay on top of it: built-in home maintenance checklists that include window inspection tasks, photo documentation so you can track how a repair holds up over time, and seasonal reminders that prompt you before the heating season starts rather than after the first cold snap. When a job goes beyond DIY, the contractor Q&A feature connects you with expert advice without the guesswork of a cold call. Start your free trial at Workbenchguide and run your first window inspection checklist today.
Sources
- Air sealing windows (Building America Information Sheet)
- Practical Air Sealing Techniques for Windows – This Old House
Leave a Reply