
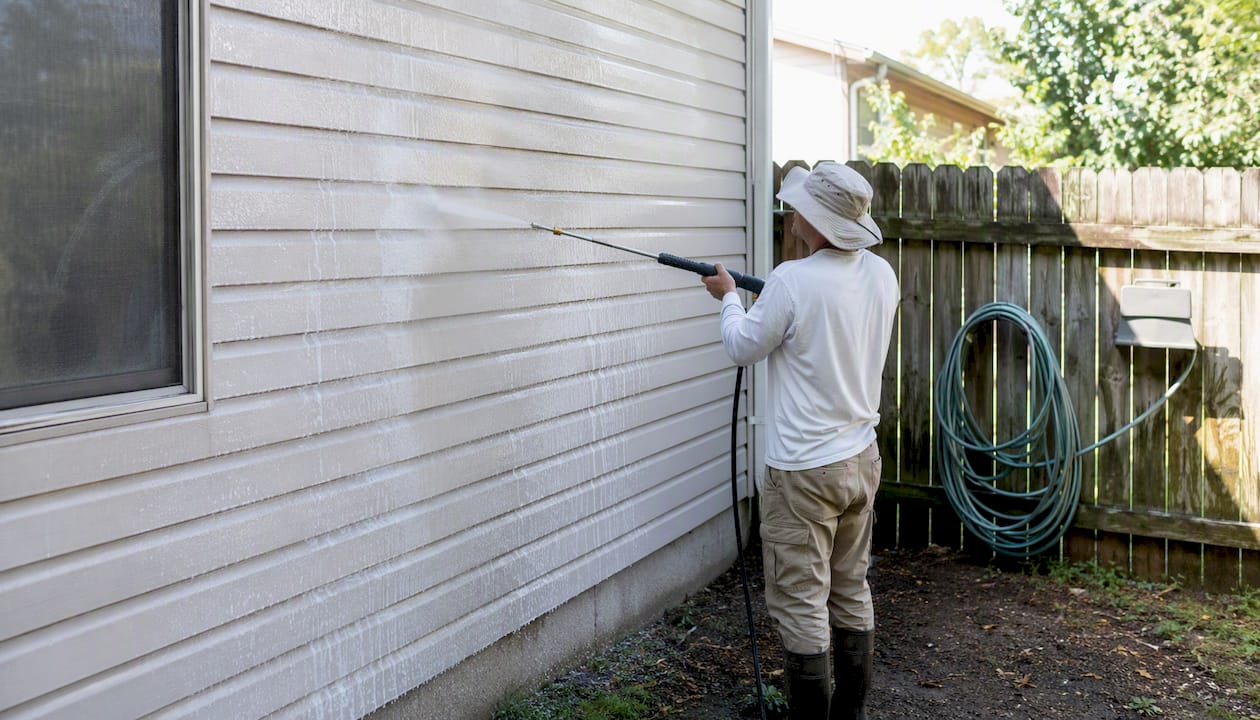
Yes, you can power wash siding, and vinyl handles it well when you use soft-wash technique instead of blasting away at full pressure. That means low PSI, the right nozzle, a downward angle, and detergent that does the actual cleaning work while the water just rinses it away.
Before you pick up the wand, follow these home improvement ideas and appearance upgrades rules:
- Test a small, hidden section first and check your siding manufacturer’s warranty language.
- Keep the wand level or angled slightly downward, never pointed up at panel seams.
- Hold a standoff distance of 12 to 18 inches from the surface.
- Use a wide fan nozzle. Skip anything labeled red or zero-degree.
Pro Tip: Chemistry does the cleaning; pressure just rinses it off. Spray detergent at low pressure, let it sit, then rinse. Don’t try to blast mildew off with brute force.
Key Takeaways
Soft-wash technique, meaning low pressure, correct nozzles, and detergent that does the real cleaning work, is what keeps vinyl and fiber cement siding safe during a power wash.
| Point | Details |
|---|---|
| Chemistry over pressure | Let detergent dwell 5 to 15 minutes before rinsing instead of relying on high PSI. |
| Correct nozzle sequence | Use a black detergent nozzle to apply, then a 25° or 40° nozzle to rinse. |
| Never spray upward | Angling the wand down prevents water from getting trapped behind siding panels. |
| Test and check warranty first | Spot-test a hidden area and confirm your manufacturer’s warranty allows power washing. |
| Track it as a habit | Workbenchguide helps you schedule recurring siding cleaning and log photos for your maintenance record. |
Table of Contents
- How to Power Wash Siding Safely on Different Surfaces
- What to Do Before You Start Power Washing
- What PSI and Nozzle Should You Use for Siding?
- What to Spray on Siding Before Washing
- The Step-by-Step Power Washing Sequence
- Mistakes That Damage Siding (and How to Avoid Them)
- After the Wash: Inspection and How Often to Repeat It
- Safety Gear You Need Before You Start
- Turn This Into a Recurring Habit, Not a One-Time Scramble
- Keep Your Siding Clean Without Doing It All Yourself
- Frequently Asked Questions
- Sources
How to Power Wash Siding Safely on Different Surfaces
Vinyl and fiber cement handle pressure washing well as long as you stick to soft-wash technique. Aluminum siding is another story. It dents easily, so keep pressure low and never let the nozzle get too close. Wood clapboard needs the most caution of all. Test it first, and if the home is older, check for lead paint before you do anything aggressive, since high pressure can chip old paint and send contaminated debris flying.
Skip the pressure washer entirely if you spot any of these:
- Loose, cracked, or warped siding panels
- Brittle vinyl (common in cold weather, when the material stiffens and cracks more easily)
- Shingle-style siding, which traps water between layers
- Failing caulk or gaps around windows and trim
Vinyl and fiber cement are usually fine to pressure wash safely, but never force water upward under the laps. Trapped moisture behind the panels is what breeds mold, not the washing itself.
Walk the exterior first. If you see visible rot, large gaps, or unknown old paint that might contain lead, stop and call a professional instead of guessing.
What to Do Before You Start Power Washing
- Close and tape windows shut, and shut off power to any outdoor outlets near your work area.
- Move or cover outdoor furniture, grills, and anything else that shouldn’t get wet with detergent.
- Pre-wet nearby plants and lawn areas, since cleaning chemicals can scorch foliage on contact.
- Walk the siding and repair anything loose. Fix missing caulk, damaged trim, or open vents before you introduce water pressure into the mix.
- Spot-test your cleaner and pressure setting on a small, inconspicuous section.
- Gather your gear: a ladder safety plan (or an extension wand so you can skip the ladder altogether), a soft-bristle brush for stubborn spots, and a downstream injector or detergent tank if you’re using chemical cleaner.
Pro Tip: If your house has two stories, buy or rent an extension wand instead of climbing a ladder with a running pressure washer. It’s slower, but nobody’s ever been hurt by a slow job.
What PSI and Nozzle Should You Use for Siding?
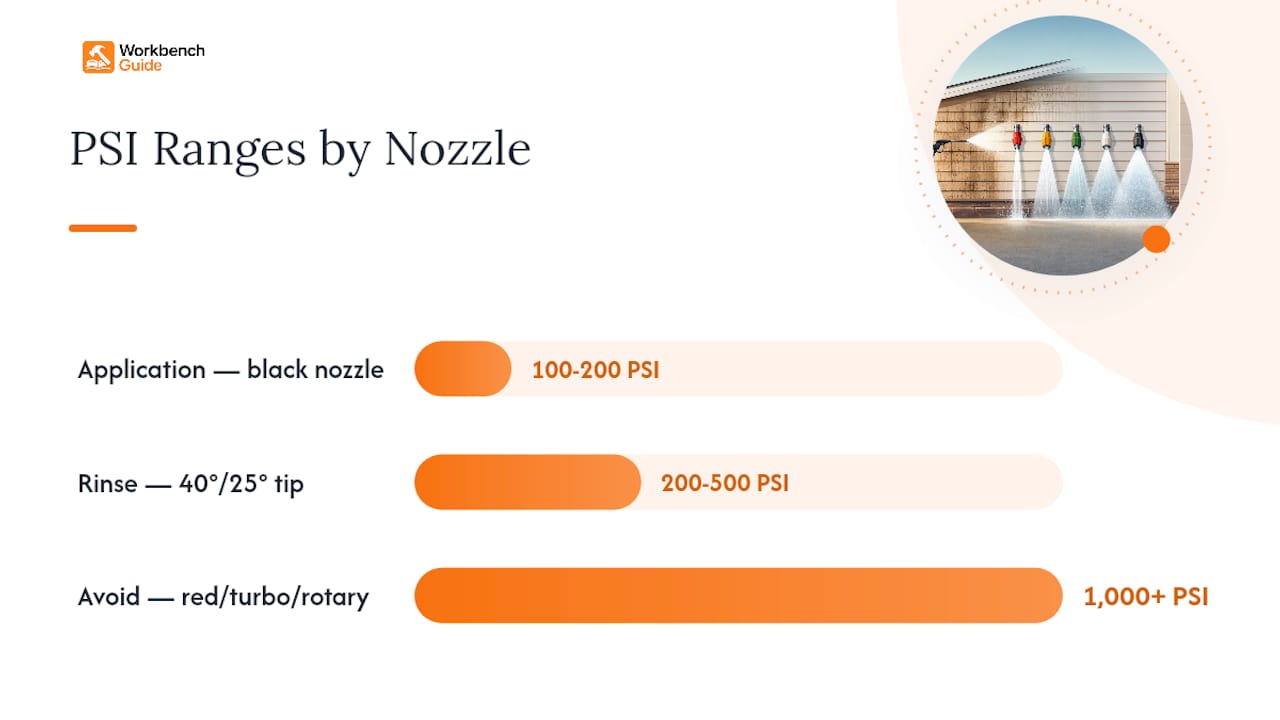
The mindset that matters most here: chemistry cleans, pressure rinses. You don’t need brute force. In fact, brute force is exactly what damages siding. Application pressure should sit around 100 to 200 PSI, or you can skip pressure at application entirely by downstreaming detergent through a low-pressure injector. Rinse pressure runs higher, generally 200 to 500 PSI. Never point 1,000+ PSI at vinyl. That’s a job for concrete, not your house.
Nozzle choice matters as much as pressure. Use a black detergent nozzle to apply your cleaning solution, then switch to a 40 degree white tip or 25 degree green tip to rinse. Avoid red (zero degree) nozzles and any turbo or rotary tip entirely. Those concentrate water into a point strong enough to punch through vinyl seams.
- Application: black nozzle, 100 to 200 PSI, 12 to 18 inches away
- Rinse: white (40°) or green (25°) nozzle, 200 to 500 PSI, 6 to 12 inches away for careful rinsing
- Never use: red (0°), turbo, or rotary nozzles on any siding
Ask This Old House demonstrates the standard approach: black detergent nozzle to apply, a 25° or 40° tip to rinse, wand kept 12 to 18 inches from the siding and angled slightly downward the entire time.
A unit like the DeWalt 3600 PSI, the kind Ask This Old House uses in demonstrations, produces plenty of power for rinsing at a safe distance. The PSI rating on the machine isn’t what you apply directly to the wall. Your nozzle and standoff distance control the actual force hitting the siding.
What to Spray on Siding Before Washing
For general dirt and grime, a peroxide-based cleaner made for siding, like Simple Green Oxy Solve, works well in a detergent tank and rinses clean without leaving residue. Surfactant-based formulas help break the surface tension of dirt and pollen so water actually lifts it away instead of just moving it around.
For light everyday grime, a simple vinegar and water mix (roughly one part white vinegar to four parts water) works fine as a DIY option. For mildew and algae, you need something stronger. Diluted bleach can work, but the dilution matters more than most people realize: industry guidance targets roughly 1 to 2 percent sodium hypochlorite on the actual surface, achieved through a downstreaming setup rather than pouring bleach straight from the jug.
- Never let bleach or strong cleaner sit and dry on siding. It streaks and can discolor the vinyl.
- Pre-wet nearby plants before applying, and rinse them again afterward.
- Always spot-test on a hidden section and check your warranty documentation first.
The Step-by-Step Power Washing Sequence
Once you’re set up, the process itself is straightforward if you follow the sequence in order.
- Pre-rinse the entire section with plain water to knock off loose dirt and debris.
- Apply detergent starting at the bottom of the wall and working up. This sounds backwards, but starting low prevents streaking because the cleaner running down lands on panels that are already wet, not dry ones that would show drip marks.
- Let the detergent dwell for 5 to 15 minutes depending on the product and outdoor temperature. In hot, direct sun, re-mist the surface so the cleaner doesn’t dry out before it finishes working.
- Rinse from the top down using your 25° or 40° nozzle, keeping the wand level or angled slightly downward.
- Move to the next section and repeat.
While you work, check each section as you go:
- Watch for water being driven under seams instead of running off the surface.
- Look for cracked or bowed panels as you rinse.
- Note any spots where caulk is failing or trim looks loose.
Small problems you spot mid-job, like a gap around a window frame, are worth pausing to seal before you keep spraying that area.
Mistakes That Damage Siding (and How to Avoid Them)
The most common way people wreck their siding is spraying upward at an angle. Water gets forced behind the panels, and once it’s trapped there, mold and rot follow. Other frequent errors: using a narrow or turbo nozzle out of impatience, standing too close to the wall, cranking the pressure too high, and letting bleach solution dry on the surface before rinsing.
If you notice water intrusion, cracked panels, or bubbling paint mid-job, stop immediately. Dry the area with a towel if you can reach it, and inspect behind the siding if a panel has come loose. Suspected water intrusion or rot behind the wall is a job for a professional, not a second attempt with a different nozzle.
After the Wash: Inspection and How Often to Repeat It
Once you’re done, re-rinse any plants that got hit with detergent, pull off your window tape and covers, and test that everything still opens and closes properly. Walk the whole exterior looking for driven water or missed spots.
Over the next few days, keep an eye on caulk lines, window trim, and any interior ceilings near exterior walls for signs of moisture. For most homes, cleaning once a year keeps siding looking good. Shaded, coastal, or heavily soiled walls often need attention twice a year instead.
Safety Gear You Need Before You Start
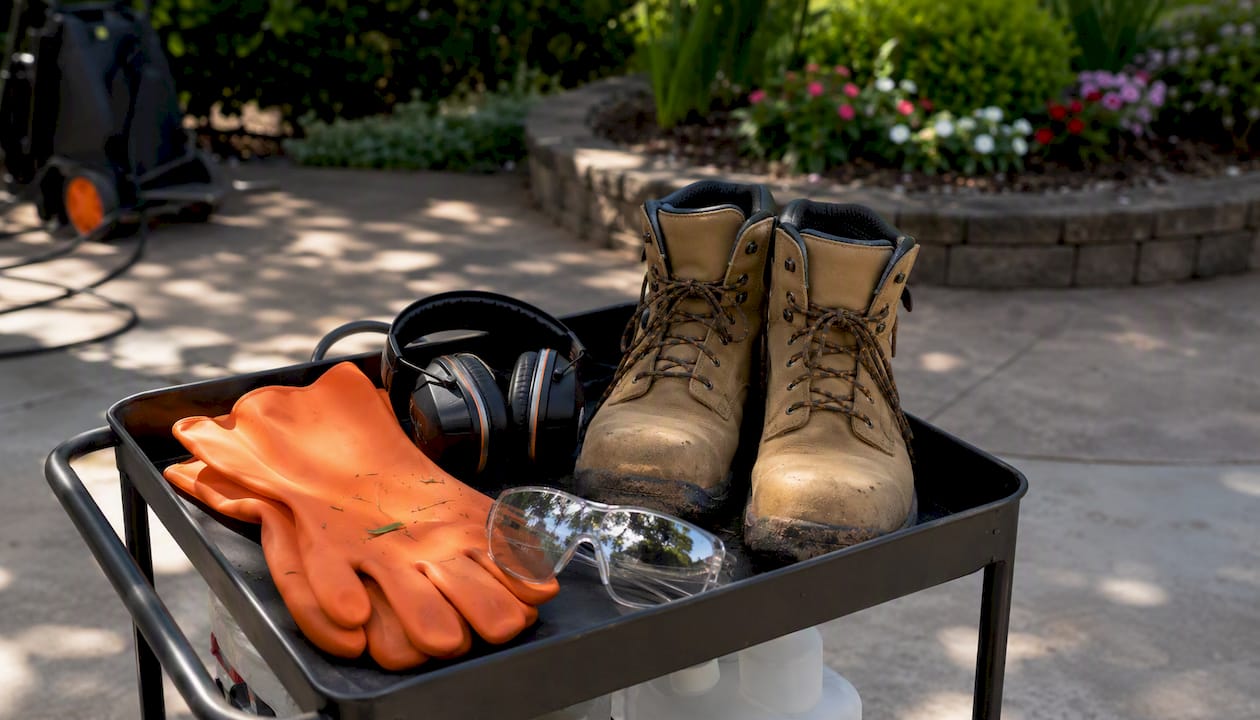
Wear safety glasses, chemical-resistant gloves, and non-slip shoes. If you’re running a gas-powered unit, add hearing protection. Keep bystanders and pets clear of the work area, tape over outdoor outlets, and use an extension wand instead of a ladder whenever you can.
Turn This Into a Recurring Habit, Not a One-Time Scramble
A simple checklist with a quarterly reminder catches mildew buildup and caulk failures before they turn into repairs. Before your next wash, confirm your siding manufacturer’s warranty language still allows pressure washing, and snap before-and-after photos for your own maintenance record.
- Set a reminder to inspect siding every three months, not just once a year.
- Keep dated photos so you can spot gradual changes, like creeping mildew or a caulk line that’s starting to fail.
Pro Tip: A five-minute quarterly walk-around catches small problems while they’re still cheap to fix.
A conservative approach pays off over time
I lean toward chemistry-first soft-washing every time, because it’s gentler on siding and causes fewer callback problems down the road. Test a hidden spot, check your warranty, and don’t rush the dwell time. If you’re looking at a full second-story job, suspected water intrusion, or siding that’s already showing rot, that’s when hiring a pro makes more sense than pushing through it yourself.
Keep Your Siding Clean Without Doing It All Yourself
Not everyone wants to rent equipment, mix chemicals, and spend a Saturday on a ladder, and that’s a completely reasonable call. If you’d rather track the job than do it yourself, Workbenchguide helps you schedule recurring exterior cleaning, log before-and-after photos, and set reminders so mildew and grime never build up long enough to become a bigger problem. It also connects you to contractor Q&A when a job looks more complex than a standard soft-wash, like suspected water intrusion or extensive rot behind the panels.
Check out the home maintenance checklist to build a schedule around your siding, gutters, and everything else on the outside of your house that needs regular attention.
Frequently Asked Questions
How often should you power wash vinyl siding?
Most homes do fine with an annual cleaning. Shaded, coastal, or heavily soiled exteriors often need it twice a year to stay ahead of mildew and algae buildup.
Can power washing damage vinyl siding?
Yes, if you use too much pressure, the wrong nozzle, or spray upward at seams. Sticking to soft-wash technique, correct nozzles, and a downward angle avoids nearly all common damage.
What’s the best homemade cleaner for siding mildew?
A diluted bleach solution targeting roughly 1 to 2 percent sodium hypochlorite on the surface, applied through a downstream injector, handles mildew and algae effectively. For light dirt, a vinegar and water mix works fine.
Do I need a professional pressure washer or is a consumer model enough?
A consumer-grade unit in the 1,500 to 3,600 PSI range is plenty, since you’re rarely applying more than 200 to 500 PSI directly at the siding once you factor in nozzle spread and standoff distance.
Is it safe to power wash siding near windows and electrical outlets?
Only if you tape windows shut and cut power to any nearby outdoor outlets first. Keep the wand angled away from window seals to avoid forcing water behind the trim.
Sources
- How to Clean Vinyl Siding | This Old House
- Pressure Washing Vinyl Siding: Complete Operator Guide · MakeWash
- Surfaces safe to clean with a pressure washer | Consumer Reports
- How to Clean Vinyl Siding (and How Often) | County Roofing Long Island
Leave a Reply