

Most homeowners don’t think about their water heater until they step into a cold shower or find a puddle on the basement floor. By then, the damage is done. A solid water heater maintenance guide can help you avoid both of those moments entirely. Regular maintenance can reduce your energy costs by up to 30% and add years to a system most people completely ignore. This guide covers every key task for both tank and tankless units, with safety steps, tool lists, and the kind of specific detail that actually gets the job done.
Table of Contents
- Key takeaways
- Your water heater maintenance guide starts with preparation
- How to flush sediment from a tank water heater
- Inspecting and replacing the anode rod
- Testing the T&P relief valve
- Maintaining a tankless water heater
- My honest take on water heater care
- Stay on top of every home maintenance task
- FAQ
Key takeaways
| Point | Details |
|---|---|
| Flush annually, more in hard water | Flushing once a year removes sediment and extends tank life significantly. |
| Check the anode rod every 3 years | A failing anode rod is the leading cause of tank corrosion and early replacement. |
| Test the T&P valve every year | The pressure relief valve is your last line of defense against a dangerous tank rupture. |
| Tankless units need descaling too | Mineral buildup inside tankless heaters cuts efficiency fast without annual descaling. |
| DIY maintenance saves real money | Professional servicing runs $150 to $350 annually; most of these tasks cost you a few hours. |
Your water heater maintenance guide starts with preparation
Before you touch anything on your water heater, you need the right tools and a clear safety plan. Skipping this step is how people get burned, literally.
Tools and materials you need
Gather these before you start:
- Garden hose (long enough to reach a drain or outdoors)
- Flat-head and Phillips screwdrivers
- Pipe wrench or socket wrench
- Replacement anode rod (magnesium or aluminum)
- Sediment bucket
- Teflon tape
- Safety gloves and eye protection
- Multimeter (for electric units)
Safety steps before any task
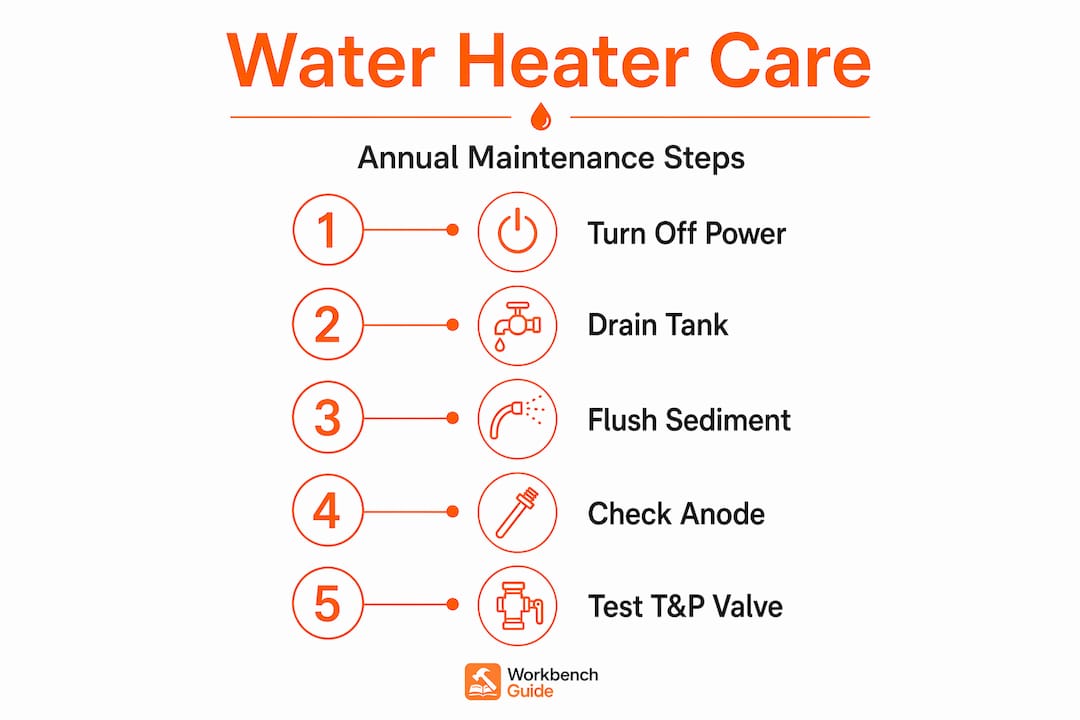
Turn off the power to an electric unit at the breaker box. For gas heaters, set the burner to the “pilot” position. Shut off the cold water supply valve at the top of the tank. Then, wait. Water can stay scalding for hours after the unit shuts off, so plan to let it cool for at least two hours before flushing. Overnight is even better.
Understanding which type of unit you have matters too. Tank water heaters store and heat a fixed volume of water, usually 40 to 80 gallons. Tankless units heat water on demand with no storage tank. The maintenance steps differ between them, and this guide covers both.
Pro Tip: Pull out your water heater’s manual before starting. The manual lists exact thermostat settings, valve locations, and model-specific warnings your neighbor’s unit might not share.
How to flush sediment from a tank water heater
Sediment is the biggest silent threat to your tank unit. Minerals in your water supply, mostly calcium and magnesium, settle at the bottom of the tank every time the water heats up. Over time, that layer acts like insulation between the burner and the water, forcing the system to work harder and costing you more on your energy bill.
Flushing takes 30 to 45 minutes annually, but if you live in a hard water area, doing it every six months is the smarter call.
Step-by-step flushing procedure
- Turn off power or set gas to “pilot.” Shut off the cold water inlet valve.
- Connect a garden hose to the drain valve at the base of the tank.
- Run the other end of the hose to a floor drain, utility sink, or outdoors. Keep the path downhill.
- Open a hot water faucet somewhere in your home. This prevents a vacuum from forming and speeds drainage.
- Open the drain valve slowly. Water will begin flowing out. Watch for sediment in the stream.
- Once the tank is empty, briefly turn the cold water supply back on to flush remaining sediment through the drain valve. Repeat until the water runs clear.
- Close the drain valve, disconnect the hose, and close the hot water faucet you opened earlier.
- Refill the tank by opening the cold water supply valve. Wait until water flows steadily from that open hot water faucet before restoring power or relighting the burner.
Pro Tip: Let the tank cool overnight before flushing. Residual hot water can cause serious burns even after the unit has been off for an hour or two.
A few common mistakes to avoid:
- Never restore power to an electric heater before the tank is completely full. Dry firing destroys the heating element fast.
- Don’t force a stuck drain valve open with excessive pressure. If it hasn’t moved in years, it may break and cause a leak.
- If the water runs discolored even after several flushes, that rusty or discolored water can signal internal tank corrosion, which means it’s time to call a professional.
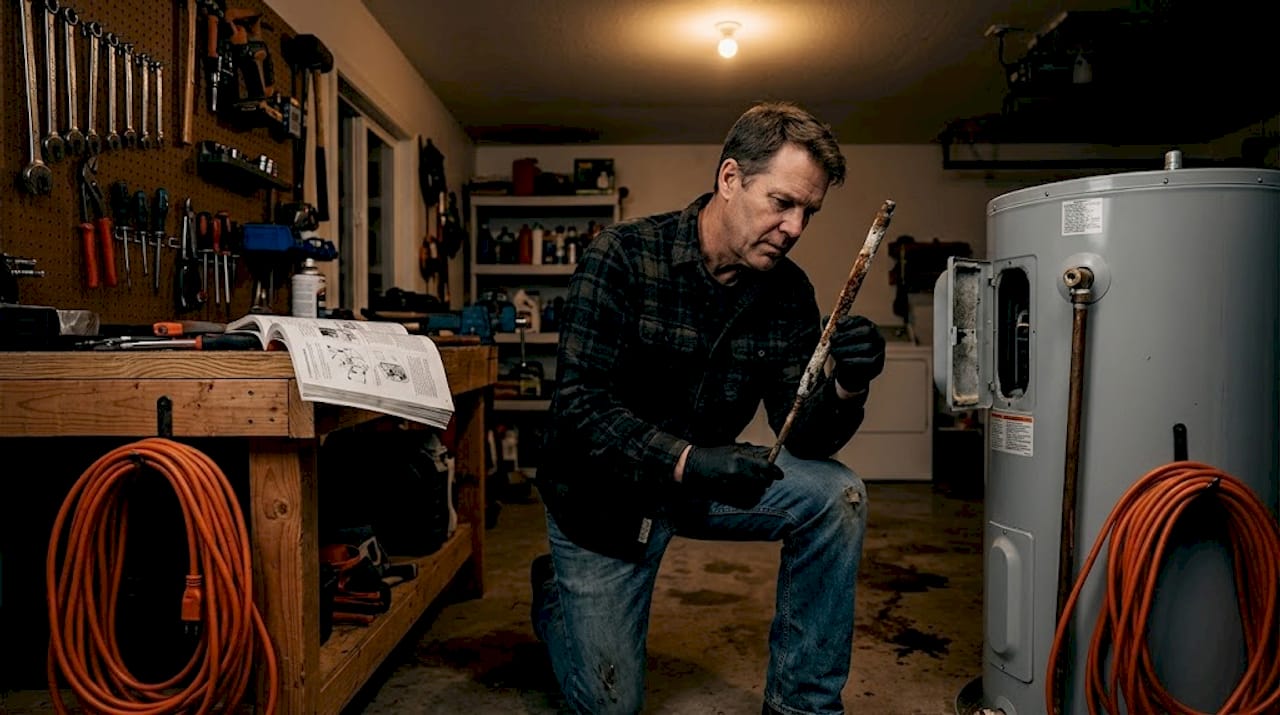
Inspecting and replacing the anode rod
The anode rod is a metal rod, usually magnesium or aluminum, suspended inside your tank. It corrodes so your tank doesn’t. That’s its only job, and it does it quietly until it runs out of material to sacrifice. When that happens, the tank itself starts to corrode from the inside out.
Anode rod failure is the primary cause of tank corrosion, especially in hard water areas. Most rods last three to five years, but hard water accelerates their breakdown considerably.
Signs the rod needs replacement
- The rod is less than half an inch thick
- You can see the steel core wire running through it
- Heavy calcium deposits coat the surface
- Your hot water smells faintly like rotten eggs (a sign the rod is depleted and bacteria are thriving)
To replace it, locate the anode rod at the top of the tank. It’s usually under a plastic cap or directly accessible with a 1 1/16-inch socket. Apply the wrench and turn counterclockwise. These rods can seize up over years of inactivity, so you may need a breaker bar for extra leverage. Once removed, compare it against the signs above.
When buying a replacement, match the type to your water. Magnesium rods work best in soft water. Aluminum rods handle hard water better. If sulfur smells are already a problem, a zinc/aluminum alloy rod can suppress the odor. Wrap the threads in Teflon tape before threading in the new rod. Tighten firmly, but don’t overtorque. Restore water and power, then check for leaks at the rod fitting.
Pro Tip: Check the anode rod every three years as part of your regular water heater service guide. Catching a depleted rod early is one of the cheapest repairs you’ll ever make.
Testing the T&P relief valve
The temperature and pressure relief valve, called the T&P valve, is the most critical safety feature on your tank water heater. It opens automatically if pressure or temperature inside the tank exceeds safe limits. Without it, a malfunctioning heater can build enough pressure to rupture the tank. A stuck T&P valve risks exactly that outcome.
Testing the T&P valve annually takes about two minutes and should be on every homeowner’s calendar.
How to test the T&P valve
- Make sure you know where the discharge pipe points. It should run down toward a floor drain or discharge safely away from people.
- Place a bucket under the discharge pipe end.
- Lift the test lever on the valve for about three seconds, then release it.
- Water should flow out while the lever is open, then stop completely when you let go.
If water keeps dripping after you release the lever, the valve is faulty and needs replacement. If no water comes out at all when you lift the lever, the valve may be stuck or corroded.
Pro Tip: For annual safety checks on any home system, add the T&P valve test to your list right next to smoke detector battery replacement. Both take under five minutes and prevent disasters.
A leaking or non-functional T&P valve is not a wait-and-see situation. Replacement valves cost $15 to $30 at any hardware store. If you’re uncomfortable replacing it yourself, this is a worthwhile call to a plumber.
Maintaining a tankless water heater
Tankless units don’t store water, so they don’t collect sediment the same way. But they have their own maintenance needs, and skipping them causes a different kind of problem: scale buildup inside the heat exchanger. When hard water minerals coat the inside of those small passages, the unit works harder, heats less efficiently, and eventually fails early.
Tankless units need annual descaling with a food-grade descaling solution, plus inlet filter cleaning every three to six months.
Descaling your tankless unit step by step
- Turn off power or gas to the unit.
- Shut off both the hot and cold water isolation valves on the unit.
- Connect a submersible pump and hose to the service ports on each valve (most modern units have these).
- Fill a five-gallon bucket with a food-grade white vinegar solution or a manufacturer-approved descaler.
- Run the pump to circulate the solution through the heat exchanger for 45 to 60 minutes.
- Flush the system with clean water to clear the descaling solution completely.
- Restore water flow, restore power, and check for leaks.
Cleaning the inlet filters
Tankless units have small mesh filters on the cold water inlet and sometimes on the hot water outlet. These catch debris before it enters the heat exchanger.
- Shut off the water supply.
- Locate the filter screens at the inlet connections.
- Pull them out with needle-nose pliers or your fingers.
- Rinse under running water and use a soft brush to remove buildup.
- Reinsert and restore water flow.
Here’s how the two types of heaters compare on maintenance:
| Task | Tank water heater | Tankless water heater |
|---|---|---|
| Sediment flushing | Annually (or every 6 months) | Not needed |
| Descaling | Not needed | Annually |
| Anode rod inspection | Every 3 years | Not applicable |
| Filter cleaning | Not applicable | Every 3 to 6 months |
| T&P valve testing | Annually | Annually (if equipped) |
My honest take on water heater care
I’ve talked to a lot of homeowners who treat their water heater like a household appliance that runs forever and asks for nothing. I completely understand that mindset. It sits in a utility closet or garage corner, does its job without complaint, and gets zero attention. Until it floods your floor.
What I’ve seen consistently is that the homeowners who avoid expensive replacements are not doing anything complicated. They’re flushing the tank once a year and checking the anode rod every three years. That’s it. Those two tasks alone are what separates a water heater that lasts 12 to 15 years from one that gives out at nine.
The thing most people overlook is the thermostat setting. I see units set to 140°F all the time, and it’s unnecessary for most households. Setting it to 120°F saves roughly 5% in energy costs per 10 degrees you lower it, and it slows scale buildup. That one change costs you nothing.
My other piece of advice: build a simple maintenance schedule and stick to it. Not because each task is urgent on its own, but because they work together. A clean tank with a healthy anode rod and a functioning T&P valve is a system that won’t surprise you. Preventive maintenance isn’t exciting, but an emergency plumber call at 6 p.m. on a Friday is even less exciting.
— Sean
Stay on top of every home maintenance task
Water heater care is one piece of a much larger picture. The homeowners who avoid expensive, unexpected repairs are the ones who track what needs to be done and when. Workbenchguide makes that easy with step-by-step DIY guides, maintenance reminders, and project checklists built for real homeowners who don’t want surprises. Start with a year-round maintenance checklist to organize every seasonal task in one place, including your water heater. If you want to go deeper, the full home maintenance schedule breaks down what to check each month so nothing slips through the cracks. Small habits now mean fewer disasters later.
FAQ
How often should I flush my water heater?
Flush a tank water heater at least once a year. In hard water areas, every six months is better to prevent heavy sediment buildup.
What are the signs your water heater needs maintenance?
Rusty or discolored water, longer heat-up times, unusual popping or rumbling sounds, and water that smells like sulfur are all signs your water heater needs attention.
How long does a water heater last with proper maintenance?
With annual maintenance including flushing and valve inspections, a tank water heater can last 12 to 15 years compared to 8 to 10 years with no care.
Can I do water heater maintenance myself?
Yes. Most tasks in this water heater service guide, including flushing, anode rod replacement, and T&P valve testing, are straightforward DIY jobs that require basic tools and an afternoon.
How much does professional water heater servicing cost?
Professional servicing runs $150 to $350 annually. DIY maintenance costs a fraction of that, mostly the price of a replacement anode rod every few years.
Recommended
- How to maintain your HVAC: homeowner guide to boost efficiency
- Winterizing Your Home: Simple Steps to Prevent Costly Repairs
- WorkbenchGuide – Modern home maintenance platform with DIY guides, schedules, checklists, and task tracking to help owners and managers care for properties confidently.
- Fall maintenance checklist: protect your home this season